
The Tunic Challenge – Part 4
This has been such a wonderful project with Amy Johnson from Amy’s Free Motion Quilting Adventures. I know for sure that I wouldn’t have made this shirt right now if it wasn’t for this challenge and being able to sew along with a friend.
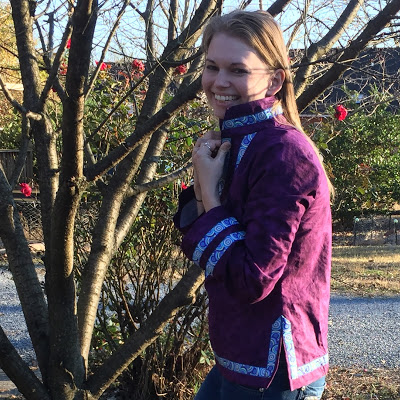
My favorite part of my tunic is definitely the Renaissance Ribbons that accent the front placket, sleeves, collar, and hem. I went a bit ribbon crazy!

But I don’t think it looks ridiculous. A bit formal, yes, but for the first time in a long time, I’ve made a shirt I will look forward to wearing!
My least favorite part is the collar. When I created the muslin test garment in week 2, I used the bias strip collar, but I didn’t think it looked good with my long neck.

Then I played with the band collar and for some reason I couldn’t get it to fit properly along the neck edge. I’d also caught a cold and was running a high fever so I don’t think I was exactly in the best frame of mind for collar fitting.
The next morning I tackled the collar after taking some cold medicine plus half a shot of 5 Hour Energy…which incidentally is a very interesting cocktail if you’d like your whole body to go numb while your mind drifts off on tangents of strawberry milkshakes and shortbread cookies.
I digress…I managed to measure the actual collar of the shirt, then the collar pattern and I found you could use the regular angled collar for another placket, but only if you change the seam allowance from 5/8 to 3/8. So I stitched it and stuck it on my shirt and this time it fit perfectly.
That is, until I put it on and realized I’d just added a 3 inch collar to an already high neckline. I’m ready for my Elvis impersonation! Uh Huh!
The good news is I can fold the collar down so it doesn’t come up to my ears and I really like this look. All in all, this wasn’t a huge problem and is certainly not a deal breaker. I love my tunic!
Now for a few tips and insights as I’ve finished this project:
1. Do not skip making a muslin! Also don’t change your collar design halfway through like I did. If you change your mind, make another muslin to test the new collar.
2. Don’t test the muslin by putting it on for 5 minutes and looking at yourself in the mirror. That just tells you what it looks like. Put it on and wear it around the house for a few hours – that will tell you want it FEELS like and if you will really like that length. Turns out, I shortened my tunic a bit too much.
3. There can never, ever be enough ribbon trim. Seriously. It’s awesome!
4. All projects are made better with the help of a friend. At least for me, they actually get done! Thank you Amy!
So that’s what I’ve learned from the Tunic Challenge. Let’s check out Amy’s blog to see how her tunic turned out.
Do you want to read the past posts about this challenge? Click Here for Part 1 about cutting out the pattern.
Click Here for Part 2 on sewing the muslin test garment, and Click Here for Part 3 on cutting out the fabrics for our finished tunics!
Let’s go sew,
Leah Day
Looks great Leah! I'm so glad you're feeling better too. My post is finally up on my blog as well.
love that look with the braid – I don't think you have overdone it.
Your tunic looks amazing!