
Pantograph Quilting Basics Tutorial
It’s pantograph quilting time! I’ve been working on a new batch of quilting tutorials for the past few weeks. I’ll be honest – this took a lot longer and was a lot harder to learn than I expected. See what I mean in this new video:
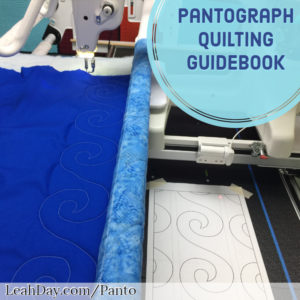
Take the tutorial to your machine with this Pantograph Quilting Guidebook!
Click Here to find the new pantograph designs I’ve created and pick up your free Pantograph Quilting Guidebook!
This 24 page guidebook is packed with information and colorful photos to guide you through the basics of pantograph quilting on your quilting frame. This style of quilting works from the back of your machine using a laser light or stylus as a guide and rear handlebars to move the machine.
Advancing the Quilt when Pantograph Quilting
Pantograph quilting is an easier form of quilting because you’re following a drawn design. But it can be tricky to understand and wrap your brain around how the quilt moves and the designs are evenly spaced.
Our exclusive pantos have a feature unique from all other pantographs available. All of the pantograph designs from LeahDay.com are marked with extra dashed lines to make advancing the quilt easier.

The extra dashed lines on the above and below the design will help you space the rows of this pantograph.
By stitching up to the topmost, dashed line, you’re creating the space between the pantograph rows. Then when you roll the quilt back on the frame, make sure your needle is in the down position so you don’t lose your spot.
Roll the machine down so it’s between the two dashed lines at the bottom of the pantograph design. Then as you tighten up the backing fabric and quilt top, the quilt and machine will naturally move around 1/4-inch. This is now perfectly positioned on the dashed line that runs along the bottom of the pantograph design.

I advanced the quilt using the dashed lines printed on the pantograph to evenly space this Single Wave design.
Watch Out for the Quilt Edges!
From there it’s a simple process of repeating those steps across the quilt. Watch out for the edges of the quilt which can like to flip over as you begin quilting your next row. I was very careful to begin a row by securing the edge of the quilt down. Just be very mindful of where your fingers are if you’re holding down the edge of the quilt and moving the machine from the back of the frame.

I like to secure the edge of the quilt as I move to the next row of the design.
So that’s it for the basics of pantograph quilting! Please ask any questions you have in the comments below. I may shoot a special video just to answer your question.
Let’s go quilt,
Leah Day
What a great video. Always appreciate your willingness to show the good and not-so-easy aspects of every quilting technique. Have never used a pantograph myself, but you have given me a new appreciation for them. Lots of good tips!
Sorry got it. Had to click on the picture. My mistake.
Hi Hettie – I’ll definitely check on this to make sure it’s working properly! I’m glad you got your guidebook!
Thank you for doing this. I have multiple quilts where I’ve done the first row by panto but then took off the frame. I’ve never been able to properly line up after that. This makes me want to leave work early today so I can run home and try this, now that it makes sense to me.
Yay! I am SO happy to hear this! I hope you’re able to quilt lots of your quilts with pantographs now!
Sorry couldn’t seem to find the free guidebook for pantos
I’ve taken it down for a revision. Quilting on a Hoop Frame definitely needs a bit more fiddling to do pantos right.
Do you have to do a calculation based on the length of your quilt such that you get full pattern repeats through to the end of the quilt? Or is it okay that the end of the quilt may only have room for, say, half of the pattern repeat?
Most quilters like to begin with a partial first row, then whatever happens at the end, it will usually end with a partial row as well. I’ve updated the Pantograph Quilting Guidebook to include info on beginning and ending with a partial row – https://leahday.com/products/pantograph-quilting-guidebook