
How to Setup the Grace Q-Zone Hoop Frame
Today I’m setting up the Q-Zone hoop frame from Grace Company! This is an awesome little frame that only takes up 4 1/2-feet of space and you can use your home machine or a small longarm for quilting! Watch me build my Q-Zone frame and quilt with a home sewing machine in this quilting tutorial:
Click Here to learn more about the Qzone. Yes, we are official machine and frame dealers for Grace Company! Feel free to send me any questions you have about this frame here.
How to Build the Q-Zone Hoop Frame
Once you’ve opened your boxes, make sure to go through everything slowly and carefully, consulting the inventory list provided by Grace Company. Also be sure you have a level on hand for later.
It’s important to know which machine you plan on mounting to the Qzone hoop frame as assembly and mounting are different for a Grace Qnique longarm than a home machine. You’ll need a top plate carriage for a home machine and there’s a limit to the size of machine you can put on the frame as you can see in this diagram:
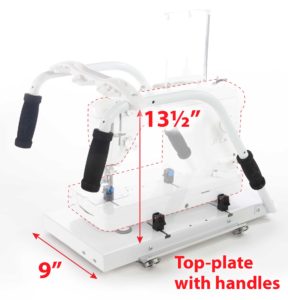
Measure your machine to make sure it fits within the size of the carriage.
Be sure to have someone on standby to help you put the frame upright. You can do nearly all of assembly yourself but it really does help to have someone help you stand the frame up. James was not being the most happy handy helper, but he gave me just the right amount of help I needed!
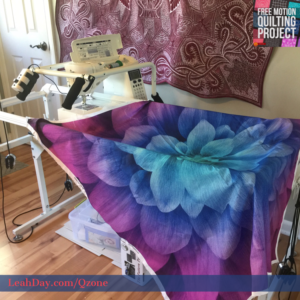
I chose to use a home machine on my Q-Zone frame. I began test driving the Qzone with Stippling, which was very comfortable to stitch. No, there wasn’t a lot of space to quilt in, but in the time I played with the machine, I emptied an entire bobbin. I haven’t emptied a home machine bobbin in awhile, so that was a good bit of distance despite the small space.
I want to practice a bit more before quilting this pretty fabric panel on this frame!
All in all, I found setup and my first run on the machine to be very user friendly and comfortable! Stay tuned for more videos on the Grace Qzone Hoop Frame. Please let me know what questions you have so I can share more videos for you to enjoy!
Let’s go quilt,
Leah Day
I currently sew on a 3 rail frame that is set up at 5 feet. I tried 10, but in my 12 foot wide room, I got tired of constantly tripping over myself or bumping into the frame. Also i needed more space for cutting and piecing, and of course, fabric storage! I have been eyeing this hoop frame, but my biggest concern is having to start basting quilts again, and being able to quilt something that is larger than the frame itself. I have yet to see a good demonstration of that. Do you think it’s possible to quilt smaller quilts (say 36″ wide) on this frame without basting, but instead just using leaders on all 4 sides? And if you had a larger quilt, say twin size, do you think you could baste it on the frame itself (clamping to all 4 sides, basting that section, then moving the quilt and doing the next section) before quilting? I refuse to go back to crawling around on the floor, as I’m 50yo with arthritis in much of my body. The whole point of frame quilting for me was avoiding basting and avoiding the discomfort/pain of shoving the quilt through a regular machine. Long story short (too late!), I am looking forward to seeing you demonstrate all sizes of quilts using this frame, because your videos are very easy to follow and I think you really explain things well.
Thank you Julia! Yes, I have a video on quilting a 36 inch wide quilt that didn’t need to be shifted from side to side – just simply rolled and advanced through the frame. You can find that post here: https://freemotionproject.com/2019/04/quilting-first-quilt-qzone-frame.html
On the basting, so far I’ve quilted one small crib quilt – 36 x 40 and did not baste it in the traditional way. I pinned the backing fabric to the top leader, pinned the batting across that top edge too, then left around 4 inches of space and pinned the quilt top to the backing and batting. I did this standing at a table instead of on the floor. Then I smoothed out the layers so they were even and pinned the opposite edge of the backing to the opposite leader cloth. I didn’t pin throughout the quilt and trusted the frame to tension the layers.
Again, this is my FIRST large piece on this frame, but it seems to have worked well. I need to keep testing and playing with it to be 100% sure this method can work for larger quilts. For now I would encourage you to keep working with your 3 rail frame and quilting daily. The same skills used to quilt on one frame translate to the other and since you already have it, you might as well use it! More videos are coming soon!
Thanks so much for showing this. I have been considering this frame to use my home machine for several months, but was afraid that it wouldn’t work well. Your video makes it clear that this is something I will buy in the future. I plan on watching all your videos on how to use this frame!!
Wonderful! I’m so happy you found this helpful Candy!
Was there another quilting frame that is simple
The Brother Dream frame was the first of this type. Grace Company designed that one 2 years ago and has now come out with the Q-zone frame which is slightly different, but the same idea with a small foot print and allowing you to quilt bigger quilts.
What size throat does the machine in your video quilting the 36″ quilt have?
That is a Juki F600 and has an 8 inch harp space. With the bars of the frame and the roll of the quilt, I ended up with 5 inches to quilt in at the beginning and this reduced to about 3 1/2 by the end.
How do you work out how to set the height of frame for standing up to quilt please?