
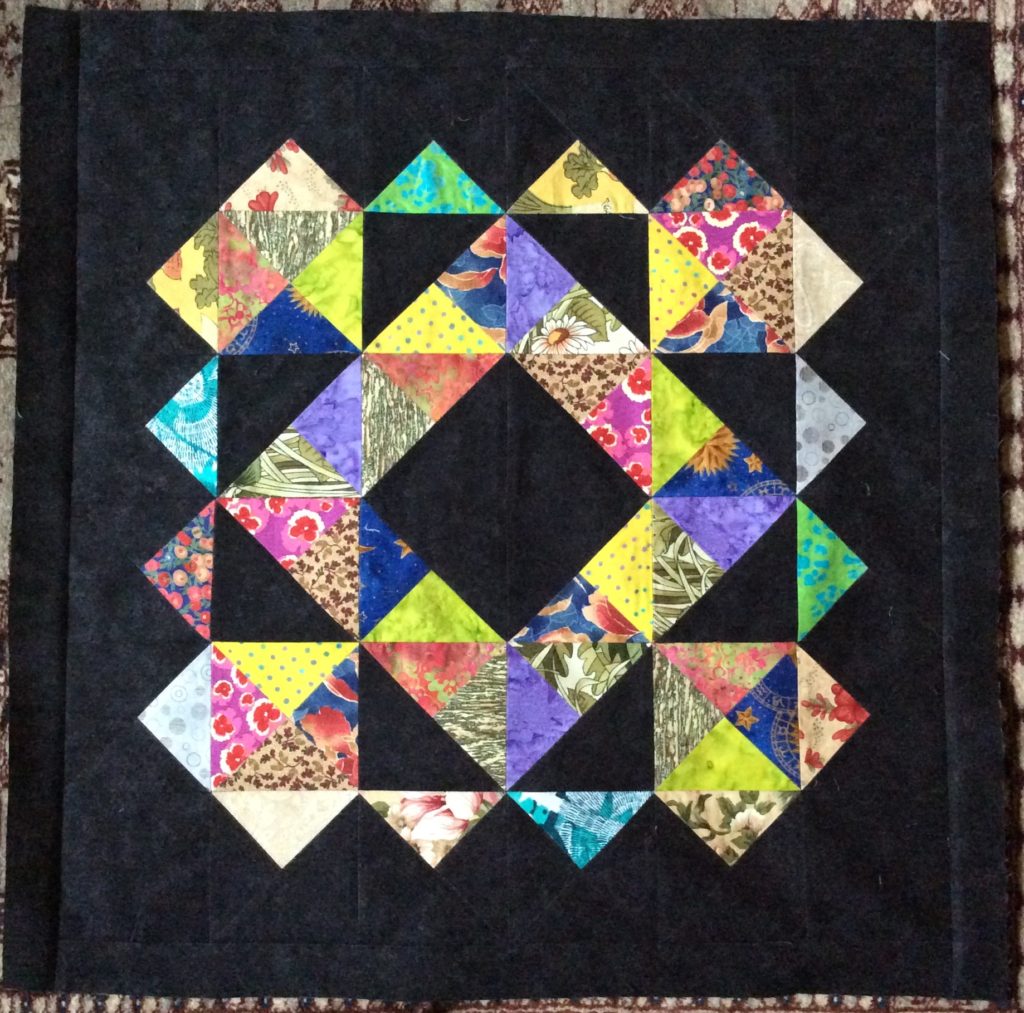
How to Piece a Patchwork Mosaic Quilt Block
Ready to get lost in a Patchwork Mosaic quilt block? Learn how to transform 14 colorful 5-inch fabric squares into this scrappy quilt block:
Click Here to find the quilt pattern for Block #2. The best part of the Friendship Quilt Along is we’re going to piece AND quilt the blocks together! Be looking forward to the first quilting tutorial on January 14th.
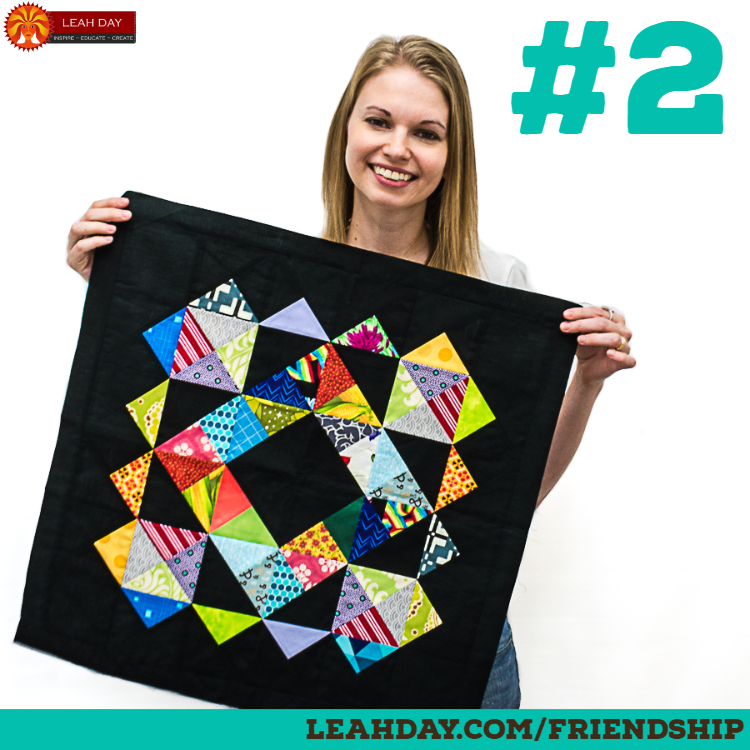
We’re going to piece and quilt this beautiful quilt block this month!
You’ll need to know how to make half square triangles, quarter square triangles, and hourglass squares to create your Patchwork Mosaic block. Find extra quilting tip tutorials linked up right here:
How to piece Half Square Triangles
Quarter Square Triangle Quilting Tutorial
How to piece Hourglass Squares
Click Here to learn my 5 tips for Quilt Piecing. This will help you understand why I use a scrap charger and change my stitch length to 1.5 mm.
If you have questions about pressing seams open, Click Here to find a podcast episode all about this topic.
Understanding the Quarter Square Triangles
We’re starting with many pieced units for this quilt block and the most complicated part is understanding how these units are created. For the Quarter Square Triangles, you’ll begin by making a batch of half square triangles, some combining two scrappy squares, some combining a scrappy square and background square. Just refer to the pattern to stack and stitch all the half square triangles you need.
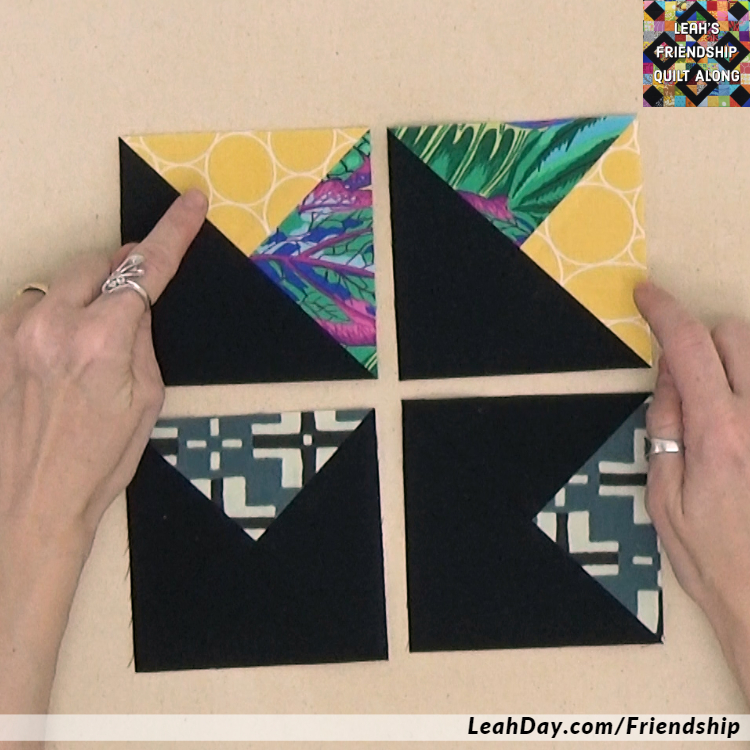
The look of your Quarter Square Triangles will change, depending on the fabrics you use.
To turn the units into Quarter Square Triangles, you simply need to stack and stitch again with an extra piece of background fabric. The background square will be cut slightly larger than the half square triangle just to give you a bit more wiggle room.
Hourglass Square Construction
Piecing the Hourglass Squares is very similar, but again, you have a choice to use either two matching half square triangles, or two different ones. If you use the same HSTs, you’ll end up with a checkerboard Hourglass with two of each fabric in the unit.
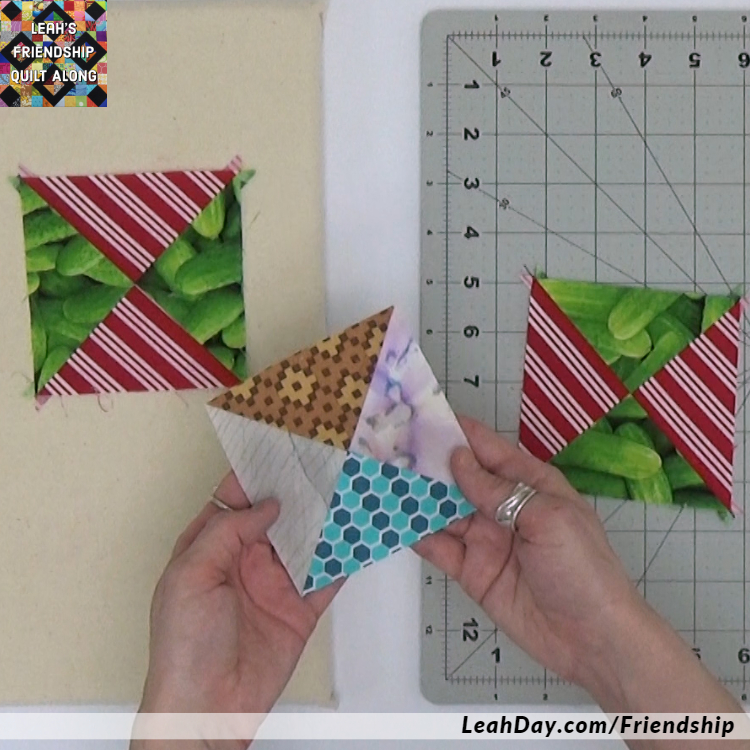
This is a really cute unit that can be a quilt block all on it’s own!
If you use two different half square triangles, you’ll end up with four different fabrics in your Hourglass Square as you can see in my hands above. The piecing is identical to piecing a half square triangle so you can think of this as doubling the unit. Just take your time matching up that center seam so it matches perfectly in your finished HGS as well.
Check in on Color
As I mentioned in the tutorial video, every unit makes 2 of everything. The fabrics you begin with as half square triangles get cut in two. Then when you turn those units into QST or HGS, they get sliced in half again. Working through this math as I wrote the pattern gave me a bit of a headache!
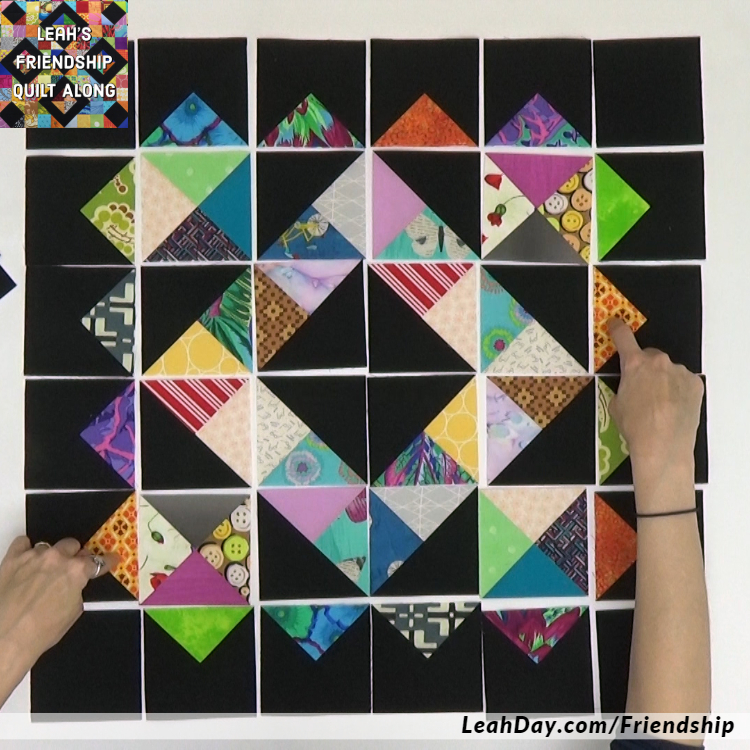
Place the matching units on opposite sides of the block so they’re less obvious.
If you don’t want ANY repeating fabrics in your Patchwork Mosaic, you will need to double the number of Half Square Triangles you make from the beginning and make sure none of the fabrics are used twice. Then you’ll end up with double the number of units in the end and you can set those aside for a future block.
Personally I think that’s a bit obsessive compulsive when the whole purpose of this quilt is to use up scrap! I love the memories that are coming out with each new fabric so I don’t mind when it pops up multiple times in a particular block. I arrange the matching pieces diagonally across the block from one another and try not to resist the temptation to fiddle and rearrange it to death. Trust me, that is a big waste of time!
Fun Piecing Experience
I challenged myself this month to piece this block on my Singer 27 treadle machine. I first clipped all the units together into rows and carried them over to the machine. I’m using the same low shank patchwork foot I always use. The nice thing about early Singer treadles is they are usually low shank machines and still compatible with this popular style of feet.
This was a really fun piecing experience and quite challenging! I had to focus on both keeping the pieces lined up, and moving my feet and keeping the machine running in the right direction. Treadles can easily begin stitching backwards, which causes a bad thread break. Whenever I took my hand off the pieces, I was rolling the hand wheel towards myself to make sure the machine got going in the right direction.
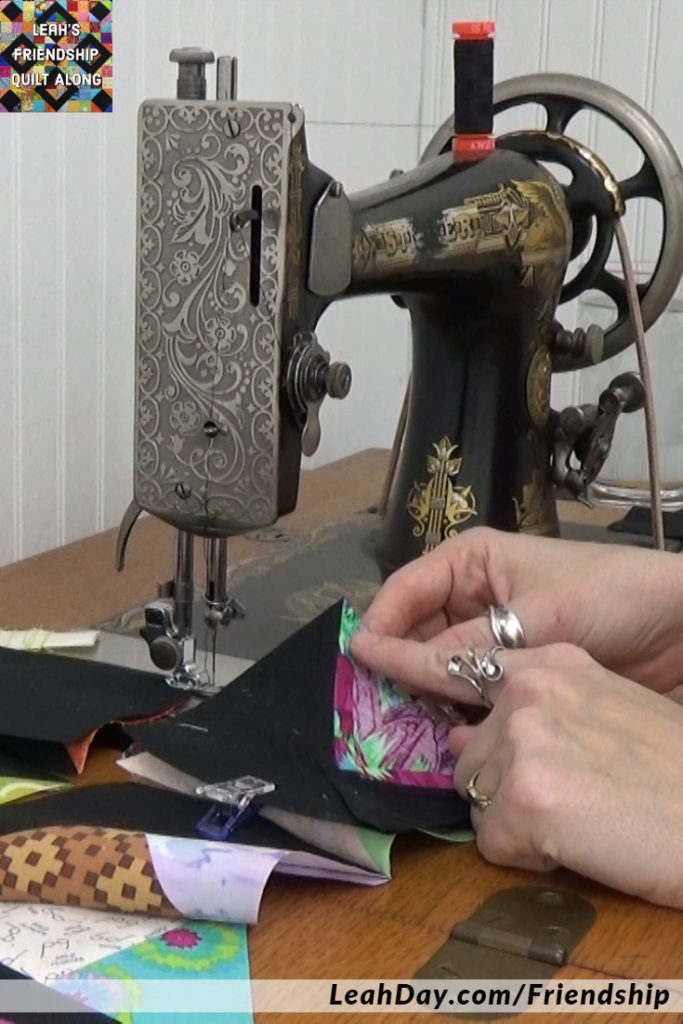
I’m piecing on my Singer 27 treadle for the first time in video!
It was a lot more to think about than usual and I loved filming this video on this machine. I found the slightly louder clickity noise it makes quite relaxing. Did you like seeing the piecing on this machine too? Would you like to see me quilt this month’s block on this machine?
How to Deal with Bulky Seams
Unfortunately this Patchwork Mosaic quilt block could win an award for Most Bulky Seams! It wasn’t bad while piecing the individual units together, but as I pieced the rows, the back of my foot got hung up on the seam allowances.
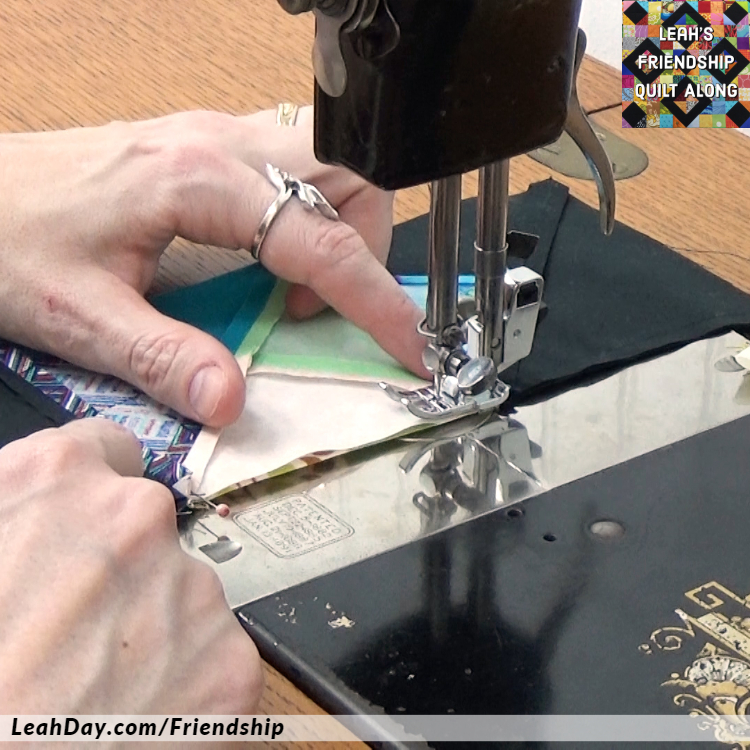
This is where my patchwork foot would get stuck when piecing the rows together.
I lowered the pressure of my presser foot and whenever I went over a seam, but that still didn’t completely sort it out. I lifted the foot, and gripped the row to the back and to the front and tried to stitch and shift the fabrics at the same time.
Unfortunately it was very easy to make a really big stitch as I got off that stuck spot. I ended up stitching back over a few spots just to seal up those holes.

I lifted the foot and gently tugged on the fabrics, but had to be careful not to make a giant stitch!
I’m not sure I would have had this issue if I was piecing on my Eversewn Sparrow 20. I’ll need to experiment with the pressure I have set on the Singer 27 and see if I can lighten this up even more without effecting the overall stitch quality.
So just be aware that you may experience some bulkiness over these seams, even if you press everything open and flat. I’m going to experiment with trimming the extra seam allowance from the half square triangles down to reduce a bit more of that bulk overall.
Don’t Worry about the Edges
I had one slippery block in a row that just didn’t want to play nicely. After piecing the entire block, I found one pesky quarter square triangle was either stretched out of shape or I didn’t trim it down properly. It extended around 1/8 inch beyond the edge of the block.
Please don’t worry if this happens to you. As you can see, the entire outer edge of the Patchwork Mosaic is background fabric. You’ll also piece a set of strips around the outer edges of the block to bump it up to the full size. So it doesn’t matter of the outer edges of the pieces are perfect. I’m going to trim this wonky edge off, attach the border strips and not worry about it one bit!

Remember, we always piece bigger than needed for a quilt-as-you-go quilt. As you’ll learn in the Block #1 pattern, all the blocks will be trimmed to a certain size before connecting them together in the finished quilt.
Have you already finished your Patchwork Mosaic Block? Please share a picture of your quilt block! Scroll down and attach an image to your comment to share a picture of your quilt block on the blog.
Note: if you get a 404 error in the comments, please just send me a message here and I’ll post your picture for you.
Check out Ann’s Patchwork Mosaic quilt block!
From Ann: I really enjoyed the piecing challenge and look forward to
quilting it.
Let’s go quilt,
Leah Day
P.S. It’s never too late to join the Friendship Sampler Quilt Along! Click Here to find the patterns.
Find more Friendship Quilt Along Tutorials
Check out the other tutorials I shared for this Patchwork Mosaic quilt block:
Hi Leah,
Is this the treadle machine that u was cleaning in the summer??
It looks great
Yes, it is! I still haven’t gotten my Singer 12 working yet. I’m honestly about to give up on it and buy another machine to go in that base. But the Singer 27 is a rock star!
What is the patchwork foot you are using? I have made a couple of quilts on a treadle but I didn’t have a special foot.
Most older Singer treadles at least are low shank machines. So I’m using the same low shank patchwork foot I use on my Eversewn Sparrow. You can find it here: https://leahday.com/products/patchwork-foot
I’ll have to give that a try. I know that when I tried a 201 zipper foot on my modern machine, it wouldn’t sew because the foot was too skinny and wasn’t in contact with enough of the feed dogs.
That’s interesting! It might be why I’ve had a bit of trouble with my patchwork foot squishing these seams. I’ll see if I have an older patchwork foot that will work instead and it might be the solution.
Thank you for the tip of using the clips to hold the quilt block together as not to have a mistake when you go to the machine. I have used straight pins .
Pins work great too! It’s so easy to flip things around the wrong way. I did it for years until I found a solid system with the clips or pins.
Mine’s done, but I can’t post a photo. I’m getting a 404 page not found message
I just sent you an email Ann to work that out! I’m sorry about that!
Thank you Leah. I have sent you the photo…
I’m getting the 404 page not found message
I’m sorry about that Cindy! Send me a message instead and I’ll post your picture for you https://freemotionproject.com/contact-leah