
Quilting Basics 6: Stitching in the Ditch
We can’t run through the basics of quilting without a tutorial on stitching in the ditch! This is an important step in the quilting process that secures the layers of the quilt together and adds a nice outline between designs.
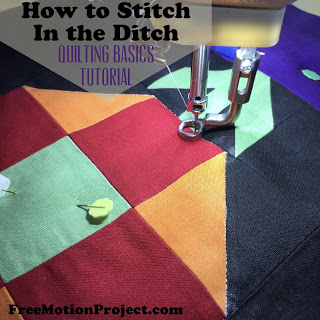
There are many ways to stitch in the ditch, but by far the easiest is with your walking foot. The walking foot uses the feed dogs on your machine to feed the quilt smoothly into the machine so you can take one stitch at a time and stay right in the ditch.
See what I mean in this new Quilting Basics Tutorial video:
.jpg)
Click Here to find all the Quilting Basics Tutorials linked together in one handy playlist.
I set my stitch length to 1.6 mm when walking foot quilting because it produces a nice, tight stitch that looks great on the front and back of the quilt.
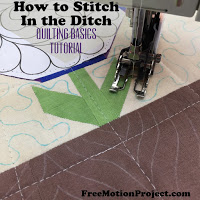
I use ditching primarily as an outline between designs. I don’t want the Gentle Flames in the vase to look like they’re floating in midair. By stitching in the ditch around the vase, the wiggly lines of the design have a nice outline to contain them. The ditching lines also give me a line to travel stitch along so the block looks as good on the back as it does on the front.
Stitching in the ditch is also a very easy way to quilt your quilts. Don’t ever feel like ditching is a cheap way out. When you’re first getting started quilting sometimes it’s the only design you can “see” on the surface. By following the quilt piecing lines, you’re enhancing the overall design of the quilt, securing the layers together, and moving one step closer to finishing your project. None of those things are cheating!
As you get more experience with quilting, your mind will naturally start poking you with inspiration and ideas to innovate. You may create a quilt like a log cabin that would be a total beast to stitch in the ditch so you naturally look for new designs to avoid that headache.
Regardless of how your quilting skills develop, stitching in the ditch is like learning how to properly mix cement to a brick layer. It’s a foundation step that must be mastered to move on to the next step. In short, everything builds from here.
Now if you’re looking for more challenge, you can always stitch in the ditch in free motion. Yep, that’s right – you don’t have to ditch with your walking foot. You can ditch AND fill in free motion.
This is a bit more challenging because the machine is doing less work for you. You have to push the quilt under the needle, and work to stay in the ditch, AND produce nice even stitches.
Whew! I did say challenging right? This is a tricky technique and I admit even I hop out of the ditch when quilting this way, but it’s a very useful technique to master.
Have I inspired you to try stitching in the ditch? Are you ready to tackle Block #1 with gusto? Share any questions you have in the comments below!
Let’s go quilt,
Leah Day
I love stitch in the ditch, it is great for all of the reasons you outline in your post.
Sorry if this is a dumb question but is the SITD technique possible if you press seam allowances open instead of to one side? Thanks for a great tutorial!
Great question! Yes, I believe this is perfectly fine. I explain why in the post on Piecing Tips – http://freemotionquilting.blogspot.com/2017/01/quilting-basics-2-quilt-piecing-tips.html
I’m just getting started with machine quilting. I watched your video and saw you bring threads to top. What next. Do you tie them in a small knot? What’s best.
Hopefully I get an answer as I see your website is several years old.
Thanks.
I begin quilting. I do not build up thread in place. I hang onto both threads and begin stitching, then I go back and tie off and bury the thread tails later. Here’s a video that explains this – https://youtu.be/sIGaKecQ-kM