
Quilting Basics 7: Free Motion Quilting Tips
Yesterday we learned how to stitch in the ditch with our walking foot and I mentioned you could do this with free motion quilting too. Today let’s learn some tips on free motion quilting and how this cool quilting technique works on your home machine.
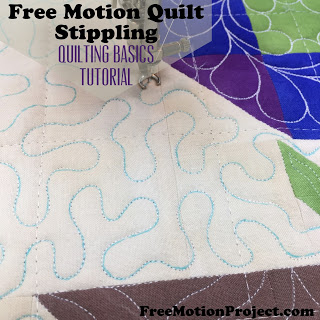
Click here to find the Stippling worksheet in the Block #1 pattern.
I can’t emphasize enough how weird free motion quilting is. This quilting technique uses your machine in a totally different way so that most of the things you can usually depend on like consistent stitch length and the fabric feeding evenly through the machine no longer happen.
So that is what makes free motion quilting feel so odd when you first get started – the machine is no longer doing the work for you. This means that the stitches you produce in free motion are entirely up to you and created by balancing the speed of your hands moving with the speed of your needle bouncing up and down.
In conclusion, your stitches aren’t going to look perfect when you first start free motion quilting. They’re not going to look consistently sized and evenly spaced the way they look for walking foot quilting. You may have a spot of itsy bitsy stitches, then a massive chunky stitch.
Until you learn how to maintain a steady speed between your hands and your foot pedal, your quilting isn’t going to look very pretty. I call this the ugly stitching phase and it’s something you just have to plow through in order to become a skilled free motion quilter. Quilt a whole lot of ugly stitches and eventually your hands and feet will figure out how to work together to make pretty stitches.
You can see what I mean in this video with Josh from the Building Blocks Quilt Along:
A few tools can definitely make free motion quilting easier. I always wear Machingers Quilting Gloves because they help me grip the quilt surface and move it smoothly over the machine.
I use a Queen Supreme Slider on my machine to make the quilt easier to slide smoothly under the needle. This is a Teflon sheet that has a pink grippy side that clings to the machine surface and a smooth, slipper top side that helps reduce the friction between your block and your machine.
When I’m not free motion quilting, I move my slider to the front of the machine off the feed dogs for quilt piecing to help the pieces slide over the table surface. When walking foot quilting I usually position it to the left of the machine to help the quilt move evenly as the walking foot chugs along.
To improve my stitches many years ago I found Magic Bobbin Washers which help to reduce thread breaks and backlash. These washers work for both top loading and side loading bobbin cases and are really nice in older machines that don’t have the new springs that stop the bobbin from rattling around.
When you free motion quilt, you’re really managing three things at the same time:
1. Moving the quilt under your needle with your hands.
2. Controlling the speed of the machine with your foot.
3. Thinking of the design and how to quilt it on your quilt.
This is quite a lot to do all at the same time! This is why I strongly advise you to quilt on marked lines. When you have marked lines, you don’t have to think at all about the design and you can focus entirely on moving your hands to form the design and balancing that speed and movement to make pretty stitches.
Now a lot of quilters ask me about quilting on marked lines and if this is cheating – it’s definitely not!
In the world of free motion quilting we have two types – free hand quilting and marked quilting. Both are equally important skills to build because you will use both techniques to create amazing quilts.
Marking a design ensures it will be placed where you want it on your quilt and will look exactly the way you want it to look. Marking is the only way to guarantee a symmetrical or evenly spaced design.
If I didn’t mark this goddess quilt, how in the world would she have finished so symmetrically?
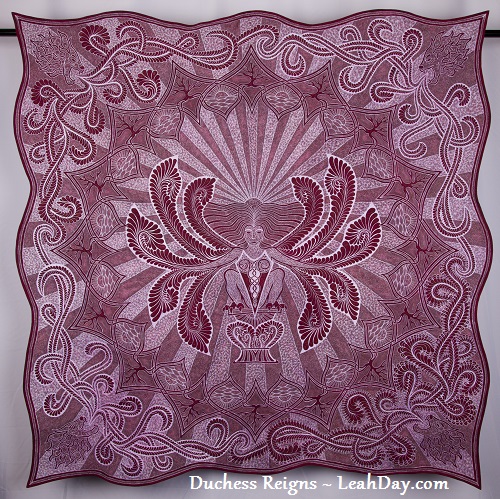
In short – marking your quilting design is NOT cheating. It’s another tool in your toolbox and one I strongly advise you pull out and use from the very beginning.
The other type of quilting – free hand quilting – doesn’t include marking your quilt because you memorize the design. This is exactly like memorizing how to sign your name in cursive – you don’t think about that anymore, right?
This type of quilting requires memorization and practice and a basic understanding of the rules for each design. All of the free motion filler designs I’ve created for the Free Motion Quilting Project are free hand designs that are quilted without marking.
So I hope you can see that we have lots of different techniques to learn with free motion quilting and there isn’t a wrong way, or a cheating way, to learn. It’s all good if you’re learning how to quilt your own quilts!
What do you think of free motion quilting so far? Have you created a lot of ugly stitches yet? Make sure to share your pics in the Block Party Facebook Group. Don’t worry – this is a super supportive group and members are always cheering one another along. It’s definitely the best part of the Machine Quilting Block Party!
Let’s go quilt,
Leah Day
I can't thank you enough for introducing me to the Supreme Slider! I use a queen size plus a regular to maximize the surface and also use it to the side when sewing any tricky materials. It's especially nice for covering up the groove between my machine inset and may sewing table.
And Machingers have saved my hands and shoulders as they enable me to relax when doing FME.
Wonderful! However, I wonder if I might misunderstand two of the terms you use.
Sometimes, the words "stippling" and meander are used interchangeably. "Stippling" is used to describe a pattern less than 1/4-inch, while "meander" is larger than that.
What I see in the images and the video is what would normally be called "meander".
Does it matter *what* we call it?
Al
Hmm…I've honestly never heard of this. Stippling and Meandering are pretty much synonymous in meaning a design with the following rules – curving, wiggly line that doesn't cross itself.
When talking about a super dense Stippling design (1/8 inch of space or less between the quilting lines), I often call it Microstippling. But really it's all the exact same design and the exact same rules to memorize.
No, I don't think it matters what we call it. So long as it makes sense to you!
Nice!