
FMQ Friday – Distortion Delimmas
It’s FMQ Friday and time to answer a great question that came in from Sue via email about our Express Your Love project:
How do I stop the quilt from distorting when quilting densely?
This is a great question because distortion definitely happens when quilting on a small scale. I think I should put that on a t-shirt – distortion happens – because it’s just that unavoidable. Even a bed quilt, quilted very openly can potentially distort. Why?
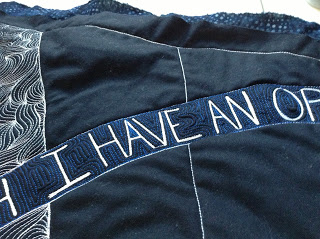 |
| Notice how the unquilted fabric around the words section is rippling. |
Well the most simplistic reason is a quilt is made from fabric and fiber which bend, shift, twist and distort depending on how you treat them. Fabric is not cardboard! It’s alive and moving and shifting, and when you disrespect it or mistreat it, it will definitely let you know!
So when you see distortion or skewing when it comes to a quilt, there’s a couple different things going on:
1. Basting security – When you baste a quilt, the layers need to be evenly layered and smooth. Ripples in one layer will effect the entire quilt, so basting carefully is very important.
This is a key reason why I don’t prefer basting spray. I know many who swear by it, but I have just never found it capable of securing the layers of my quilts securely enough. I use straight pins and Pinmoors these days, but for years I used bent safety pins. The reason I switched is the pinmoors are easier to take out while quilting and softer on my hands.
2. Initial stitching – For quilts like Express Your Love and my other goddess and show quilts, simple basting might not be enough. It really helps to start getting the layers of your quilt even more secure with actual quilting stitches that run along the outlines of each piece.
Now for the wholecloth version I’ve been working on, I started by stitching along all the marked lines in Silky White Isacord. Lately I’ve been adding more colors to the quilt and this white color is showing up and looking a bit odd:
I have no regrets about that initial stitching because the quilt needed that security, but how could I have avoided those awkward white lines when I wasn’t sure about my thread colors?
Simple – Stitch with a thread that isn’t permanent.
Water soluble thread is an awesome tool to have in your corner. I call this a tool and I mean it! It has an amazing ability to hold the layers of your quilt securely together for as long as you like, and then it disappears when you don’t want it anymore. What an amazing tool!
So had I planned ahead and known that I was going to play with multiple colors on this quilt, instead of using regular thread, I would have done that initial stitching with water soluble thread instead. It would still look exactly the same right now with white lines peeking out between the different filler designs and colors, but in the end those lines would disappear leaving no trace after the quilt was soaked in water.
We will be working with this technique later this year and many others because water soluble thread is such a useful tool. When it comes to securing your quilt together, there’s really no alternative to actual lines of quilting, so the first step should always be to outline just to get everything stable and ready to go.
3. Work evenly, work carefully – As you can see from the picture above, I’m knocking out the center sections of the quilt first and trying to work as evenly as possible through this quilt.
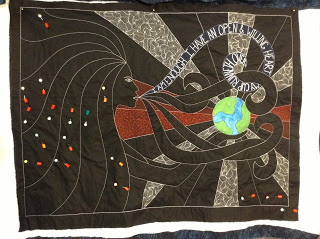
To be perfectly honest, there has been some distortion in my quilt already. Here’s a shot of the words section and you can see the fabric rippling along the edges:
 |
| Notice how “bubbly” the quilted sections are. The dense quilting will cause the surface to ripple, but blocking can usually smooth this out. |
This happened because one section is quilted densely while the other is not quilted at all. The fabric with loads of thread in it is being squished and flattened, while the unquilted section is still loose and free.
To smooth out this section, I decided to knock out a big section of background before moving on with more word / breath sections. Had I continued to work dense fills across all those flowing sections, I might have created a lot more distortion within the quilt as the fabric was pulled repeatedly in that horizontal direction.
Also consider the direction you’re moving in and the pressure and pull you’re giving to the quilt. The meaning behind “work carefully” is this – never work too long in one direction. If you stitch through a word section running from left to right (logically this makes sense because it’s the way we write words), make sure to work through the sections around it in a different direction, or at least rotate the quilt so it’s not continuing to “pull” from that direction.
When you are moving your quilt around and shifting positions, make sure to do a lot more gentle pushing forward and around than pulling towards yourself. The reason is pushing will usually puddle the quilt up into itself. There’s usually no resistance and the fiber appreciates that.
When you pull and tug towards yourself, that action is a distortion in itself, and there’s always the chance the quilt could get hung up on something and distort further.
I see this happen the most often in the edges of a quilt. As you quilt through the borders, be VERY mindful of how you are moving and treating the quilt, and your attitude about it.
If you are in a hurry or irritated, you are probably pulling the borders totally out of whack and don’t even know it. Slow down, calm down, and come back to the project when you are ready to take your time through these areas.
Now if this is totally confusing and has you feeling very intimidated, please don’t worry! Picking up on nuances like this come with time and experience.
And yes, I have distorted and skewed my fair share of quilts! Some of them were so badly stretched, they couldn’t hang properly on the wall. I had one memorable wall hanging that literally looked like the borders were molded around a corner, I had been in such a hurry to get the quilting done I’d stretched deep waves into the edges.
This HAPPENS.
Don’t be afraid of it.
Work with it, learn from it, and allow the experience to teach you something.
Just the experience of stitching small, on a tiny scale will blast your skill level through the roof! It’s absolutely worth it to work through this project, even if it ends up with slight imperfections.
And I should also note that most small distortions can be sorted out with blocking. Most of my quilts won’t hang on the wall straight, but after a solid soak and overnight pin, they are ready to behave.
Now with distortion covered, it’s time to see what you’ve gotten up to this week with free motion quilting!
Simple rules for the FMQ Friday link up:
1. Link up with a post that features something about Free Motion Quilting (FMQ).
2. Somewhere in your post, you must link back here, or you can just post the FMQF button in your sidebar.
3. Comment on at least a few of the other FMQF links. Share your love of free motion quilting and make this weekly link up a fun way to connect!
Let’s go quilt,
Leah Day
Thanks for the timely post as this is what I'm facing right now. I was in a hurry to get to quilting and added some other elements (applique). So now I'm now unpicking and will tackle this a bit better after reading your post. I think I will use the soluble thread to baste the quilt.
LauraT
Such great advice/pointers. Just raising the awareness level will go a long way to helping minimize a major skewed outcome. Wetting/blocking does so much to overcome seemingly "impossible" outcomes. Having said all that, I have come to the conclusion that there is no achievable 'perfection' but very real 'satisfaction' in the creation of this quilted art and I am so okay with that and loving it!!! Thanks for all your inspiration/dedication to us all in your sharing of experience and talent. Hugs, Doreen
These were really good points this week. I know I had the same question. Would you normally do the painting this soon in a quilt as well? I worry about brushing the paint too often and scratched it or ruining it's luster.
Distortion is spelled wrong in the title. Oops.
Shawn – You have just pointed out Bloggers fatal flaw – no spell check in the title area! NOOO! Lol. Now you know the truth: without auto-spell check I would be barely legible!
Kelly – Great question! No, I usually don't paint a quilt until later in the process, but I'm glad I tried it now. It hasn't damaged the painted area a bit to be banged around the sewing room, and it's still looking very nice.
As for other paints, we'll have to wait and see. I'd say you'd be pretty safe to paint at any stage with Jacquard Lumiere.
Leah, thanks so much for all you share with us. I have never done a whole cloth quilt before. I am following along with your "express Your Love" but I am not using your design. Ive created my own sketch, sewn thru the pattern to create a stencil, pounced it and stitched the center design with water soluble thread. However, not thinking ahead enough as we all get excited in the initial stages. I used regular thread in the bobbin as I had thought once the soluble thread was gone the bobbin thread would just be pulled out. Once I was done I realized if I freemotioned on top the bobbin thread would be trapped and it will be a picking mess to get out.
Since the center design is anchored, can I stitch the background areas first with out getting a distorted, stretched center? I'm not liking the idea I should redo the whole thing. But if I have to, it's a learning experience.
Thanks, Suzanne, Dutchess County NY
I had hoped to get my link in but it was closed after 1 day! I started to use my longarm and my first full FMQ project using it is done! Here's a link:
http://pamelynspostings.blogspot.com/2013/02/fmq-practice-longarm-machine.html
Thanks for all the knowledge you share. I've learned so much from your videos and am looking forward to implementing patterns on the longarm as well as on the regular sewing machine. All the best to you and your family!
Pamelyn from pamelynspostings.blogspot.com
Hi Leah,
Checking in again on the latest "rays" fillers. I'm finding my stitches very tiny and uneven due to the small space we're quilting inside. I know it won't be perfect, but my stitches are really teeny. I'm having to go super slow and still it doesn't look so good – hope it gets better with practice (on the quilt itself). By the way – I found stitching on the painted blue area a breeze!!!!
Hi Suzanne – It sounds like you need to either consciously let your foot off the gas or speed up the movement of your hands. Yes, this will get easier the more you do it, but try to focus on either one of these areas and see if it improves your stitch length and quality.