9. Pump Up Your Quilt’s Intensity with Boomerangs
Let’s talk intensity! In Tuesday’s post on Micro-Zippling, I stumbled across that word and it perfect describes how I play with thread – on scales of intensity.
So if you remember back, Zippling falls into the Not Intense category. It had no travel stitching, no extra thread play, so the color of the fabric shines through quite a bit. This is a great design to utilize when you want a flat, matte background and the focus to remain on the fabric, not the design.
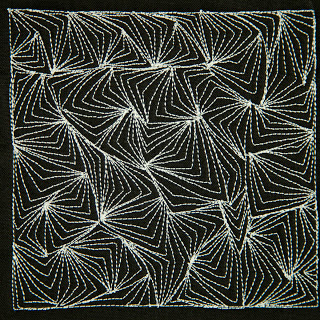
Today we’re going to learn the opposite end of the intensity scale – Super Intense! with Boomerangs:

Boomerangs is a super cool stacking design that bounces around your quilting space with speedy, jagged lines. Because of the way the design is stitched, you can do tons of travel stitching and really build up your thread excessively.
And this creates an entirely different effect for your quilts!

On the left, Zippling is on top and Boomerangs is on the bottom and on the right this arrangement was reversed. It’s hard to believe it, but the exact same color of Isacord Brick was used for both spaces!
Now let’s learn how to quilt this and see a close up of the stitches side by side:
So how do you know what a design will do in the Intensity spectrum? How can you best gauge what designs and thread and fabric will look best on your quilts?
Test it! You have to stitch up small tests of the thread, on the fabric, stitched in the design, in the scale you plan to use, pin it to a wall, step back and take a look at it.
Yes, even a bed quilt should be tested this way! If you’re wanting a very pretty, special finish to your quilt, you definitely should take the time to stitch out a sample, pin it to the wall, step back and look at it.
Why step back? Because even on a bed, you’re going to admire the quilt from about 10 feet away. And the effect of thread play like this is very different when viewed right up close and from far away.
So I hope this has helped open a whole new world of free motion quilting for you! It’s more than just thread color and more than just designs, but their combined intensity on the surface of your quilt that really makes a huge difference.
Let’s go quilt,
Leah

I noted that the boomerang section was not outlined first. Is that because you knew it's travel stitching would be sufficient? I'm trying to understand when the travel stitching along the outside of an area would be done and when it can be skipped.
I haven't had a chance to quilt along yet, but my fingers are getting itchy to start
Since finding this blog, I feel like my quilt vocabulary has grown immensely. I am learning new things every day, I am inspired to create my own designs, and my sewing machine hasn't stopped stitching! Thanks for sharing 🙂
Good Morning, Leah. I love this "new" look in brick. I also love your postings – I look forward to them while I eat my breakfast and then run off to work thinking about quilting at night!
A few questions…Do you use a special sized needle given the thread density at the "points" in the pattern? I'm alo using a fairly heavy black fabric – feels almost like denim, should I use a "heavier" needle? And question #2. I didn't outline the whie/cream rays before I McTavished them…do you recommend doing the outlining before you stitch each segment?
Thanks for this. I've put everything else down just to work on this!!
Hi Suzanne – For needles, no, I'm using the exact same needle I used for stitching Zippling. It's a Universal 80/12 needle, so nothing special.
On outlining, there is no rule other than to quilt what YOU like to achieve the look you want. I would outline the area first, but that doesn't mean you HAVE to. Does this make sense?
Hi Tsigeyusv – On outlining, I was in a hurry to shoot the video before my family came banging down the stairs 😉 After filling it, I went in and stitched the outline. As for when it's necessary – anytime you want to do it. There is no hard and fast rule with this. I think it looks better to have the outlining, but some quilters don't, so take a look at it, stitch a bit, and make the decision that works best for the way you want to make quilts.
Cheers,
Leah