5. Quilting Over Painted Fabric
Gosh, I can’t tell you how much I love working on this quilt with you this year! It’s been so nice to walk into my sewing room and ask myself “What do you want to play with today?” That question had gotten a bit lost for me under the pressure of teaching perfectly, but now that I’ve found my creative wings once again, there’s no telling what we will explore this year!
Speaking of creativity, one of the coolest ways to be super creative and create amazing effects on a quilt is to paint it.
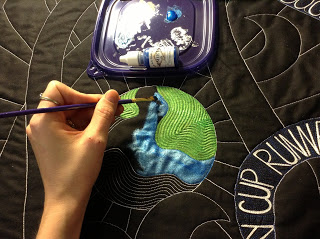
Earlier this week we learned how to paint over quilted fabric and saw the effect this could give the Earth section of Express Your Love.

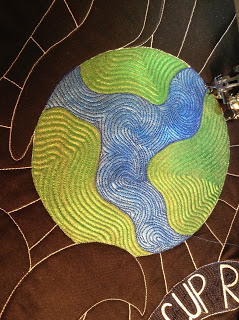
In that video, I also painted the unquilted water section as well and left it to dry for a day. Now let’s learn how to quilt back over that painted fabric because it has a totally different effect from painting over quilting:

Had I used a more contrasting thread color, or picked 2 colors to quilt on either side of the Ocean Current foundation, this could have been even more interesting. I love the shine and luminosity that comes from Jacquard Lumiere Textile Paints. It looks great on top of quilting because the light shines over the stitching and draws a lot of attention to the quilted texture, but not the individual stitches.
It also looks great with rows and rows of echo quilting on top as well. I guess we should call this the “stab” effect because your needle literally has to stab holes into the paint to form the stitches.
Unlike quilting over normal fabric, these holes won’t close up completely, so there is one important warning about this technique – you cannot rip.
If you rip out stitching over painted fabric, you will leave a row of little dots behind. To cover these completely, you’ll need to paint over them again. So for sanity and time savings sake, just try to stitch as perfectly as possible, and / or be willing to accept any minor mistakes so ripping isn’t a necessity over this area.
Now if I haven’t totally freaked you out about this, let’s see how it works!
This is the first time I’ve used both techniques in one quilt and I have to say the effect is definitely worth playing with.
Now many quilters have written in to say that you don’t have paint or don’t feel like playing with it right now. That’s okay! Please follow along with this project as you see fit. You don’t have to try every design or technique unless you want to.
And just a little reminder of where everything is:
Click here for the free downloadable pattern
Click here to find the printed fabric (cheater cloth) panel
That’s it for today! Have fun playing with this super cool technique and see all that you can do with paint, fabric, and thread!
Let’s go quilt,
Leah Day

I am curious if you have ever used crayons (then ironed with wax paper) on a quilt to add color? It would take longer, require more effort but it might be softer? How soft or stiff are the Lumiere paints?
As a small child, we colored pillow cases in class. Then our teacher ironed them with the wax paper to set the color. Mine survived years of use, though I am not sure how often my mother washed it.
Your mention of playing and exploring got my mind wandering 🙂
Thank you!
Heidi
HeidiRider@aol.com
Beautiful! I love how the water is represented. I am almost caught up and can't wait to get painting 🙂 Thanks for sharing.
I must get back to this! Have you seen Helen Godden's Flying into Colour?
OK I think I under stand now how your doing this. Its applique!!! I love watching you. I wish I could get some extra cash so I could buy one of your classes. You brought me out from a depression and I really am back into my sewing. You don't no how much you helped me really you don't. So thank you so much and keep on teaching me. I wont to try and get that DVD asap. be sweet