
Question Thursday #37
It’s Question Thursday and Pat at Color Me Quilty has asked my favorite sort of question:
So my question for Leah is about the Ikea table and adjustable legs you show in this post. Since I don’t have an Ikea within at least 200 miles of me, I will need to order them online. You show two tables, one that you said you cut down. I’m assuming it was the one behind the machine. Could you share the exact dimensions of both tables and your combined sewing table configuration? How did you cut the table down, table or circular saw? Did this affect the pre-drilled holes for the legs? Was the raw edge of the table a problem? I love your sewing machine set-up, so any pertinent information would be hugely appreciated.
Okay! This is a fun excuse to share a few studio pics and lots of links to various places where I regularly look for new furniture for my sewing room.
The first thing you have to understand when looking at these pics is how long I’ve been working on these setups. We moved into this house in 2006, and pretty much ever since I’ve been improving it by large and small degrees to make each space better suited to quilt making.
And yes, it can take YEARS, mostly because some improvements may not be immediately obvious when you first start quilting in a particular room or space. It takes time actively quilting and using a space to notice that – oh, that table feels uncomfortable at that height, or – hey, I wish I had a light right here and a place to hold my seam ripper and scissors!
And yes, this is expensive. I honestly don’t know how much I’ve invested in furniture, storage bins and shelves, but keep in mind that I didn’t go out and buy it all in one day. If you’re looking to change up a big part of your sewing set up, try splitting it into 2-3 parts – get the tables set up first, then do the wall storage, then floor storage. This way you can budget for each and the bill will be easier to swallow (or hide from your spouse!)
And one more yes – Yes, I have a ridiculous amount of space. We more or less bought this house for the basement because despite needing a new roof, new appliances, and new plumbing, it was the perfect house for a quilter to have more than enough room to spread out and make big quilts. I work in my basement kitchen plus a small bedroom, and dye fabric in my laundry room.
But ridiculous amounts of space can easily mean loads of wasted space. Part of working in this space has been learning how to deal with weird areas and how to maximize my potential, even with limited electrical outlets, low ceilings, and terrible original design and construction.
The biggest key I’ve learned is to never expect “forever” fixes. You will improve things, yes, but these improvements might spark others, and in 2 or 3 years, you might end up moving the furniture around quite a bit and end up with a totally different setup and a totally different arrangement of gear.
Josh is never very happy with me when I decide to make a drastic change, mostly because he’s calculating all the cost of all the small changes that will now be destroyed for a big change. One case in point was this set of kitchen cabinets in my basement kitchen:
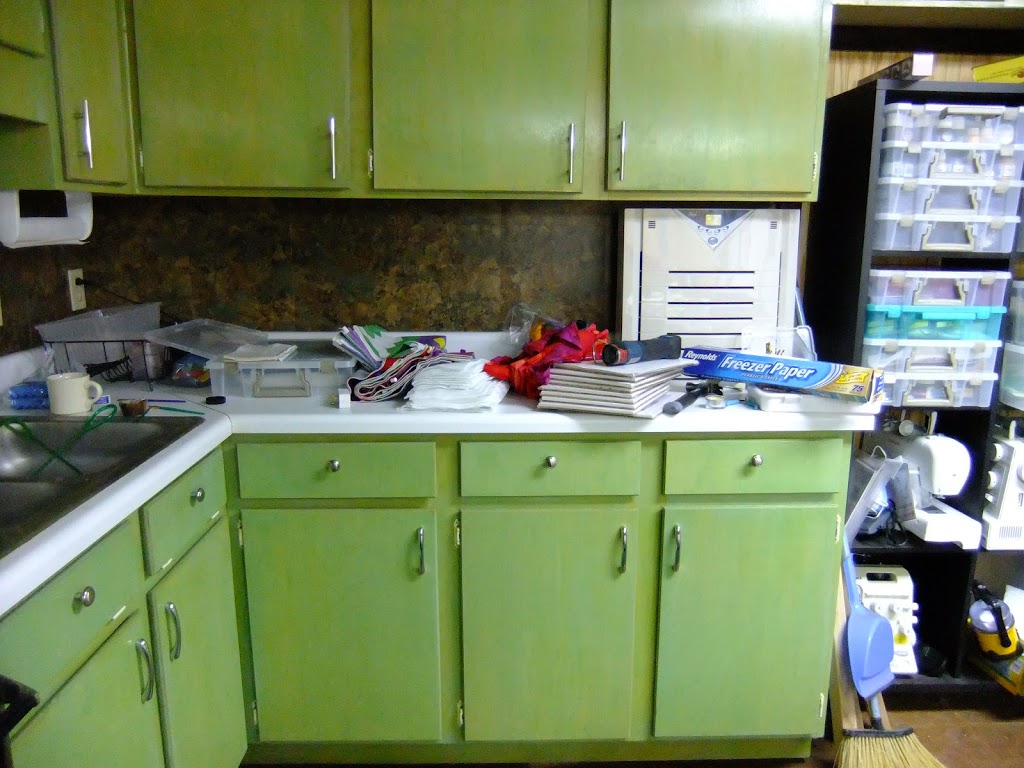
Inside these cabinets, I fitted these sliding drawers from Lowes to hold all sorts of tools, fabric paint, and colored pencils. They worked very well and allowed me to fill the cabinets with lots more stuff than I could without them.
But since last January I’ve been making plans to gut these cabinets. For one thing, they are very prone to mice and because they were very terribly built by the original owners, I can’t fix them to be mouse-proof. I don’t know about you, but having a rodent eat my colored pencils just freaks me out!
I’ve also always wanted a window along this wall to let in some natural light. Pulling down the top cabinets and moving the sink will allow this to happen, but at the moment this renovation is on hold until we get some old cast iron pipes fixed first.
But even with the kitchen remodel months (or years) away, I’m always looking ahead. Now what to do with all those sliding drawers? They didn’t cost a huge amount, but they were an investment in my sewing room and still very useful and it always helps to show Josh that I’m trying to use old things to improve new things.
So I built this custom cabinet:
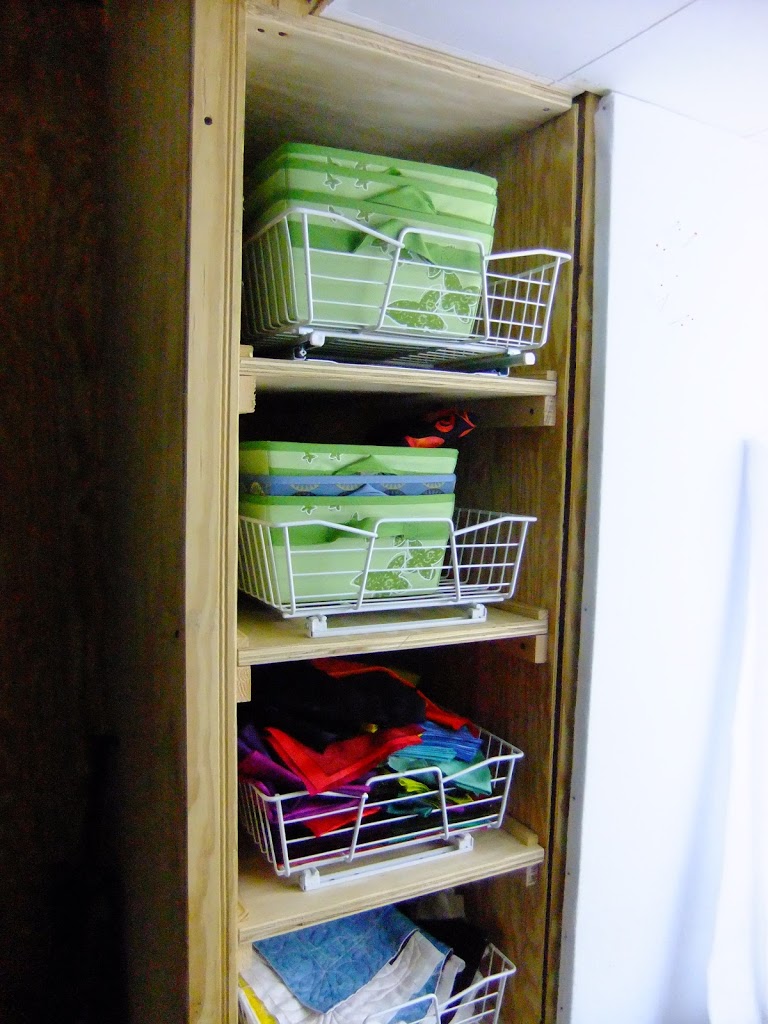
This was always a very weird area of my basement kitchen where the low ceilings did something funny right next to a door. There has never been anything to fit into this area, so I took careful measurements and using only scrap wood leftover from various projects, I built the set of shelves into the wall.
So this project, served two purposes – it used the drawers from the cabinets and it solved a weird space in the kitchen. Two birds with one stone!
This is the kind of thing I’m talking about with slow improvements and turning one improvement into another. 4 years ago when I started using this kitchen as a sewing room, I didn’t see that weird space as a place to put a cabinet. I just saw it as a weird space.
You have to look at every aspect of your space creatively. You might only have a closet, or a corner of a room. Even big spaces can be wasted if they’re not used properly. Whatever space you have, LOOK at it and really study it. Even if it’s not very big, there’s usually loads of wasted space on the walls that can be used to hang shelves.
Case in point is another weird space, this on the opposite end of the kitchen:
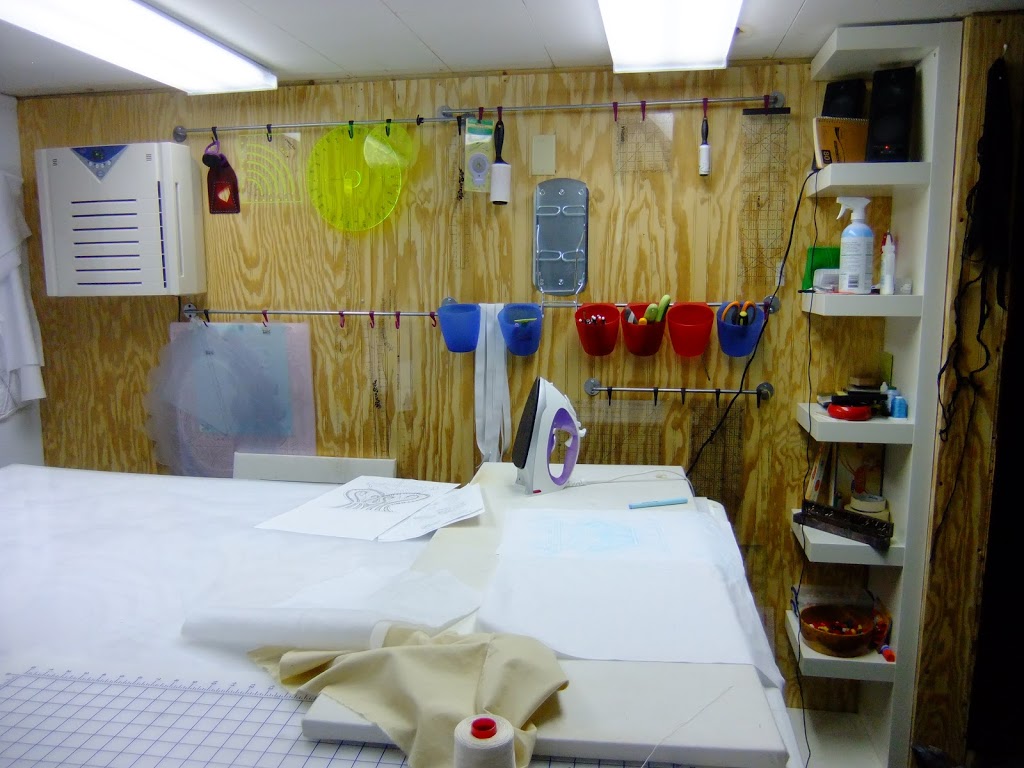
Originally when I wired this room, I put the light switch on the inside of the little wall, which was a silly move. It always felt awkward to reach in around the wall to turn on the light and again, it created a weird space in the nook created by the wall coming into the room – nothing could fit here.
So this summer I turned off the power, pulled down the paneling and switched the box to face the opposite side.
That one small change allowed me to fit this IKEA shelf into the space and it fit PERFECTLY. It was actually so tightly fitted between the ceiling and floor, I had to flip it in another room and shimmy it into the space
After getting it installed I did a little dance and thanked my high school shop teacher, Mr. Lamb yet again for teaching me how to read a ruler back in 9th grade. I swear, of all the knowledge learned in high school, that is one of the few lessons I use now on a daily basis!
Now this shelf holds all my handy tools for pressing and basting – starch, pins, pinmoors, my speakers for listening to audiobooks, and even a coaster for my cup of tea.
On the wall, I’ve hung these IKEA rails from the kitchen section with lots of cups and hooks. In the cups I keep pens, pencils, fabric marking tools, rotary cutters, and scissors. On the hooks I’ve hung the rotary rulers I use most often close by, then the rulers I use least often further down the wall.
All this is very convenient because as you see in the photo above, I keep my pressing board on the corner of this table, perfect for pressing fabric and within easy reach of scissors, starch, and marking tools.
I don’t use a built-in, permanent ironing board, but prefer to have a free standing board I usually place on this corner of my table. I built this board with plywood (48″ x 20″) using Sharon Schamber’s perfect pressing board instructions and it is absolutely worth it’s weight in gold.
When it’s not being used, I just lean this board against the wall in the hall or against the ruler wall. It’s only 3/4″ thick plywood so it’s heavy, but not too heavy to move around easily.
I do exactly the same thing with my cutting mat. I have a very large cutting mat and usually leave it in place on the tables so I can cut at any time. If I need to I can shift it off to against a wall so my tables are totally clear.
These might seem like such small things they seem silly to bother with. Does it really matter if you have a place to put your drink? Does anyone need a special location for starch?
The answer, in my opinion, is yes. Having a place for these things means they don’t get lost in the chaos of my tables. I know exactly where they are and don’t have to search for them.
Before I used a kitchen rolly cart for all these odds and ends it always ended up covered in a messy array of junk. Even now when I’ve moved it into another room, I can’t ever find what I’m looking for on this cart. It’s terribly designed and only gets cluttered up. Looking at it now, I’m seeing a need to scrap this cart and move the stuff on it to the built in cabinet in the kitchen. As always, I’m looking for ways to improve by small degrees.
So now on to the sewing machine setup! Right now I have 3 machines set up to work at any time. One is in the weird hallway area between the kitchen and sewing room:
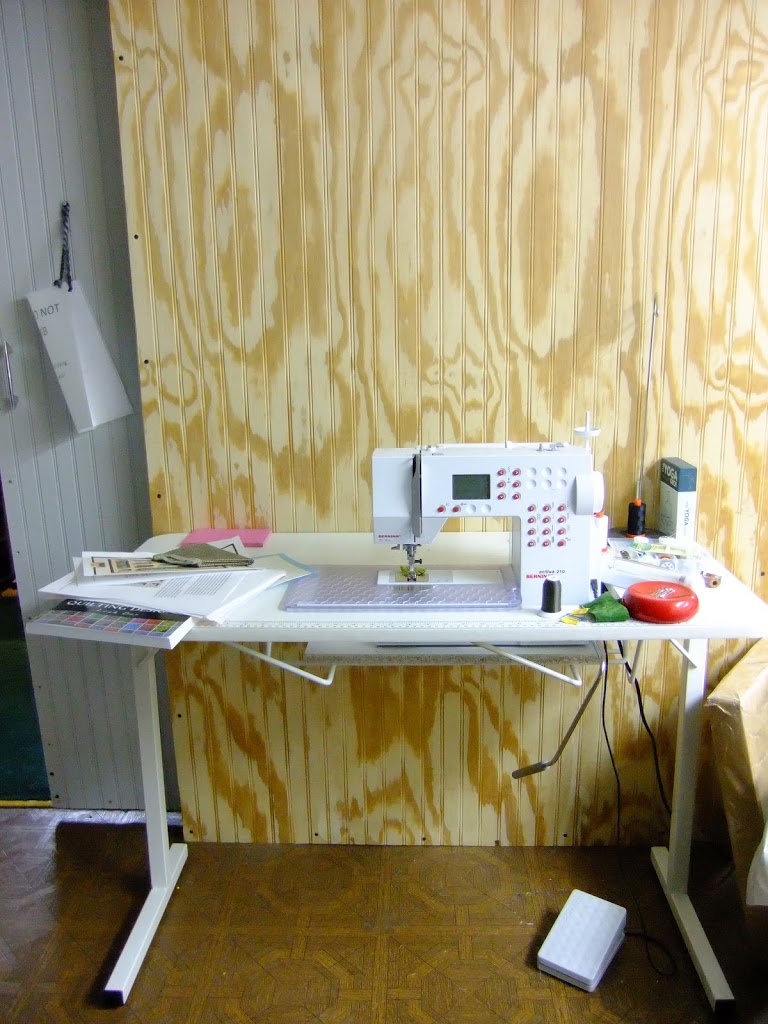
This is a Bernina Activa 210 set up in a Gidget 1 Arrow sewing table. This is mostly used for piecing right off the cutting table. I cut on the table, sit down and piece the pieces together. It’s very quick this way and the risk of pieces getting confused is minimal.
Because piecing doesn’t usually require a lot of space, you really don’t need a big table for your piecing machine. The size of the Gidget tables is small enough where you have the room to piece a quilt together, but not excess, wasted space to the back which will only end up getting dusty.
Looking at this picture I can see two places I can improve this setup. If I added some shelving over the table, and a set of drawers like these, I could better deal with the clutter that usually ends up junked on this table. It’s not in dire need, but I can see how these two things will improve this area significantly.
In truth though, I prefer to piece on my Bernina 1230, which is currently in the sewing room in this Marilyn cabinet also made by Arrow Sewing Cabinets. This is a very good cabinet, though there were a few small things I modified on it to make it work perfectly for my needs.
First, I cut out the piece of wood that covered the base of the sewing machine and replaced it with angle brackets. The wood was intended to support the frame of the table around the door, but all it ended up doing was make changing the bobbin very, very difficult.
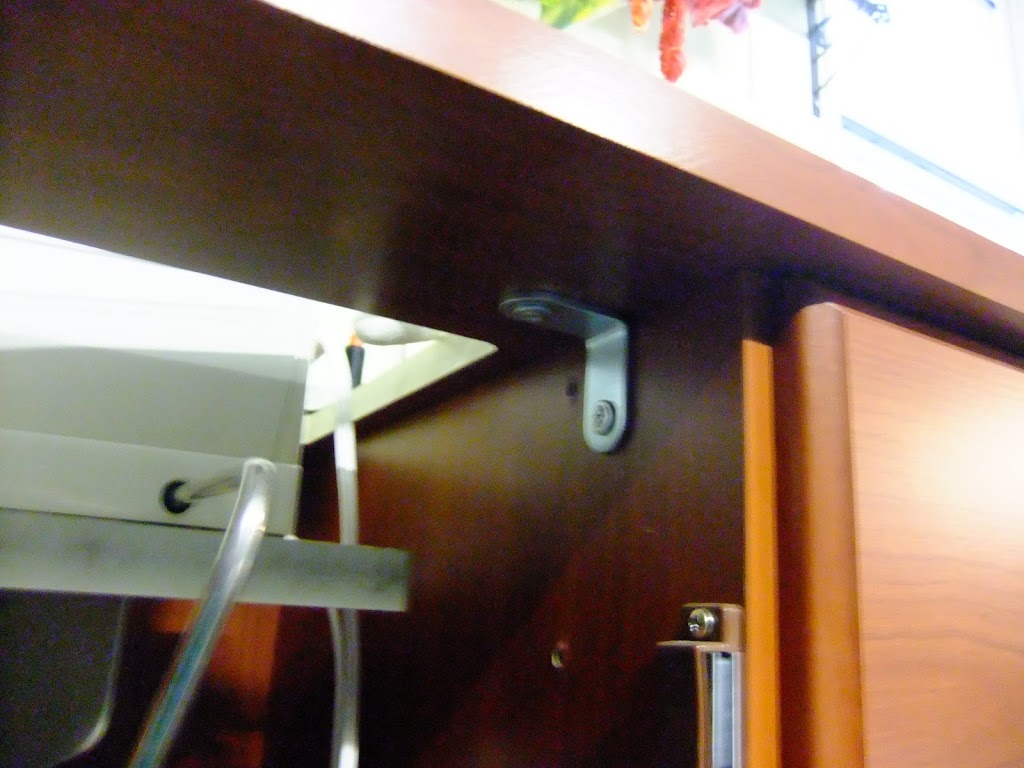
So after a bit of hammering, I chipped out the piece of wood and screwed in L shaped brackets for support instead. Now it’s super easy to slide my hands inside and change the bobbin without moving the machine out of the cabinet.
I use these L shaped brackets a lot as you will see and always have a pack or two of various sizes around the house. I believe this one was leftover from putting together IKEA furniture. They’re easy to use, and very simple in design, but do understand that modifying a table like this will void your warranty. I’m not guaranteeing it will work for you, only sharing what has worked for me so far!
I also replaced all the original hardware for the cabinet. This is aesthetic of course, but if you hate the drawer pulls they just have to go.
Again, this machine is almost entirely used for piecing and a little applique, so the table doesn’t need to be huge to accommodate this need. It has gotten a bit cluttered up top, which means I really need to go through the drawers and rearrange things and get it all better organized.
Eventually I’m hoping to move the 1230 into the hall so it can be used as the main piecing machine and install an embroidery machine in this cabinet. No, I have no idea what embroidery machine I want yet, or even if I really want to make embroidered quilts. It’s the design aspect of embroidery and the amazing software being made that’s intriguing me…but that’s a story for another day.
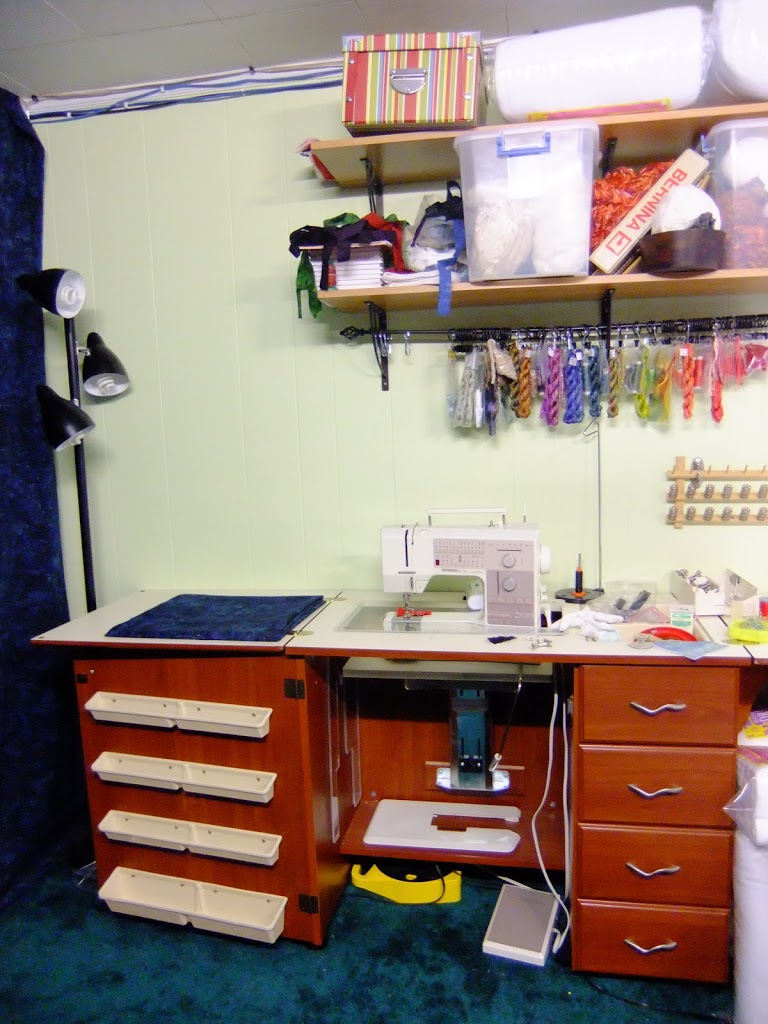
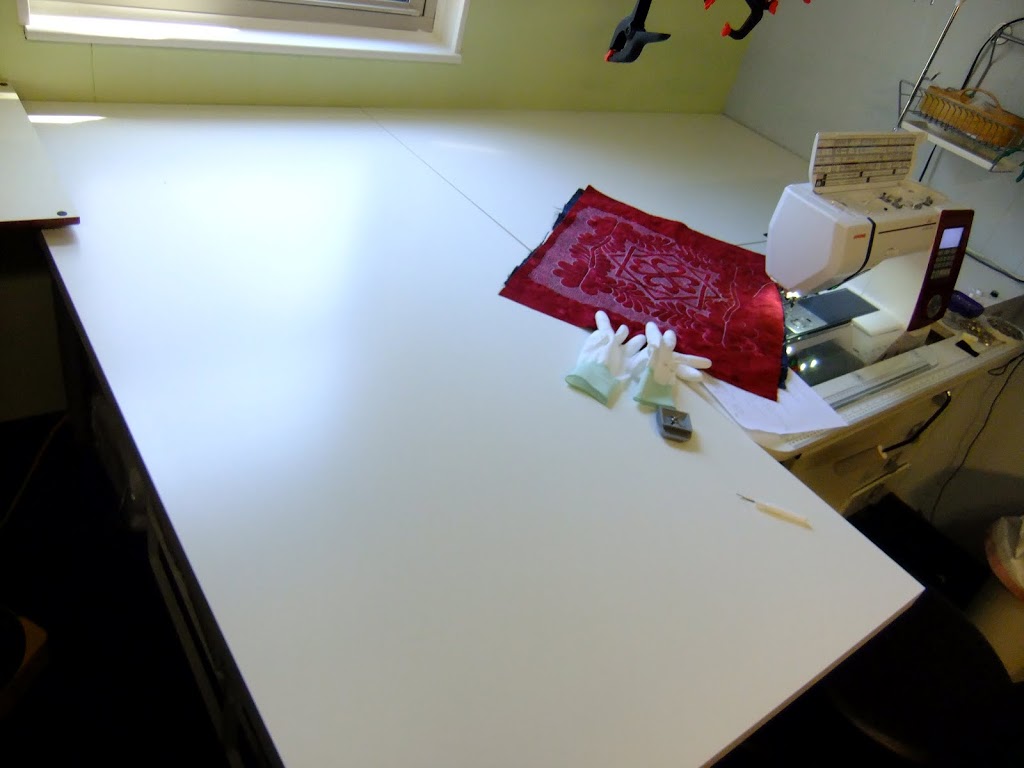
Now to quilting! This is the table that has required the most work, and the most frequent modifications since I started quilting in this space.
Right now I’m quilting on the Janome Horizon 7700 and it’s installed in a Gidget 2 sewing table. I’m using 1 x 4 boards under the long legs to bring the table up about 1/2″ on carpet which has brought it up to the right height to fit with many other tables.
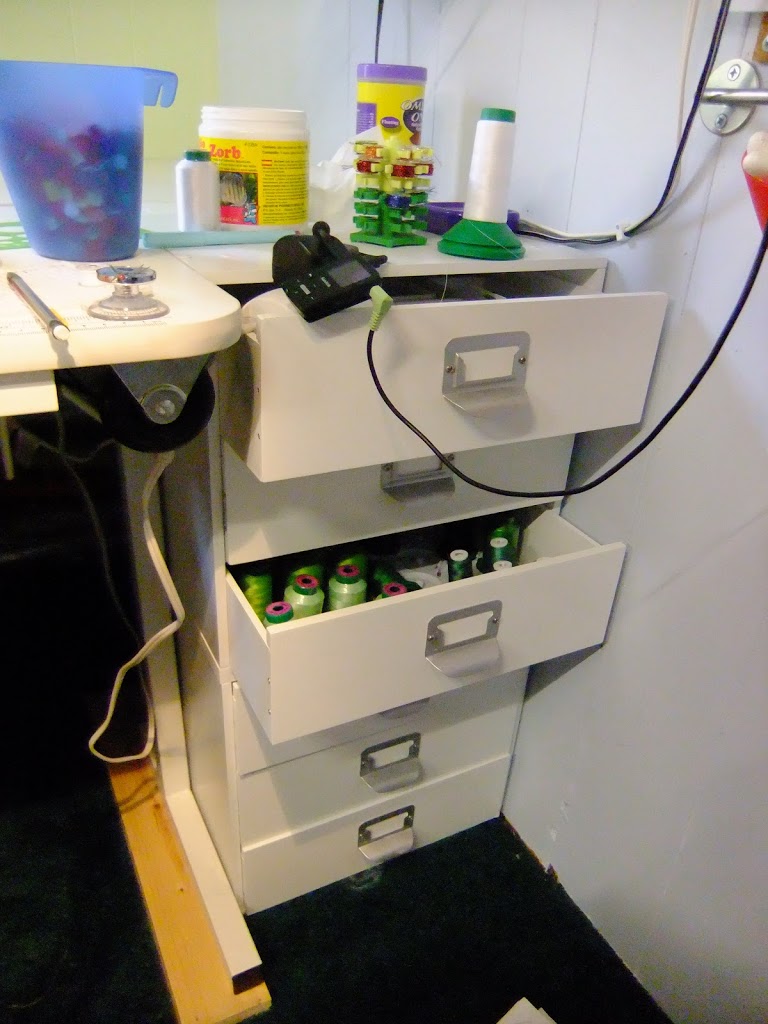
To the right I have a set of two Recollections drawers picked up from Michaels for thread, bobbins, and miscellaneous quilting tools. This has worked perfectly to hold many spools of thread organized by color and the height worked out just about perfectly with the table surface.
To the back I have this IKEA Vika Amon table – the 59″ long version which I cut down to 54 3/4″ to perfectly line up with the Gidget 2 plus Recollections drawer width.
As for cutting the table down, I just used this Delta Jigsaw. Make sure you have a blade long enough to go all the way through the table and of course, be very careful as you cut it.
As for the legs, I use these Vika Kaj legs which adjust to any height. For the cut down table, because it was going right up against a wall, and because I knew I would never have anything super heavy on that side, I only used 2 legs on the left and used big L brackets to screw the table permanently against the wall on the right and back.
This is a unique situation for a quilting table that I wouldn’t do for any other kind of table. Yes, quilts can be heavy, but no, they’re not going to be so heavy they will overwhelm a strong set of brackets.
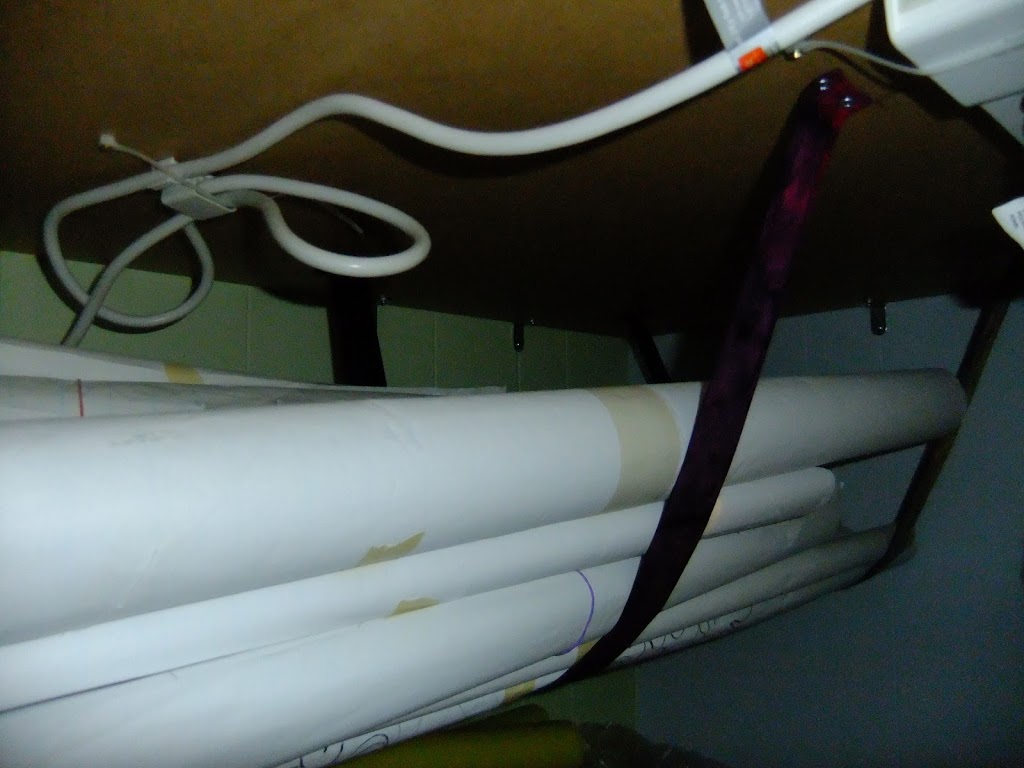
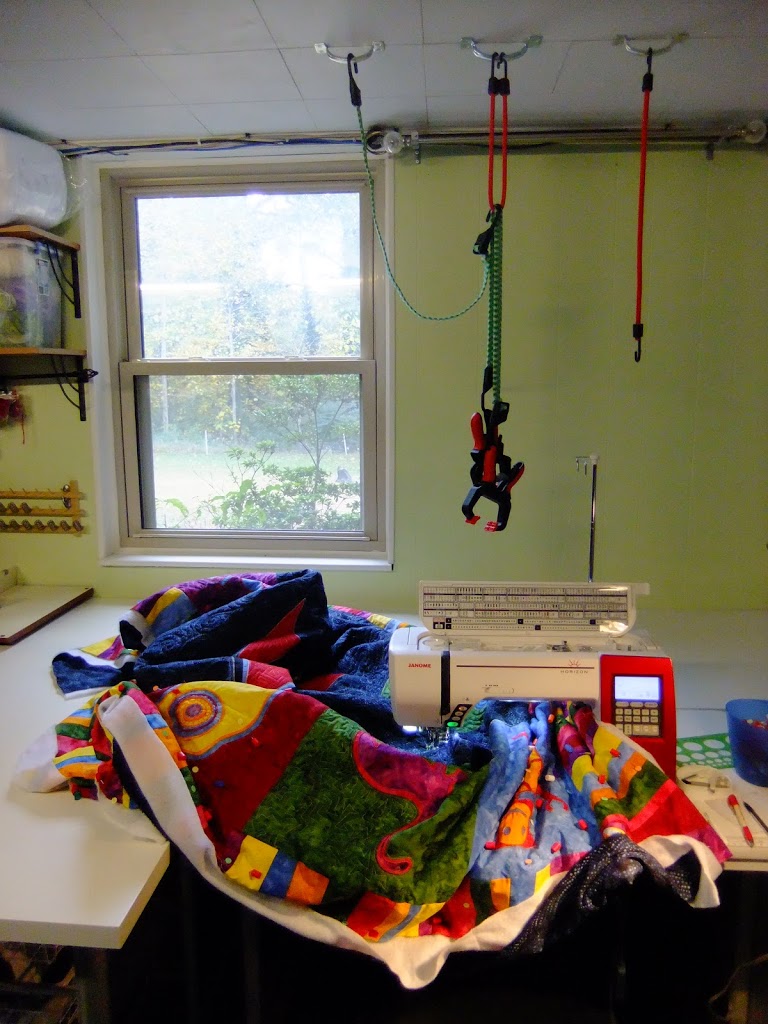
You can see the L brackets in this photo, plus the fabric straps which hold large quilt patterns rolled up, and my electrical extension all running under the table. It gets a bit complicated, but every space can be used for something, though it might not look great in a photograph.
Now added to the left side of the table is another 59″ Vika Amon Table (not cut down – full size), and has all 4 Vika Kaj legs attached. This table needed all 4 because I regularly lean against it and put a lot more weight on it.
Could I get away with just 2 legs and screw it into the wall with L brackets to the back? Probably. Again, it’s not like this table is ever going to meet 500 pounds of books, so it doesn’t need a huge weight limit.
Why all this obsession about fewer leg? They’re expensive! And don’t go for the non-adjustable legs – they aren’t tall enough to do the job and you’ll end up with tables of multiple heights, which is the whole point of going with IKEA tables in the first place.
Also if you just use folding tables, you won’t be able to do this:
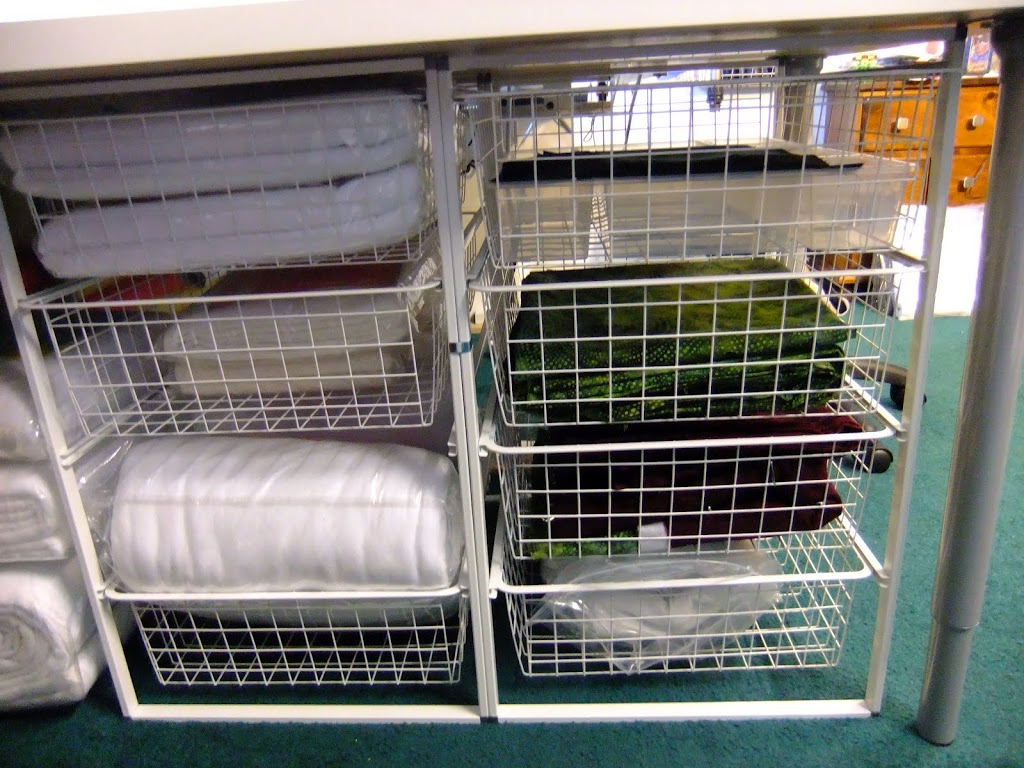
Two Antonius frames will fit perfectly into this area and are a great place to store batting. If you use a folding table, this area will be wasted because the bars that support the legs will eat up the space.
Now on to fabric. I’ve had a love/hate relationship with every single fabric storage system I’ve ever used, mostly because no system ever gives me the total freedom to see every piece of fabric I own and be able to see immediately how much yardage I have of it. That would be a magical thing, but I think it’s totally impossible! So yardage goes on this wall:
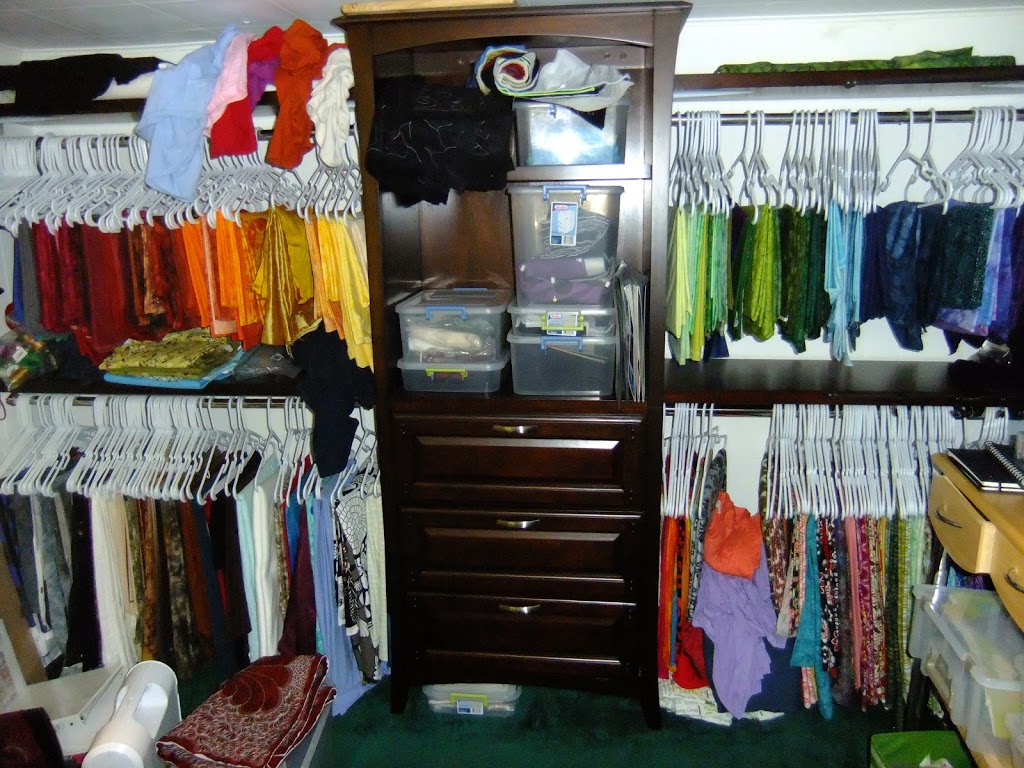
This is a fancy closet organizer from Lowes which I picked up before knowing about IKEA, otherwise I could probably have gotten something better designed and possibly a lot cheaper. It was a real royal pain in the butt to install and I don’t have fond memories of getting the extra conduit pipe cut to the wrong size twice before getting it properly installed.
But after all the hoopla, this really has been a great setup for fabric. The one thing to keep in mind is STUDS. You need serious support for this much weight hanging on these poles. I used big screws with serious anchors where I couldn’t find studs to screw into directly.
The one thing I don’t like is this isn’t very useful for small pieces – fat quarters and smaller just get lost on hangers, or fall off constantly. So those got tucked into the drawers where I forget about them all the time and never remember to pull them out and cut them up. Improvements are definitely needed in that sector.
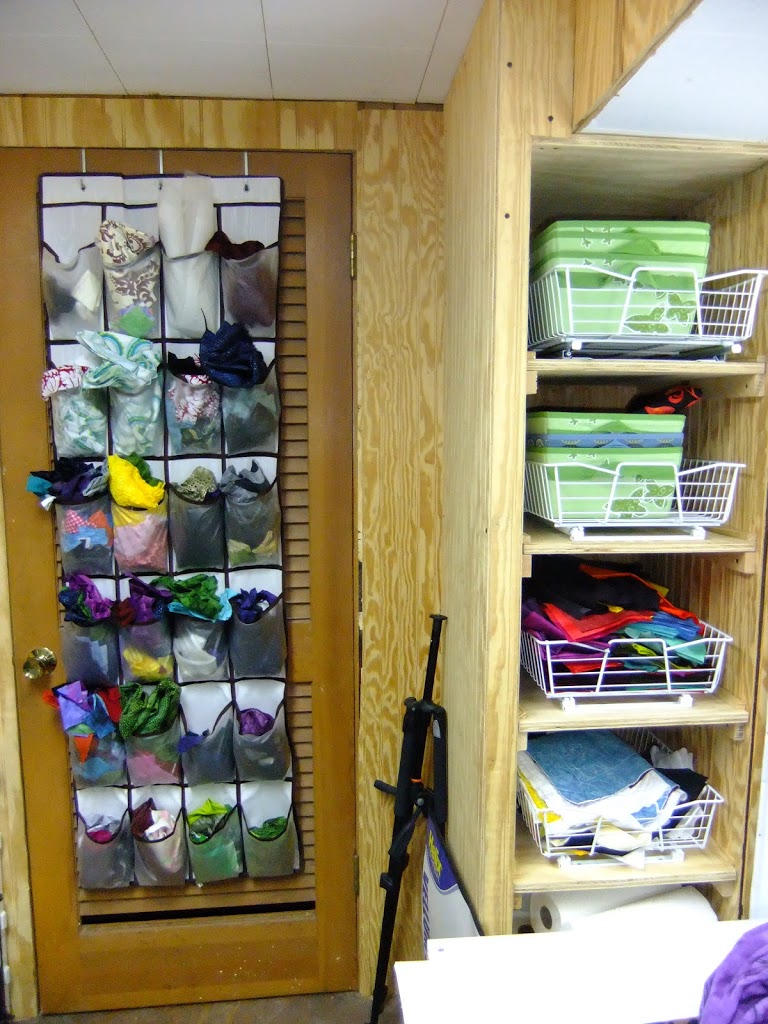
Scraps generally get wadded up and stuffed into this over the door shoe hanger. It works, but it also doesn’t work. Lately I’ve begun saving scraps by the quilt they were cut for in Double Deep Artbins like this:
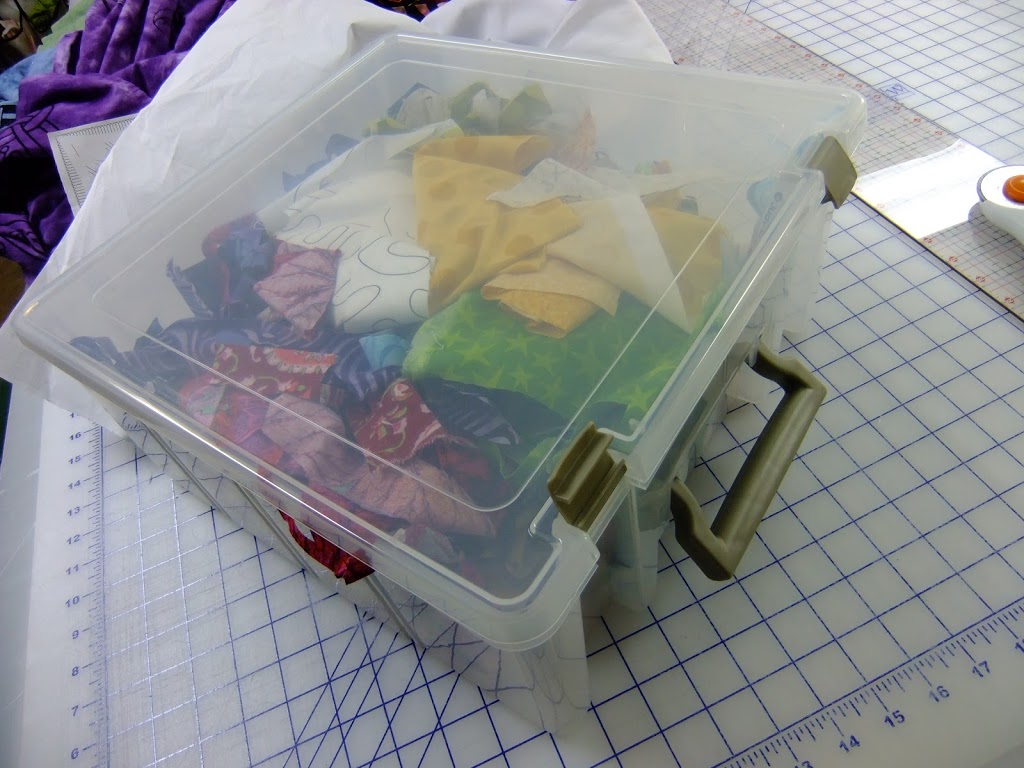
I figure if the colors worked well for one quilt, they could be cut to make another from the same scraps. It saves the headache of sorting through it all and pick and choose all over again.
And Artbins just happen to fit perfectly in this cubby shelf I bought 10 years ago from Big Lots. I’m not sure if this shelf is still available, but it sure has lasted the test of time for me!
So that’s about it! At the moment, I’m pretty content with how everything is working and only see small areas where things can be rearranged to reduce clutter and improve efficiency.
Still, things are only static for awhile with me. I’m always looking for ways to improve, and the kitchen cabinets will definitely be getting an upgrade soon.
As for designing the new kitchen, I’ll start by taking careful measurements of the walls, then use a graphic design program like Serif Draw Plus to draw an outline of the kitchen. Then it’s just a matter of searching through IKEA’s kitchen cabinets and drawing squares and rectangles the size of cabinets and playing with the arrangement until something works perfectly.
Working this way is time consuming, but doing it yourself will save time. If I paid a contractor to work out the kitchen cabinet layout, I’d probably end up paying a lot more and ending up with a setup that isn’t ideal for my needs.
Yes, punching out the new window and running a new electrical line are both projects I’m going to leave to my handyman, but hopefully I’ll be able to keep the cost down by using IKEA cabinets I construct myself.
Just keep in mind, no matter how big of a space you have, you CAN find drawers and cabinets and organizers to fit, and fit perfectly for your needs.
You just have to be patient and meticulous. Take careful measurements and spend a lot of time searching websites and taking notes. It might end up feeling like a hobby in and of itself – searching IKEA for the perfect furniture – but it will save you loads of time wandering through the showroom guessing about what will fit and what won’t.
Now Josh has been asking me to do a video studio tour of the studio for ages. Would anyone like to see a video tour like that even after all these pictures?
Let me know in the comments if you’d be interested in that and I’ll see about shooting a video tour this week.
Now that’s it for today! I’m off to clean up and sort through a few things I saw in the photos that need rearranging.
Let’s go quilt,
Leah Day
Yes I would a video tour seeing photos which are static doesn't give the real "feel" of the room
A video tour would be helpful to see how all these pictures fit together.
Your blog is always so helpful. Thank you for taking the time to help so many people.
Yes please to a video tour. It would make it come alive and you could see how it all fits together. Great job Leah.
Thank you for all your explanations. Love to see a video-tour.
At the moment I'm making some rearranging myself. Waiting for my (new!) Juki98 to return from repairing.
I love the inspirations you send out on your blog. And put me down for a "yes" to the video tour!
This was helpful but I'd love to see the video tour. Although we don't have the same space, seeing your space gives me ideas for mine. Thanks! ~Jeanne
Thanks so much for sharing your sewing space with us. Would love to see a video. For me no space is ever big enough. I have had space as small as a shoe box to a 12'x14' room.
Thank you so much for being so generous with your time and knowledge. I enjoy your letters so much, and I hope to take the plunge into quilting soon! 🙂 I would love to see a video… thanks.
I found the storage information interesting. I'm not likely to be building kitchen cabinets, but I bought two of the Ikea tables with the adjustable legs because of the earlier post you did when you first got them. I LOVE MY TABLES.
I've got a totally different question. I'm currently stitching in the ditch on 5 very traditional blocks and there has to be a better way. Do you stitch in the ditch? And if so, do you use a walking foot or do you free motion it?
Yes, I would love a video tour.
Yes a video tour would be great! I'm like you, always looking for improvement in this area. I'm trying to talk my husband into letting me move the deep freezer out of my sewing space and in to the garage. But I need a replacement table first. I serves to sit my computer on to watch Netflix as I sew, but a bit inconvenient when somebody wants in the freezer………you know…….to make themselves a frozen pizza because Mom's to busy sewing to cook;) My place is not nearly as big as yours, but it's much better than the kitchen table!
I have been in my house since 2004 and this sounds so much like my own story. I have just recently "finished" my latest reno of my studio space. Too true that there is no "forever" fix. Each day brings new challenges and ideas that you didn't think of before. I'd love to see a video of your space.
Thank you so much for taking the time (away from your quilting!) to share all of this information Leah! I'm in the process of turning a spare bedroom into my quilting room and there are so many options to consider… I've decided for now to just to focus on using the room and gather ideas online. Then I'll be ready to start making changes. And, plan my trip to IKEA!
Hi Leah and all. I've recently discovered your free motion project, set up a blog and I am trying to learn how to use it so I can show you my projects. I love your do it yourself projects as I'm a diyer too. I'd also like to see a video tour. All your explainations and tutorials have helped. i ordered you book but can't figure out how to do the designs without your tutorials. I have been so encouraged by all of you that I got the courage to start quilting a quilt I pieced for my daughter. As soon as I figure out how to link up, I'll post my progress on UFO Sunday.
I would love a video tour!
I'd love to get a video tour!
I'd love to see a video tour. I also love IKEA. My sewing room is almost completely furnished by IKEA. I have quite a few shelves hung on the wall, a tall Billy bookcase & a 36" high one,& an Alex 6 drawer unit on casters, which fits nicely under my mid-arm quilting machine. It holds a lot of small/mid sized things that would otherwise get lost &/or be piled on a table. I even have a small shelf mounted on the wall at the same height of my sewing table. There isn't much space on the right side of the machine & I was always dropping stuff onto the shelf that holds the machine. Now I have a place to put a drink, & velcro'd my tv & stereo remotes to the edge. Thanks for sharing all this info on organizing your quilt room. After seeing what you've done, I might move some things around. And now that I know what I need to get to keep my rotary cutter from disappearing, Ill have to make a trip to IKEA.
I would love to see a video tour of your creative space! I am hoping to convince my DH and FIL to let me move my quilting space from a bedroom on the third floor to the chicken house that hasn't seen a chicken for about 10 years! Getting my LA from "way up there" to "way out there" should be interesting…across the muddy/snowy/dusty/weedy (depends on the season) barn yard…but oh the space out there would be fantastic!!! With a whole bank of south-facing windows 🙂 No heating or cooling as of now, but I'm sure we can figure something out! Otherwise, I'm taking over the guest room!!! I'd love to see how you have solved your storage issues and made everything so handy and clutter-free!
Would be wonderful to see video tour – I also want to see how your back yard is shaping up!
Yes to tour.
I would love to see a video of you using those suspended clamps on bungie cords on a large quilt. How often do you have to change locations? Adding this system to my sewing room is my next upgrade. It would help my planning if I could see it in use. Thanks for sharing.
Thanks Leah ~ enjoyed the tour and look forward to a video one day! Great ideas and inspiration for making a few adjustments when we do my studio renovation next year 🙂
Godspeed,
mary
Yes, Leah, please let us see a video tour to put these photos together.
I would love to see a video tour because as another person said it would be easier to see how you utilize these spaces and move from place to place. For example, in the picture of the pressing board/cutting table, do you stand on the far side of the table? It's hard to see how much space there is. Thanks for all you do. I just signed up for your class on Craftsy.com. I'm excited!!
I am so happy to have found your free motion videos on you tube. It has changed my quilting 100%. Here is a cheap tip on quilting tables: take one or two of those fold up tables (about $36), get pvc pipe cut into 13 inch lengths and put on legs. Voila, no more bending over to cut or pin a quilt.
Thanks for the photos. It helps to see how you have solved some of the space and storage problems. I'd love to see a video.
Fat Quarters and smaller pieces of fabric can also be hung up by using the cheap plastic skirt & pants hangers that come with clothes you buy from places like Wal-Mart. They have the built in squeeze clips and take up minimal space from a height measurement.
One snapshot would show you my total dedicated sewing space (next to the window in my bedroom). As the quilt grows, I use my bedroom and/or living room floor for layout. Ideas for quite small spaces are welcome.
Thanks for the photos and the explanations….you're always so thorough when explaining anything and that helps so much! I outgrew my tiny sewing room years ago. Now that I'm an empty nester 🙁 I have taken over two of the upstairs bedrooms to use; one as a sewing/cutting room and the smaller as a fabric pantry.Lately I've been thinking about using the space more efficiently and your post gave me lots of food for thought.
Would love to see a video tour.