
Quilt Along #18 – Go Loopy with Loopy Line!
Time to get back to the Quilt Along today with a new…old…new design! This design is new to the project (wasn’t included in the original 365), but old in the sense that I think every book on free motion quilting EVER written has included this simple variation of Stippling:
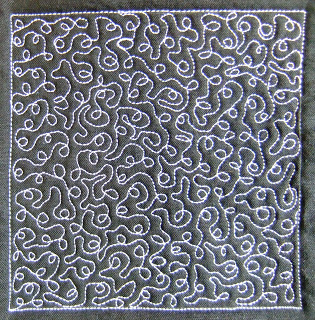
I’m calling this design Loopy Line and it’s really quite a simple variation – just add loops to your already wiggly Stippling line to create a slightly different, more tangled texture.
Let’s learn how to break this design down into simple rows, then put all the shapes together to create a complex Loopy Line design:
Learn More About Quilting Loopy Line
Difficulty Level – Beginner.
Design Family – Independent.
Within this video, I basted the little fat quarter sized practice sandwich using Pinmoors. These small silicone anchors allow you to baste your quilts using straight pins, and best of all, make it much easier to remove the pins as you quilt. Click here to learn more about Pinmoors.
When it comes to loopy line, the most simplistic version of the design is a row of loops. These also work a bit like the cursive letter “e.”
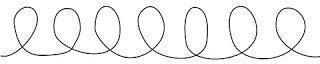
The neat thing about Loopy Line is so many of the simple versions look so terrific, you can use them on your quilt as is! A row of “e” shapes can look terrific in the sashing or borders of a quilt!
You’ll probably find this design easier to quilt this way – with the loop curling upwards. Now try the opposite and stitch the row with the loop twisting downwards:
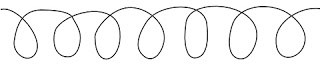
A bit more tricky? It might feel less natural simply because you have a frame of reference and built muscle memory for the letter “e” which curls up rather than down.
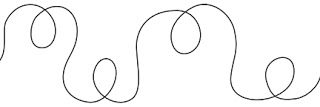
Now let’s kick it up a notch and put both forms together to create this lacy design:
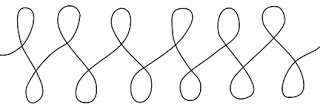
Again, this looks good enough to use in your quilt’s sashing! Just keep the loops evenly spaced and this design will be a big hit!
If we can curl the loops outward, can’t we also curl them inward? Try it to create this version:
This is a bit more tricky, but once you get the flow of it, it’s quite a nice design to stitch. You will need to form loops inside tight areas and sometimes this is the only way to do it.
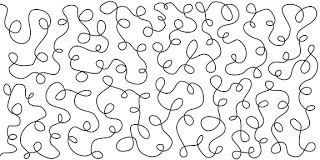
Now put all the elements together and just go loopy!
What Do You Think About Loopy Line?
I’m intrigued to see how you like this design. A quilter commented last month:
“I never learned to cross my lines of quilting. A teacher taught me to never do that so now crossing my lines of quilting just seems wrong. I don’t like to do it.”
I have no idea why a teacher would teach that it’s bad to cross your quilting lines, and for the record, no, it won’t damage your quilt in any way. If anything, it will hold the quilt more securely together!
Think of this simply as a different element of design that will add a slightly different texture. If you like the texture, stitch it! If you hate the texture, find a design you do like!
Stippling, Sharp Stippling, Zippling, and Circuit Board are all designs formed with lines that never, ever cross so you definitely have some alternatives to choose from if you decide Loopy Line isn’t for you.
Practice Quilting in a Modern Quilt
Now that we have five awesome designs in our repertoire, it’s time to use them all in an awesome modern quilt project!
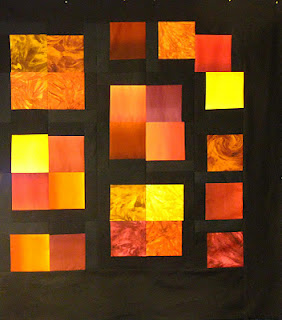
Make this Modern Box quilt with me next week!
Next week with Quilt Along #19 we’re going to learn how to piece the blocks to create our modern quilt top.
You will need around 1-2 yards of background fabric that is solid, or reads as solid. You could also use strips or scraps, but make sure your strips are between 2.5 – 4 inches wide.
You’ll also need anywhere from 15 to 30 squares of some other color. You can use more solids, or your favorite prints, or hand dyed fabrics. I cut all of my squares 6 inches. You’re welcome to cut yours bigger or smaller, it’s totally up to you!
We’re going to focus on this project for the next 3 weeks so if you want to quilt along with it, definitely get some materials prepared and ready to go for next Wednesday.
Let’s go quilt,
Leah Day
This was one of the first designs I ever did- I think before basic stippling! I love using loops on my quilt, but have never thought of using it as a tight filler. I need to change my perspective to take large scale designs into the smaller scale!
A fun variation is to do two outward loops than two inward (or any other combination). I like to have a pattern though- to me random never looks random!
I just started following the FMQP a few weeks ago, being an absolute beginner quilter I'd asked my guild ladies how they got their quilts, quilted and if it wasn't hand done, it was done on the long arm. I think my eyebrows nearly popped off my head when I discovered how much that cost lol. So in research and suggestions I found Leah's site (YAY!!) I discovered that normal stippling for me is counter-intuitive, I simply can't do the u shapes or the lobster claw type stuff without stressing myself out. So I searched the 365 days patterns and discovered the sea oats flower & pattern, playing with it and drawing it out in many different ways I ended up with a design like loopy lines only with the sea oat 'seeds' and then I added in some simple leaf shapes and a shape similar to a wave only echo'd (Once I find my camera I can post some pictures). So loopy lines doesn't just have to be loops, I think that this type of pattern is so easy to adjust, play with and alter it has got to be a staple in any FMQ'ers repertoire.
This is absolutely one of my favorite designs that I do by itself or add other elements and use this to "connect" them. So relaxing to do! I so agree with Jessim, random is so much more difficult to accomplish than an established/repeating pattern. It must be that teeny, tiny part of my brain that is organized and must be "in control"! LOL! So glad to be back with you, Leah, and our weekly sessions.
This too, was one of my first designs. I love it.
I did the loops on my first quilt, but it was a bit more messy 🙁 But I think it's still good. I am looking for a good "star" stipple. I have a buzz lightyear quilt in progress for my 4 year old grandson and I am planning on using glow in the dark thread to quilt it. I haven't found a design yet and I still haven't decided on the thread brand (several have glow in the dark).
I used this recently for sashing, nice!
Welcome back, Leah, and congratulations on your coming baby daughter. Exciting news. I struggle with free motion quilting but am persevering. I have been practicing your loopy angles – but need to do more. Think my brain refuses to slow down! Make sure you keep me on your list. I need the practice!
June x