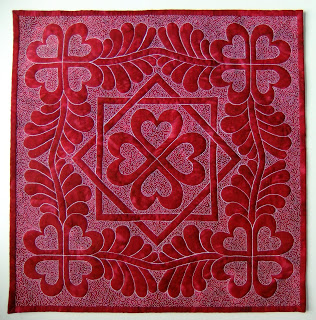
Yay! It’s finally time to start working on this Heart and Feather Wholecloth! You can still find this pattern available now in the Heart & Feather Wholecloth Workshop.
For the last several weeks we’ve focused entirely on large scale, soft bed style quilting, which is really the opposite of this style of densely filled wholecloth quilting.
If stitching out this wholecloth with dense stippling just doesn’t seem like your style, consider reviewing the tutorials for Quilt Along #8 and Quilt Along #9 and challenge yourself to finish a few UFO quilts.
If you decide to follow along and create this wholecloth quilt, you will learn loads about free motion quilting, stitching on a line, and fitting and filling space as you move through the quilt.By working on it, you will gain valuable skills that will translate into simpler quilts.
Of course, a project like this is best swallowed in small sections so this week let’s focus on preparing our fabric, marking the designs on the surface, and basting all the layers together.
No, we’re not even going to start quilting the outline of this quilt this week!
Instead let’s focus on working through the basics step by step slowly so we’re all on the same page with this project.You may already know how to mark a wholecloth design and have a favorite method for this, but there are several other methods that are worth trying as well.
So let’s learn how to prepare and mark our fabric first in this video:
Now let’s get started with a short introduction to wholecloth quilting. A quilt intended for a wholecloth is very different from a quilt you’ve pieced or appliqued using multiple fabrics in a complex design.
For one thing – you don’t have multiple fabrics!You only have one fabric to work with and it’s important to treat it carefully throughout this process.
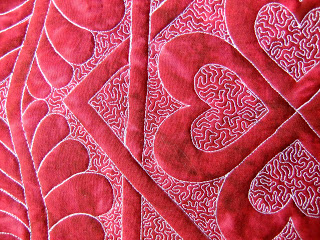
A wholecloth’s design is entirely dependent on what is MARKED on the fabric. The design consists of many motifs that are first marked, then stitched right on the line, then the background is filled densely to draw more attention to the larger designs.
Because of the way it’s created, a wholecloth quilt needs to finish very flat so the motifs don’t become distorted by fabric or batting shrinking.
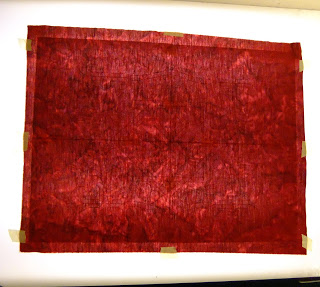
In order to eliminate the possibility of shrinkage, you must prewash your fabric.
Prewashing will do more than just preshrinking your fabric, it will also rinse out any stabilizer, chemicals, or excess dye that may be left in the fabric from the manufacturing process.
Once the fabric has been washed and dried, it will likely feel very soft and be slightly wrinkled.
If you tug on fabric after it’s been washed, it will stretch quite a bit. This is not a good think for marking a wholecloth because as you mark, the fabric will stretch and distort the designs you’re marking.
So the next step before marking is to starch and iron your fabric twice.
Spray starch on the right side of the fabric, then flip it over and press from the wrong side with a hot, dry iron. Once the fabric is entirely dry again, spray more starch on the wrong side, then flip and press from the right side.
By spraying starch on one side, and pressing from the opposite side, you will ensure the starch bonds with the fabric.
Many quilters don’t like starching fabric because they get white flakes all over their fabric. This happens when you spray starch and immediately hit it with your iron, which causes the starch to burn. This absolutely won’t happen if you give the starch a chance to soak into the fabric, THEN press with your iron because the starch will bond with the fabric and not your iron’s sole plate.
Note: I use Niagra Brand Spray starch in a spray bottle, not an aerosol can. I LUV this starch!
The core reason for starching is to eliminate most of the stretch and give in the fabric before marking.
It’s also super important to start with a stiff, flat piece of fabric because once you start marking, you CANNOT PRESS AGAIN.
I can’t stress this enough. Once you start the marking process, if you iron your fabric again, you will likely heat set your markings onto the fabric surface, making them impossible to remove.
Think of the marking lines on a quilt as a magic trick.We put the lines on the fabric to follow, but in the end once the quilt is finished, these lines need to disappear completely in order for us to get away with our “trick.”
Of course, not all marking pens or pencils react well to starch, so it’s a good idea to test your marking device on similar scrap fabric before getting started.Make sure the marks show up well, but also wash out, or can be erased completely.
Now that your fabric is ready to go, let’s get to marking!
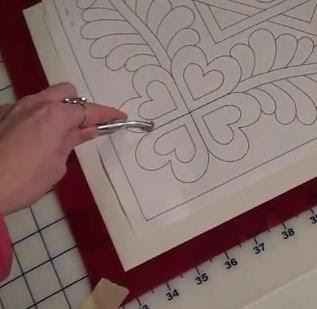
Marking a Quilt – Method 1: Lightbox tracing
My favorite method for transferring a wholecloth quilt design onto fabric is to use a lightbox.This is essentially a box with a light inside and a translucent cover that allows the light to shine upwards, creating a surface that you can draw on.
Using a large lightbox, tape the pattern to the surface, then smooth the fabric over the pattern and tape it in place. You’ll want to secure the sides and corners so the fabric doesn’t shift as you mark.
It’s not a good idea to leave the fabric unsecured from the surface of the pattern or lightbox.Fabric shifts and moves easily, which means it’s very easy to mark incorrectly unless the fabric is properly secured.
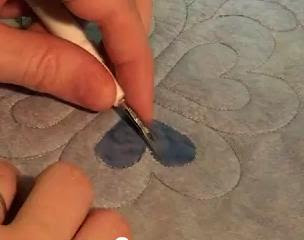
Now working from the center to the outside, mark all the lines carefully onto the fabric.
Let’s have a short discussion about marking devices here:
There are literally hundreds of marking tools on the market these days, and no, I definitely haven’t tried them all. The best rule of thumb is to try a few different pens and pencils before finding one or two that work best for you.
The biggest key with all marking devices is to save the instructions for removing the marks! It’s impossible to remember if a particular pencil should be erased, washed out with water, ironed off, etc without the original packaging.
I like these particular marking pens because they produce a fine, thin mark which is very easy to follow when quilting on the line. A thicker, chunkier markers can be annoying to follow in the quilting process because the mark is so wide, unless you stay right in the middle of it, you may distort your quilting design.
Getting back to lightbox marking, this really is the easiest tool to work with because it allows you to mark the exact design with no extra fuss or steps added to the process. Just turn on the light and you’re ready to go!
Of course, lightboxes tend to be both expensive and big, so here’s an alternative method for marking:
Alternative Method: Glass Door – The fact is, not everyone has a lightbox, nor do most quilters have the space or desire for one.An easy alternative is to use a large glass window or door.Tape your pattern to the door, then tape your fabric on top, making sure all the marks and lines match up.Sunlight should shine through the door, through the pattern, and make it possible for you to mark the design on your fabric.
Marking a Quilt: Method 2 – Light Fabric
A super easy way to get around this whole marking issue is to simply use a very light fabric. Yellow or white fabric will be light enough that you can easily see the pattern under the fabric and be able to mark with no extra equipment or materials.Traditionally wholecloth quilts are white, and probably for this reason! It’s far easier to mark light fabric because the pattern can be easily seen through it.
Marking a Quilt: Method 3 – Tissue Paper
For this method you’ll need to trace the pattern onto tissue paper, then this paper will be sandwiched along with your quilt to provide the marking.
Personally I found this method only worked when I hand basted the tissue paper to my quilt top. This forced the layers to stick together properly so the paper didn’t shift while quilting.
The idea here is that the tissue paper will provide the pattern, and the quilt can now be layered with batting and backing and quilted, following the lines on the tissue paper. No marks are actually transferred to the fabric, so this is a good way to ensure no marks remain after quilting.
The only downside is once the quilt is quilted on all the lines, you’ll need to rip off all the tissue paper. This is time consuming, but it definitely can work:
Marking a Quilt: Method 4 – Tracing Paper
For this method, you’ll first secure your fabric to the table top, then cover it with a piece of tracing paper, then your pattern on top.
Using a tracing wheel, simply run the wheel over each of the lines of the pattern to transfer the marks from the pattern to the fabric.
While this method is certainly the most straightforward, it requires tracing paper, which can get expensive if you decide to tackle a very big quilt.
Please keep in mind that these are just five options for quilt marking.There are literally hundreds of different ways to mark a quilt, some easier, some more expensive, some more tedious, but each with upsides and downsides to the method.
The best thing to do whenever trying a new marking method is to try it with an open mind, test first on a SMALL sample, and see what happens.Record how much time it took, how frustrated you felt, and how the project finished.
Experiment and think outside the box with this in order to find what will work for you, your home, and your quilts.
Basting 101
Now to finish up this preparation process, the last step is to baste your quilt with backing fabric and batting.
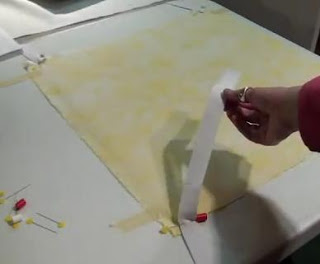
For basting, the first step is to secure your backing fabric to a table top. Personally I use a combination of masking tape and 1 inch elastic strips.
The elastic strips are a new way to baste which allows you to secure the fabric and allow the elastic to STRETCH it tight across the table. I use a 1.5 yard long strip of elastic and this is more than enough to attach to one side of the backing, stretch below the table, then secure to opposite side of the quilt.
The nice thing about the elastic is it’s reusable. Unlike masking tape which can only be used once, I’ve used the same set of elastic for 3 years and they’re still working great!
I use elastic strips whenever possible in the basting process, but sometimes my tables or the size of the quilt require also using masking tape to secure some edges. Make sure to use more than you actually need to ensure the backing doesn’t become unsecured from the table.
Next spread your batting over the backing, spreading it out with your hands to remove any wrinkles.
If you’re using a lighter fabric, make sure to go over both the backing fabric, batting, and quilt top with a lint roller to remove any strings or lint. These annoying little leftovers from our sewing room can definitely show through lighter wholecloth quilts.
Next layer the quilt top over the surface, smooth it out and secure the three layers with basting pins. In the video I showed my new preferred method of using flower head pins and Pinmoors to secure the quilt together.
For wholecloth quilts, I generally place pins closer together simply to reduce the chances of the quilt shifting. It’s a good idea to use more pins than you need just in case the layers start acting funky when you get on the machine.
———————————
UPDATE – I received several questions about this post and have updated here so the post is complete:
What fabric should I use for the top and back of a wholecloth quilt?
If this is your very first wholecloth quilt, it’s strongly adviseable to use high quality 100% cotton in a solid color.
Prints are obviously not suitable for a wholecloth because the printed pattern will conflict with the pattern you’re creating with quilting. However, if you have a very, VERY simple print you want to use, give it a try so long as it’s high quality 100% cotton.
Personally I love to use spray batik fabrics, the kind that read as almost a solid color, but with swirls of lighter and darker color within the fabric. Batiks generally have a tighter weave than most printed cotton fabric, which forms a solid base for both marking and quilting right on the lines.
If you’ve stitched several wholecloth quilts and are looking to experiment, you can play with silk, satin, and other non-quilting fabrics, but understand that these fabrics will not work as easily as cotton. Often the silky fabrics will easily shift and stretch, causing motifs to easily distort.
How big should the fabric be cut?
The outside square of this pattern isn’t the finished size. It’s more a guideline for the pattern fitting on the page and being taped together, so if you like, you can make this quilt anywhere from 16″ – 18″ square.
I cut all my fabric 20 inches square for both the top and the backing, which will give more than enough space to hang onto the edges while quilting, which will ensure good stitch quality throughout the quilt.
Should I prewash, starch, and iron the backing the same way as the quilt top?
Yes! You’ll want to treat the quilt backing fabric and quilt top the exact same way. Prewash to eliminate any shrinkage, starch and iron to remove any stretch or give to the fabrics.
What kind of batting do you use for a wholecloth?
This is a great question that is super important to the outcome of your wholecloth quilt. You need a batting that will NOT SHRINK after being quilted and washed. Yes, you will likely have to soak your wholecloth in order to remove the markings on the surface, so there’s really not a way to get around this issue.
Most cotton and cotton/poly blended battings will shrink slightly and this can distort the designs you’re stitching over the surface.
For best results, I recommend polyester batting. Many professional quilters recommend wool batting, but I honestly haven’t tried these enough to recommend them.
I will personally be using Quilter’s Dream Polyester Batting in the Deluxe thickness for my Heart and Feather Wholecloth. This is the thickest batting from Quilter’s Dream and will provide a wonderful loft to the puffy areas of this quilt without the extra step of trapunto.
What if I find a cotton batting with no shrink?
If you can find a cotton batting with absolutely no shrink, you can use it, BUT ONLY IF YOUR FABRIC IS A DARK COLOR.
This must be stressed: if you are creating a light (white, yellow, etc) wholecloth with fabric that was light enough to see through for marking, this fabric will also be light enough that EVERYTHING will show through it.
This means lint, stray threads and strings, and all those little black dots from cotton batting.
You might not notice the black bits when you look at a cotton batting, but this is an organic substance that originally came from plants and traces of those plants will always remain. Every time I use a cotton batting I find little bits of bark and leaf, so matter how high quality or expensive the batting was.
This is extremely undesirable for a lighter quilt. Once you finish it, soak it, and get ready to hang it on the wall, you will start seeing “things” inside the quilt that look almost like bugs.
So especially if you’re going with a light colored wholecloth, choose a polyester batting and mark sure to lint roll all the layers before basting.
Are we not going to trapunto this quilt?
No. In order to keep this project as simple as possible, we’re not going to cover trapunto this time.
Trapunto is a traditional element in wholecloth quilts, but it is not a requirement.
I thought about offering optional steps for trapunto, but really it just seemed very complicated and potentially confusing. Look how much information I forgot to include in the Wednesday post!
We will definitely return to this project again in the summer or fall and will cover the extra step to trapunto then.
———————————–
And that’s it! We’ve taken our small wholecloth quilt from plain fabric, prepared, marked, and basted it so we’re ready to start quilting next week.
Definitely take your time playing with some of these marking methods this week. Every method has upsides and downsides, and you just have to find the one that works best for you.
Now we’ve missed a whole week of linking up so let’s link up all your posts so you can share your progress with everyone following along!
Instructions for Linking Up Your Blog:
1. Write your blog post. Publish it on your blog.
2. Copy the link of the specific blog post. This is not just the link to your blog itself (www.freemotionquilting.blogspot.com), but the link to the specific post: https://freemotionproject.com/2012/01/quilt-along-2-quilting-in-rows.html
3. Click the blue link up button above and paste your link into the box.
Keep in mind that you’re posting your progress from LAST week on THIS week’s post. This way you have time to watch the lesson, play with the ideas, then post your progress to the next quilt along. I hope that makes sense!
As always, any questions you have, please post them in the comments below or on your blog and I’ll answer 5 tomorrow on Question Thursday.
I’d better shut up now and go quilt my next wholecloth!
Leah Day has been teaching online since 2009. She's the creator of the Free Motion Quilting Project, a blog filled with thousands of quilting tutorial videos. Leah has written several books including 365 Free Motion Quilting Designs, Explore Walking Foot Quilting with Leah Day, and Mally the Maker and the Queen in the Quilt.
I have been following along, but I have not been doing any free motion quilting 🙁 I have a huge project (queen size quilt) I have been piecing, and it's close to ready to quilt. I'll blog about it and link up then. I do have a question. I know practice is important, but I often find myself getting really good at FMQ while I am doing it, but then I start another project (mostly piecing) so that when it is time to FMQ again, I feel like I lost some of my improvement. Unfortunately, with my career (the one that pays for supplies for projects), I do not get to sew everyday. So, this can be a long time between FMQ. I do feel like I'm getting better, but it's taking a long time. Do you have any suggestions for this problem?
Leah, All your lessons are so helpful and well thought out! I'm looking forward to getting up to date but will go ahead and start getting the fabric ready so I'm ready for next week. I already used the Pinmoors that I ordered from you – they are great!
Is that table you are using to pin baste the same 3' x 5' plastic table that you used to have behind your machine? It looks like it's a soft plastic – but guess it's either not being scratched with the needles or you don't care that it's getting scratched?
*whining* i wannnttooo makkeee oneeeeeeeeee ;c) tee hee also. . BTW. . . your microstippling is incredible. . I have such a hard time with it so I'm looking forward to working on this with ya!
My name is Mila. It's wonderful to find people like you Leah, your instrucctions are so clear the video and the explanation. I will try this proyect . I'm improving my FMQ and my english. Love from Canary Islands and thank you
I am busily trying to get to an organized position so i can start this project. I have been reading your blog since the beginning and you are wonderful for making such fantastic resources available to us. This project will be my first whole cloth and i am very excited to try it.
Here's how I prep my fabric: Wash, and then hang up (my studio in in my basement and i use magnets to hang large pieces of fabric to the duct work), lightly saturate fabric with starch, let dry completely, iron with a hot iron (i use steam and i only have to do one pass). When the fabric is cool it will feel like paper! It is a bit of work, but I LOVE how the fabric is super easy to work with after doing this prep and no white flakes ever.
Back to spring cleaning, so I can eventually GO QUILT! 😉
My first reaction to the photo was "No way – I could never do that..". But I'm feeling a bit reassured after watching this week's video, and having got the design onto my fabric. Now I'm quite excited! A question – I have various bits and pieces of batting I could use for this: any recommendations as to the best sort to use for a wholecloth quilt?
Sally – the strip is long so one side is secured to the backing then the strip is stretched under the table and the end is attached to the other side of the quilt backing. If you have folding tables, you can also loop the strips on the table legs.
Bev – Yep, that's exactly right.
Mike – Have you considered having some small 10 inch quilt sandwiches handy to play with quickly? This way you could hop onto your machine and quickly stitch get some practice before going to work. You can do a lot in 15 minutes – it may surprise you!
June D – Yep, it's just a plastic folding table and it's scratched up pretty badly already. I'm not into using furniture that can't be USED!
Anne – I'd say any batting goes, but make sure it doesn't have any shrink to it. Personally I like polyester batting the best. If your wholecloth shrinks after it's finished, it could distort your design.
This looks like a lovely project. I've never done anything like this but I'm going to try and follow along. I like the elastic basting method and *think* I now understand how to do it – the elastic is just attached to the end edges of the fabric and not all down the side?
Hello Leah! I am very new to free motion quilting and when you say that the finished whole cloth for this project is going to be 15.5, exactly how big do I cut my square of material?
Theresa – Yes, the elastic is only attached to the edges of the backing fabric, pulling it tight just like masking tape.
Michelle – It can be spray basted, but I won't guarantee the results. I've played with spray basting twice with wholecloths and both times hated it because it didn't hold securely enough.
Debbie – The finished quilt can be anywhere from 16 – 18 inches, so cut your fabric 20 inches square to start. The outside line of the pattern isn't the finished size, but a guide to taping the pattern together!
June D – Only if you want to mark those lines. They're mostly for registration purposes. For bigger wholecloths you can fold the fabric in half and diagonally and use these folds to line up the pattern if you have to reposition or move the quilt to mark every section. I mostly included them because they make taping the pieces together easier.
I hope that helps! I guess I didn't teach this part very well!
Brilliant use elastic to secure the backing taut. I love the idea of using something reusable.
Any brilliant ideas for those really large bed quilts that are too large for a table? I've used blue tape on my floor, but even so, I get a wrinkle now and again.
Leah, Thank you so much for your time involved teaching new skills! I found you on utube a few weeks back and I sometimes find myself just watching the little videos over and over. I have tried some of them and have also been trying to do some type of stitching everyday! Thank you. I have a quick question. I have began getting my fabric ready for the quilt along… and am very excited! I used the blue, wash-a-way pen. I have my little quilt all traced and ready to go…. but I noticed that it seems the pen bled out a little… what I mean is the line I followed got a little thicker. I really don't see it as a problem, I will do my best to stay in the center of the line when stitching. I just was wondering if you have had that problem? It was warm in my sewing room yesterday… could the humidity play a roll in that? Again, thanks so much for your time…I can't wait to see the next step!! Debra
Hi Leah, I just found this post and I'm pretty excited. I've been wanting to make a whole cloth quilt for a while. Your blog is what turned me on to freemotion quilting by the way. Thanks for that! It's been so much fun.

 Tape your pattern to the door, then tape your fabric on top, making sure all the marks and lines match up. Sunlight should shine through the door, through the pattern, and make it possible for you to mark the design on your fabric.
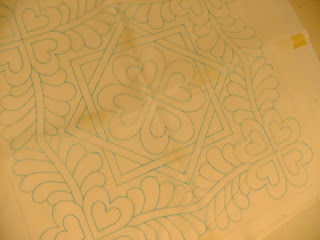 Traditionally wholecloth quilts are white, and probably for this reason! It’s far easier to mark light fabric because the pattern can be easily seen through it.
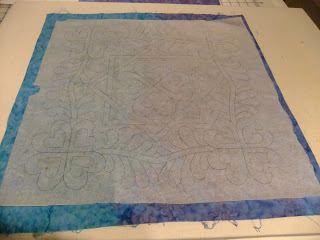
 The nice thing about the elastic is it’s reusable. Unlike masking tape which can only be used once, I’ve used the same set of elastic for 3 years and they’re still working great!
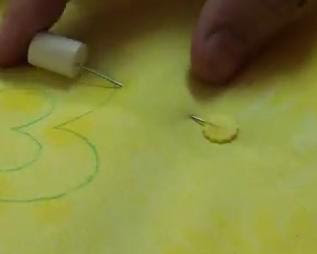
Leah, I really enjoy your teaching style. You communicate very clearly and you have excellent illustrations.
Thank you
Linda B
I have been following along, but I have not been doing any free motion quilting 🙁 I have a huge project (queen size quilt) I have been piecing, and it's close to ready to quilt. I'll blog about it and link up then. I do have a question. I know practice is important, but I often find myself getting really good at FMQ while I am doing it, but then I start another project (mostly piecing) so that when it is time to FMQ again, I feel like I lost some of my improvement. Unfortunately, with my career (the one that pays for supplies for projects), I do not get to sew everyday. So, this can be a long time between FMQ. I do feel like I'm getting better, but it's taking a long time. Do you have any suggestions for this problem?
Very interesting.
It looks to me as if you ran the elastic under the table, is that so?
Thanks!
Great information. Love the elastic idea. But–how do you secure it to the table? Thanks.
Leah, All your lessons are so helpful and well thought out! I'm looking forward to getting up to date but will go ahead and start getting the fabric ready so I'm ready for next week. I already used the Pinmoors that I ordered from you – they are great!
Is that table you are using to pin baste the same 3' x 5' plastic table that you used to have behind your machine? It looks like it's a soft plastic – but guess it's either not being scratched with the needles or you don't care that it's getting scratched?
*whining* i wannnttooo makkeee oneeeeeeeeee ;c) tee hee
also. . BTW. . . your microstippling is incredible. . I have such a hard time with it so I'm looking forward to working on this with ya!
My name is Mila. It's wonderful to find people like you Leah, your instrucctions are so clear the video and the explanation. I will try this proyect . I'm improving my FMQ and my english. Love from Canary Islands and thank you
I am busily trying to get to an organized position so i can start this project. I have been reading your blog since the beginning and you are wonderful for making such fantastic resources available to us. This project will be my first whole cloth and i am very excited to try it.
Here's how I prep my fabric: Wash, and then hang up (my studio in in my basement and i use magnets to hang large pieces of fabric to the duct work), lightly saturate fabric with starch, let dry completely, iron with a hot iron (i use steam and i only have to do one pass). When the fabric is cool it will feel like paper! It is a bit of work, but I LOVE how the fabric is super easy to work with after doing this prep and no white flakes ever.
Back to spring cleaning, so I can eventually GO QUILT! 😉
My first reaction to the photo was "No way – I could never do that..". But I'm feeling a bit reassured after watching this week's video, and having got the design onto my fabric. Now I'm quite excited! A question – I have various bits and pieces of batting I could use for this: any recommendations as to the best sort to use for a wholecloth quilt?
Several great questions so here are some answers:
Sally – the strip is long so one side is secured to the backing then the strip is stretched under the table and the end is attached to the other side of the quilt backing. If you have folding tables, you can also loop the strips on the table legs.
Bev – Yep, that's exactly right.
Mike – Have you considered having some small 10 inch quilt sandwiches handy to play with quickly? This way you could hop onto your machine and quickly stitch get some practice before going to work. You can do a lot in 15 minutes – it may surprise you!
June D – Yep, it's just a plastic folding table and it's scratched up pretty badly already. I'm not into using furniture that can't be USED!
Anne – I'd say any batting goes, but make sure it doesn't have any shrink to it. Personally I like polyester batting the best. If your wholecloth shrinks after it's finished, it could distort your design.
Off to quilt,
Leah
Do you prepare the front and backing fabric the same way?
Can it be spray basted? I've been using unscented aerosol hairspray to baste small projects. This project looks small enough to do it with.
This looks like a lovely project. I've never done anything like this but I'm going to try and follow along. I like the elastic basting method and *think* I now understand how to do it – the elastic is just attached to the end edges of the fabric and not all down the side?
Thanks for yet another great tutorial Leah! Keep it up! Looking forward to the next installment and the arrival of the Pinmores I orderd.
Good tutorial! Looking forward to the next installment. Always a pleasure to watch – keep it up!
Do we also mark the framing square on the fabric? And do we mark the diagonal lines?
Hello Leah! I am very new to free motion quilting and when you say that the finished whole cloth for this project is going to be 15.5, exactly how big do I cut my square of material?
More great questions! Here are some answers:
Theresa – Yes, the elastic is only attached to the edges of the backing fabric, pulling it tight just like masking tape.
Michelle – It can be spray basted, but I won't guarantee the results. I've played with spray basting twice with wholecloths and both times hated it because it didn't hold securely enough.
Debbie – The finished quilt can be anywhere from 16 – 18 inches, so cut your fabric 20 inches square to start. The outside line of the pattern isn't the finished size, but a guide to taping the pattern together!
June D – Only if you want to mark those lines. They're mostly for registration purposes. For bigger wholecloths you can fold the fabric in half and diagonally and use these folds to line up the pattern if you have to reposition or move the quilt to mark every section. I mostly included them because they make taping the pieces together easier.
I hope that helps! I guess I didn't teach this part very well!
Cheers,
Leah
Brilliant use elastic to secure the backing taut. I love the idea of using something reusable.
Any brilliant ideas for those really large bed quilts that are too large for a table? I've used blue tape on my floor, but even so, I get a wrinkle now and again.
Leah, Thank you so much for your time involved teaching new skills! I found you on utube a few weeks back and I sometimes find myself just watching the little videos over and over. I have tried some of them and have also been trying to do some type of stitching everyday! Thank you.
I have a quick question. I have began getting my fabric ready for the quilt along… and am very excited! I used the blue, wash-a-way pen. I have my little quilt all traced and ready to go…. but I noticed that it seems the pen bled out a little… what I mean is the line I followed got a little thicker. I really don't see it as a problem, I will do my best to stay in the center of the line when stitching. I just was wondering if you have had that problem? It was warm in my sewing room yesterday… could the humidity play a roll in that?
Again, thanks so much for your time…I can't wait to see the next step!!
Debra
Hi Leah, I just found this post and I'm pretty excited. I've been wanting to make a whole cloth quilt for a while. Your blog is what turned me on to freemotion quilting by the way. Thanks for that! It's been so much fun.
You mention methods for transferring a design. Don Linn blogged this on the 2012 free motion quilt challenge. He transferred onto organza and used the organza to transfer to cloth. Including link. http://www.sewcalgal.blogspot.com/2012/04/april-2012-fmq-challenge-tutorial-by.html
Notice you have this month's blog. So excited.
The link posted above no longer works. Is there a new link perhaps?
We've updated this pattern and turned it into a video workshop you can now find here: http://leahday.com/products/heart-wholecloth