
Emergence from Sinkhole – Wild Applique Flames
On Sunday I shared a post about the destruction of a quilt called Sinkhole and the design of a new quilt called Emergence from Sinkhole.
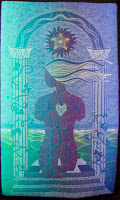
Yet it seems you guys have renamed this quilt for me! Several commenters mentioned the name Goddess Rising, which I have to admit is a pretty awesome name. I’m still on the fence as to whether I’ll change the title or not, but I’m definitely thinking about it!
 Now for this post, I want to dig into the construction method for this quilt. This has been the thing that has held me back all summer – I’m sick and tired of traditional construction methods – a.k.a piecing and applique.
Now keep in mind that I still LOVE to piece and applique traditional quilt blocks occasionally. About 2 times a year I get a craving to cut my fabric perfectly and put it back together again in cool ways.
So I’m not jumping into weird and crazy methods just because I can’t piece an accurate 1/4″ seam or needle turn applique a perfect point. I can.
I’ve run across many traditional quilters that are a bit…well…stuck up when it comes to using any other methods than normal piecing and applique. Even machine applique gets a raised eyebrow with these groups.
The general judgement is if you’re using weird “artistic” techniques the reason is not out of choice, but due to necessity. Oh great, another ART quilter who can’t piece her way out of a tumbling box!
For the record – I don’t judge anyone for the way they make quilts. Make what you want, when you want to. Make what makes you happy. If piecing drives you crazy, if applique makes you want to bang your head against a wall, don’t beat yourself up for it. Try something new and keep exploring. This hobby is vast and limitless and full of possibilities.
So that is what is on my mind – a search for a new way to create my goddess quilts that is less time consuming in the construction process so I can get on to the quilting process faster.
I’m also sick of the drive for perfection – for perfect points, perfectly matching seams, perfectly pressed seam allowances – it’s just so darn time consuming! Aside from that, perfection is an ILLUSION!
In reading the book Drive by Daniel Pink I learned that Cezanne, a painter living at the turn of the century strove continuously for perfection and mastery. Each piece was better than the last, but each piece fell short of total mastery and he was always disappointed with the finished piece.
Simply put – mastery is unattainable. You will never, ever make a perfect quilt. I will never, ever make a perfect quilt. Even Sharon Schamber, who has won the last 3 years of Houston International Quilt Festival could probably point out ways her quilts could be improved.
The point is not perfection.
The point is doing something you love.
Even the end result – the beautiful quilt – is not the point. The point is the process of stitching, the long hours of labor in creating that quilt, the PURSUIT of mastery (even understanding that mastery is unattainable) – THAT is the point of making quilts.
I love this quote from Shaker Ann Lee:
“Work as though you have a thousand years to live and as you would if you knew you would die tomorrow.”
So it really comes down to a choice of what you want to spend the most time and effort on. What do you enjoy the most about creating quilts?
I enjoy quilting the most so from now on that’s what I’m going to focus on.
Previously I’ve spent a ton of time piecing or appliqueing many different fabrics together to create smooth, flat quilt tops, that I then quilt over with lots of filler designs. In the end, I always find myself liking the back of my quilts better than the front because the back is just one simple, solid color and the thread and quilting designs stand out so much better.
I finally realized things needed to change after finishing Hot Cast. I was extremely disappointing with the front of this quilt, so much so that I only hang it backwards because the back is far more beautiful than the front:
 So how do we make a quilt where the free motion quilting is king? Can you really make a quilt with only quilting designs?
Absolutely! What do you think a wholecloth quilt is?! It is absolutely possible to make gorgeous quilts with only 1 piece of fabric and tons of filler designs.
Now let’s learn how Emergence from Sinkhole was put together:
First I started with a large piece of black fabric. The finished quilt is going to measure around 70 x 90 and this the absolute biggest quilt my tables will allow. Unfortunately I didn’t get a lot of photos at the beginning, so you’ll just have to use your imagination here at first.
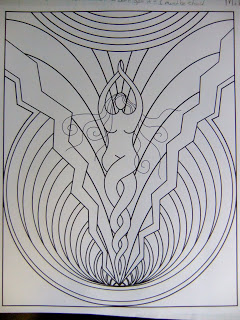
The design was first hand drawn, then scanned into my computer. I traced over each line and did a bit of fiddling to create the finished design. Then it’s just a simple process of resizing the image to be as big as you want. I decided to go quite large with this goddess. She just feels like she needs to be BIG!
Once I found a size I liked, I just hit print and the printer shot out 100 pages. I sat down and carefully taped them together to make a large scale pattern.
In previous quilts I would take the time to make a second master pattern with large graph paper all taped together. This time I decided to save time and paper and just use a ton of masking tape to hold all 100 pages together.
Once the master was finished, I laid it out on my table, then spread the black fabric on top. I marked a horizontal and vertical center line so I could easily line up the fabric with the pattern every time I needed to shift them.
My light boxes are fairly big, but they’re certainly not 70 inches wide so I had to mark 1/4 of the quilt, then rotate to mark another quarter. This really wasn’t so bad because the overall design for Emergence from Sinkhole isn’t very complex. Had this been a very complex pattern filled with loads of floral motifs it might have taken a few more days and required a lot more care in lining everything up.
Once the lines were marked, I made some decisions about the quilting. What areas should be puffy with trapunto?
I actually decided to use very little trapunto in this quilt. Normally I like to have about 50% of the quilt puffy and 50% flattened with fillers, but this time, I decided to only make a few lines puffy, leaving everything else to be filled in with different quilting designs.
One area of the quilt was special though – the rip between the Sinkhole and the Emergence goddess. I knew I wanted something really dynamic and eye catching right here.
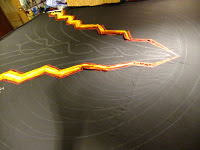 I dug around the studio and found the experiment of Textured Applique from back in May. This was the perfect place to try a large scale version of this technique because the rip was mostly long, straight sections.
First I basted the quilt with a single layer of thick batting. This would not only serve for the trapunto areas, but also stabilize the area of Wild Applique.
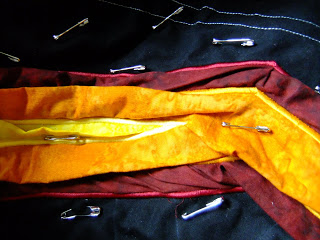
Next I cut 6 strips of red, orange, and yellow fabrics, and started with the outer red fabric first.
Starting at the narrow point, I stitched along one side of the red strip with water soluble thread. This was just to hold the red fabric in place until I could satin stitch everything down. Once one whole side was finished, I went back to the other side and began stitching it down.
The strips were cut very wide – around 3 inches for the red strip – so there was lots of excess fabric across the top. I intentionally pleated and puddled this fabric up, allowing it to ripple across the surface.
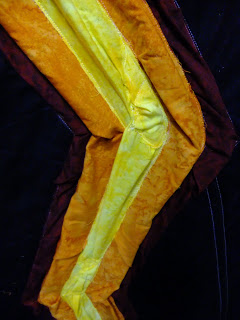 Once the red strips were in place, the orange strips were next – laid over the surface and stitched down along the edges. Finally the last set were the yellow strips.
I cut these much wider – 5 inches wide – so even the widest areas at the top would have a lot of excess fabric to play with. This also served a dual purpose to hide the black fabric beneath the yellow, which did want to show through.
Stitching all the strips on was time consuming, but it was a lot more fun than turned edge applique! What was nice is it didn’t have to be perfect – if the strips got off a bit, it was no big deal.
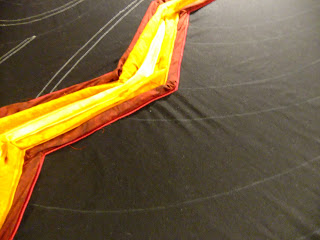
Next it was time for satin stitching the edges in place to finish this section. I began satin stitching from the center sections and worked my way out using the dual feed foot (walking foot) on the Janome Horizon.
This was VERY time consuming. Luckily I’ve recently run across a selection of James Bond audiobooks narrated by Simon Vance, one of my favorite narrators, so this wasn’t too boring.
 Next time I make a quilt with Wild Applique I’m going to try securing the strips with single lines of matching colored thread (not water soluble) and try to avoid doing so much satin stitching. The end result will likely be quite hairy (frayed threads on the edges), but if it was densely stitched, the strips wouldn’t go anywhere.
Once the satin stitching was complete, the torn section was looking really good! I still plan to go over this section with more stitching and decorative threads, but that will have to wait until after the free motion quilting is finished.
 I found during Patsy Thompson’s workshop that I couldn’t easily quilt around couched threads. The thicker threads hung up my foot and caused me to stitch badly in certain areas. So instead of couching first and quilting second, I’m going to quilt first and couch second. We’ll see how it goes!
After a few hours clipping the batting away, the quilt top was ready to be basted a final time. This was MUCH faster than I usually finish a quilt top and I love the effect of this new technique on the surface of this quilt!
 Basting however, proved challenging. The torn section is very thick and the satin stitching did want to ripple. Largely this is due to the density of the stitching – this section is very dense, where the other sections of the quilt are totally open.
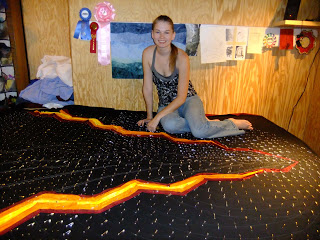
So the best way to wrangle in the ripples is by using more pins, and I mean A LOT of pins.
I ended up running to Walmart that night to buy more pins because I ran out, then I ran out again and had to un-baste an old UFO project to steal the pins for this quilt. So there’s probably more than 1000 pins in this quilt right here, and I’m only half way through!
 But the basting is really paying off! There are only two sections that have been a bit tricky to quilt. These are areas where the fabrics are wanting to ripple and pleat, but in comparison to the issues with Sinkhole, this is nothing.
Of course, this is a pretty weird quilt design and the location of the torn section makes it a bit weird to quilt. The best place to start is still the center:
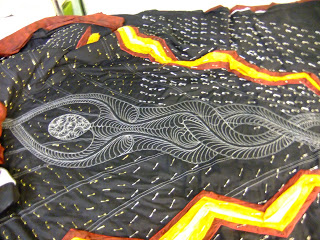 So the goddess was quilted first. Her outline was first quilted, then the center stems, then the feathers. I’m still trying to decide if I want to go back inside the feathers and add more lines of quilting. I’ll probably decide once more fillers are in the background and I can judge how much she stands out as she is.
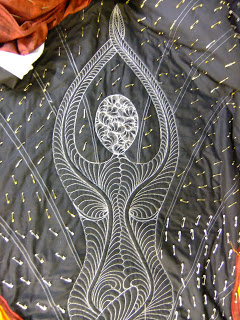 The feathers were all quilted with Yenmet Metallic silver thread in the top and silky white Isacord thread in the bobbin. I’m planning to play with thick, decorative threads for her hair after all the quilting is complete.
For the background, I split the section into 8 major pieces and will quilt each section with blue, green, or purple thread. I’m pulling in all the colors of the rainbow into this quilt and having a lot of fun playing with such beautiful colors!
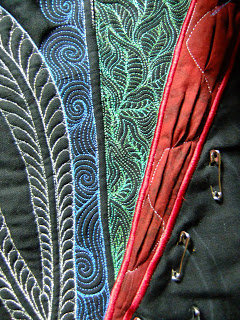 I haven’t quilted very much of the background yet, but you can get an idea of the colors from the shot above. The green sections will all be quilted with leaf designs, the blue will be quilted with water themed designs, and the purple sections with flower designs.
These three colors combined with the red, orange, and yellow of the torn section should hit up a nice rainbow like effect on the surface. Of course, the other half of the quilt will be much darker to create the sinkhole effect.
To do this properly, I’ve hunted down a selection of 16 colors of gray thread ranging from black to a light silver. I’m planning to use a variety of fillers in this section, all with straight lines and sharp angles, to enhance the sinkhole effect. The contrast between the two sides should be very interesting as it takes shape!
What’s wonderful is just being able to quilt and enjoy the process. I’m not pushing myself to quilt a section a day or anything like I used to. I’m honestly enjoying working on this quilt so much, I don’t want to finish her!
Yesterday I spent most of my time designing a few new fillers to work in the background and picking out some thread when I decided to change colors in one section. Seeing the colors show up and stand out so beautifully is wonderful! I’m used to having to flip to the back of my quilt to see this and it’s so nice to see it on the front.
So that’s it for now! Emergence from Sinkhole is definitely moving along nicely and I’m enjoying every minute of it!
Let’s go quilt,
Leah Day
This is looking like a gorgeous quilt. I just love how the color of the threads shows up against the black.
I am a process knitter and usually enjoy the making of a project much more that the finished project.
I am new to quilting. I can already see that the quilting part of a project will be the fun part for me. The main rule is to "break all the rules" and to create what you want.
So like you, I will quilt like I like to back best and enjoy the designs of the magical threads. Your latest quilt is indeed magical.
What is the origin of your goddess themes?
Best, BJ
Looks amazing so far! I think you have broken through your block!
Wow, this quilt is going to be seriously awesome! I'm so excited to see your progress, and I'm glad you've rediscovered your passion for quilting. Thanks so much for sharing your journey!
BJ – I've been creating figures like these for awhile and posted about the beginning right here: http://freemotionquilting.blogspot.com/2010/01/goddess-journey.html
One of these days when I have enough quilts I'd love to do show all the goddesses together.
Cheers,
Leah
You amaze me with your creativity and daring to create unconventionally. Your Goddess is looking beautiful and I'm so glad that you posted a picture of you sitting on it surrounding by ALL those pins because it really shows just how large the piece is. I'll be checking back often to watch your/her progress. Continue to have fun and enjoy the process. I love, love, love the quilting inside of her.
My fingers hurt just looking at that LOL! Can't wait to see your progress!
I love the rainbow colors that you have chosen for the background of your goddess. I also like the way you basted all the folds of the "tear" to keep them out of the way of the background quilting. Looking forward to seeing further pictures of the process.
That is beautiful.
crap, that's nice! crap that's big! looks amazing…:)
This is going to be beautiful! If you think you may need more safety pins, ever, I would suggest getting some from a dry cleaning supply store. You can buy them by the gross (1,444) and they are much ceaper than walmart! Also, you can buy them already open.
Oh this one is going to be GREAT–each one you make they get better & better. This is BIG..lots of pins there..that in itself took forever to do. Just WOW…I loved the depth that your sinkhole (the one you burned) made & I see you will still have that part in this Goddes one..this is really going to be AWESOME.
Leah, I would like to thank you for sharing so much of your quilting experience. You have really inspired me to have the confidence to take my quilting to a fearless, new level. I also want to thank you for sharing so much of yourself and your heart with us as well.
Holy Cow! That quilt is amazing.
I think you will out do Sharon Schamber by a long shot.
Awesome.