
Wild Applique and Trapplique Makes Textured Quilt Blocks
I’m playing with textured quilt blocks today using Wild Applique and Trapplique techniques! These are art quilting techniques designed to raise the surface of our quilts beyond flat layers of fabric and thread.
I want you to touch and experience this texture. When you touch the surface, you can feel the twisted, pleated channels with your fingertips.
Stitch on with me and let’s learn something new:
Heart Shaped Textured Quilt Blocks
I created this beautiful textured heart quilt block and can’t wait to share the steps with you! This block was very easy to create, used up lots of fabric scraps, and just look at that yummy texture!
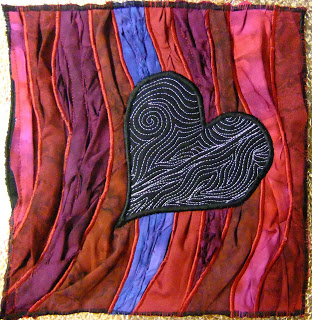
These art quilting techniques worked well on a small scale. I’m not sure how well this would work on an 80-inch quilt. But within an 8-inch quilt block, Wild Applique and Trapplique hold up very well.
Step by Step Wild Applique Texture Process
I started with a 10-inch square of black fabric and layered it with a piece of black polyester felt. I also pulled a good supply of red, purple, blue fabric scraps.

Next, I sketched a rough drawing. I kept this really simple with just flowing lines and a basic heart shape in the center.
Now for the fun part! I cut my fabric scraps into narrow strips. Using free motion quilting, I stitched down one side of the strip.

I stitched off the edge of the block into the batting area. I do this to end sewing quickly. Instead of tying off the thread and hiding the loose ends, I just cut it.
Now for the texture – I crumpled up the thin strip, wrinkling it back on itself to create random, organic pleats. Then starting from the top of the block, I quilted along the opposite edge of the strip. Because I used narrow strips to start, it took a few passes to fully fill the first section with blue fabric.
How Wild Applique Differs from Fusible Applique
Fusible applique is another awesome way to add texture to your quilt blocks. Click Here to find a beginner fusible applique tutorial.
But wild applique is a whole different ball game. We’re not in Kansas anymore Toto.
I’m not using fusible web. This is raw fabric on raw fabric. Polyester felt is on the bottom, acting like a stabilizer to keep everything flat and stable.
The pieces are also not cut anything close to size. The bigger the strip, the more pleats and ripples it creates. The intention here is texture, texture, and more texture!
Textured Quilt Blocks with Fabric Strips
My first attempt wasn’t my favorite. In my opinion, the effect was somewhat ruined by the thread on the surface. I didn’t like having to stitch over the area multiple times.
So I tried again with a wider strip. I also tried narrower strips. That’s really what experimenting is all about!

Finally, I found my formula: I used a larger strip, twice as big as the intended space. So if the space is 2 inches wide, I’d cut a 4-inch strip.
I stitched down one side, creating pleats where the curves created bunches in the fabric. Then stitching down the opposite edge, I’d twist the fabric so it created noticeable ridges throughout the space.
This was not only the easiest way of creating instant texture, it was also the fastest!
Texture? Yes! Raw Edges? No!
I’m not a huge fan of leaving rough edges to this extent. I just don’t think it looks good, so I decided to cover up these areas with satin stitching. I used a 3.5 mm wide zigzag stitch on my sewing machine. Sewing slowly to cover all the raw edges.

Looking back on it, I know there are many other ways of covering up these sections. I could couch special wider threads, or I could hands stitch beads or more fabric.
I saved room in the middle of the texture quilt block for my heart shape. Since I’ve been experimenting a lot with textured applique, I wanted to try something different for this shape.
What is Trapplique?
Animator / quilter Nina Pailey coined the term Trapplique as a mixture of Trapunto and Applique. The technique is a combination of the two. First quilt fabric with unique designs, then cut them into shapes.
These quilted shapes are puffy like trapunto, and when appliqued on your quilt, create a fun new texture!
I cut my heart shape from a scrap of quilted fabric and placed it in the center of my block. To secure the thick layers together, I first zigzag stitched around the edge loosely. I just wanted the first set of stitches to secure the heart to the surface.

Then I switched to a dense, wide satin stitch and stitched around the heart again. To make sure the edge looked perfect, I made my satin stitch wider and went around for a third time.
I still had a bit of light blue threads showing up from the quilting in the heart. Because I’d used black thread to satin stitch, I just took a black permanent magic marker and colored those threads. Instant fix!

Finishing My Lovely Textured Quilt Blocks
I trimmed down my quilt block to 8-inches square and satin stitched along the edges. So that’s it! I’m extremely happy with my finished block and the techniques I got to play with.
Wild applique and trapplique are not techniques you’ll use every day. But it’s nice to have some funky skills to add extra texture to your special art quilts.
I really want to use this Textured Applique technique in my next goddess quilt. I’ve always had issues with the hair of my goddesses being so flat. Hair is an expressive, wild force and I’ve long struggled to pick quilting designs for this space.
If the hair was created with wild applique, I wouldn’t need to quilt those spaces. The textured fabric would do all the work!
Let’s go quilt,
Leah Day
OK, now that's just cool!
Wow! That's really lovely! Great technique. Thanks for posting.
Leah,
Think about donating experiments to the Alzheimer's Art Quilt Initiative project. Project just needs to be letter size and registered. Check out http://www.alzquilts.org.
'Play time' is the best time – I keep coming up with some weird ideas and so far each I've tried has been a success, maybe not 100% but not a complete disaster – it's amazing what you find works if your prepared to let go a little
I really like that technique! I hate things that are even and standard, so this is a perfect one for me to play with. Thanks for the inspiration!
Leah, thanks for sharing your fun time in the studio. I love the little piece you created. I think I need to go play now.
This is such an inspiring post – the piece is stunning, the idea of the background and the texture and flow is really impressive.
Leah, you share so much. This is great. And here's a variation on a plain satin stitch binding – it's called a rattail binding. Check this out:
http://www.youtube.com/watch?v=5Xi2sL8PT-U
Perfect for small art pieces!
What a beautiful piece.