
Quilt Painting Tutorial – When Applique Just Won’t Work
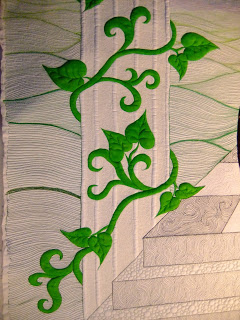
We’re learning quilt painting in this tutorial today! Yes, there are times when the design you’ve drawn is just too fiddly and applique absolutely won’t work. I’m just not skilled with applique enough (or too lazy) to create such tiny detailed work like these leaves and tiny stems:
Jump ahead to find the part of this quilt painting tutorial you most need to read:
When Do I Paint and When Do I Applique?
Don’t get me wrong – I certainly know it’s possible to do this with hand applique and even easier with fusible applique, but I didn’t feel like dealing with a lot of fiddly pieces for this quilt.
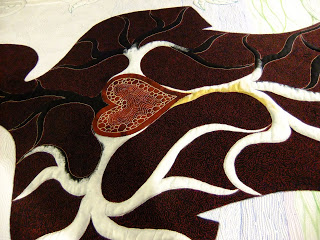
I actually did applique a lot of pieces – the body, hair, and center heart shape on this quilted wall hanging. The shapes that were big enough to handle and easily turn the edges under were appliqued instead. Though I’m wondering now if turning the edges is a bit silly, but that’s a topic for a different applique tutorial.
While I really love the appearance of paint on a quilt, I do find the process a bit tedious. Still, the beautiful glow created by these Jacquard Luminere paints is adding a spectacular metallic look to the quilt top. I could never have achieved the perfect molten metal look of the body veins with any other paint or fabric:
How I’m Painting a Quilted Quilt
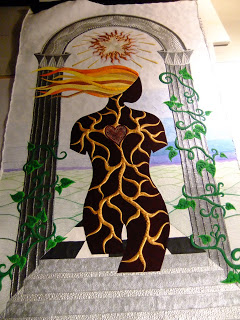
Painting my Hot Cast Goddess Quilt has been a multi-step process because painting over black fabric is challenging. This fabric wants to eat paint and it took many tries to figure out how to get the effect I was after.
First I covered the veins with white paint. This nuked the black fabric from orbit and finally allowed the brighter colors to show up. Then I painted over the white with Jacquard Luminere Gold.
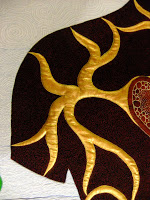
Then I dry brushed Luminere Bronze and Copper lightly on top. I only dry brushed the paint roughly over the middle of the veins so the color would be darkest in the center and lightest towards the edges. I’m extremely pleased with this effect and how beautiful this turned out!
Why Not Use Shiva Paintstiks?
Hot Cast isn’t the first goddess quilt I’ve painted. Here’s one of my favorite painted goddess quilts, Release Your Light:

Sewmuch2do asked this in the comments: Why did you choose Jacquard paints over other mediums – i.e. paintstiks or something else? What about quilting overtop of the painted surface? How has he paint affected the hand and quiltability of it? Thanks!
With Release Your Light, I had large, open spaces to paint. Shiva Paintstiks are oil based paint pressed into a jumbo sized crayon. This paint is applied either from the paintstik itself, which is like drawing with a giant kid’s crayon, or applied with a stiff bristle stencil brush.
Almost the entire surface of Release Your Light was painted with Shiva Paintsticks. Everything except her body, hair and heart, which similar to Hot Cast were all created with turned edge applique.
Many quilters comment that it’s nearly impossible to tell this quilt was painted. Most people ask how I appliqued the points so perfectly!
While I love the effect, and yes I could get a stencil brush as small as 1/4 inch, this was simply the wrong paint choice for Hot Cast. It would be like coloring in a kid’s coloring book with a crayon the size of a broom handle – nearly impossible to paint within the lines.
Painting a Quilt with Paintbrush
Hot Cast is a much smaller goddess quilt, and has a lot more tiny nooks and crannies. Jacquard paints are more fluid, basically the consistency of normal paint. So you can apply this paint with a normal paint brush. If you need to paint a tiny space, you simply pick up a tiny brush.
Unfortunately using a smaller brush does take more time! It can get tedious painting tiny details on a quilt, especially if you aren’t quite sure of your paint color.
A big tip I learned from painting Hot Cast is to always have the entire painting plan laid out. Don’t try to change colors halfway through a space. Luminere Paints especially do not blend well and it’s almost impossible to cover up a darker space with lighter paint.
Also no matter which fabric paint you use, paint will ALWAYS change the hand (the feel) of the fabric.
Painting First or Quilting First?
There is a choice when painting a quilt to paint before or after you quilt the project. Quilting before the project will allow you to paint on a flat surface – just the quilt top. This may be easier to apply the paint because the quilt isn’t so puffy from batting or quilting texture.
Painting the quilted quilt can also be terrifying. When I sat down to paint Release Your Light, I had a fully finished, bound quilt. It was DONE!
Applying the paint and potentially messing it up is scary, but personally I don’t like stitching through painted fabric.
Why? Mostly because I find that painted fabric is stiffer and my needle pierces it, making noticeable holes. Also it seems that no matter how small my stitches, they just stand out more than I like on the surface of painted fabric. Keep in mind that this is just my personal preference.
It’s fun to play with both options! Sometimes painting the fabric first, then quilting with a different colored thread can create some really cool effects you can’t get any other way.
How Will Fabric Paint Affect a Quilt?
If paint is sold as “fabric paint” it’s not going to damage your quilt. As I mentioned, it will change the hand of the quilt. Please don’t plan to sleep under a painted quilt – it won’t feel cozy!
Quilt painting is another art quilting technique. This is meant for quilts that hang on your wall or are entirely decorative in nature. This isn’t intended to be cuddled up with on the couch.
It’s important to understand that there are three main styles or purposes of quilts:
- Bed quilts, throws and baby quilts designed to be cuddly, snuggly and dragged around the house. These quilts should be constructed for bed-use with simple piecing or applique techniques and quilted so they finish soft.
- Wall Hangings and art quilts designed to hang on a wall. These quilts are denser, stiffer, more like actual art so they hang well. You wouldn’t expect to cuddle with the Mona Lisa would you? Worrying about the stiffness added to an art quilt with paint is kinda silly – it SHOULD be stiff!
- Show Quilts designed specifically to compete and win ribbons at shows. This is a quilt in its own world – totally different ball game!
It’s now been more than 10 years since I painted Hot Cast and Release Your Light and both quilts have aged very well. The paints are still as bright as ever and the fabrics show no signs of added age or wear from being painted.
Test Your Quilt Painting Ideas for Success
I find the best way to know what you’re doing (and take the intimidation factor down a notch), is to make samples of your quilt before you start painting. Using 6″ squares, paint half the square with the paint you want to use, then leave the other half unpainted. Once the paint is dry, quilt the entire square with the free motion design you want to use.
Now paint over the section that was unpainted. Let this dry and see what you think – do you like the side with the paint on top or the quilting on top? It’s entirely down to your preference!
Without a sample, how will you know what you’re doing? It’s very important to take your time with this and know what you’re doing before jumping in with both feet.
And it’s also important to understand painting is very time consuming. If you do plan to cover a large section of your quilt with paint, think about how much time it’s going to take, then triple that estimation! But it does create a really cool effect on the surface of the quilt that can be very hard to achieve with multiple pieces of fabric, so it’s worth it.
Let’s go quilt (or paint),
Leah Day
You are so inspiring! Thanks for all the great information on something a little scary!
Thank you so much for this great and very useful tutorial!
have you tried these derwent color pencils? they are activated by water…. I just saw them the other day….
Leah,
Great and inspiring video! Keep those excellent ideas coming.