Machine Quilting Ideas for Log Cabin Quilts
Today I’d like to share four machine quilting ideas for log cabin quilts. Meredith K pieced a beautiful log cabin quilt top and sent me a picture to play with. It’s high time we begin using the free motion quilting designs from this quilting project and this post is sure to give you some ideas.
Updated 2023 – I’ve updated this post as of 2023 and have added new links to newer quilting tutorials for you to check out. Since originally posting this tutorial, I’ve shared many log cabin quilting tutorials and even hosted a log cabin quilt along! Click Here to find the Rainbow Log Cabin Quilt Along series.
Quick links to the topics covered in this quilting tutorial:
- Log Cabin Quilt Patchwork Design
- Seeing Through the Patchwork to the Quilting Design
- Straight Line Quilting a Log Cabin Quilt
- Soft Bed Quilting Style
- Another Straight Line Quilting Design
- Third Quilting Design for Log Cabin Quilt
- Selecting Thread Color for a Log Cabin Quilt
- Fast and Easy All Over Machine Quilting Idea
- Quilting a Log Cabin Quilt for Show
- Quilting Your Log Cabin Quilt Up a Notch
- Links to More Log Cabin Quilt Tutorials
Log Cabin Quilt Patchwork Design
When I saw Meredith’s picture, I was instantly reminded of the Rainbow Log Cabin Quilt, the first log cabin style quilt I made. I was also reminded by how hard it was to pick a machine quilting design.

Log cabin quilts are pretty tricky because the patchwork design is typically very bold and there are so many piecing lines. Should you follow the piecing lines or ignore them? Should you enhance the bold color differences with more contrast or less?
How the heck do you quilt a log cabin quilt??? It’s really hard to see the quilting design potential with all the seam lines and pretty fabrics.
Seeing Through the Patchwork to the Quilting Design
I played with Meredith’s log cabin picture in paint for awhile and came up with three different machine quilting ideas. Here’s the first I came up with:
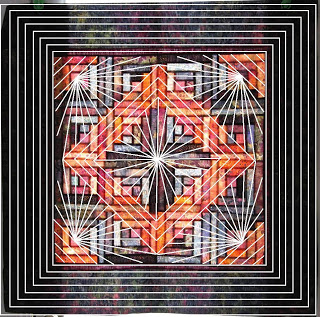
Straight Line Quilting a Log Cabin Quilt
This first log cabin quilting idea is really basic and I feel that most beginners should be able to quilt it. You can even quilt the straight lines with walking foot quilting or ruler quilting.
The key with quilt marking is to use fabric marking pens or pencils you’ve tested and made sure will wash out of your fabrics. Click Here to find the fabric marking pens I use and recommend.
While the marking may take awhile, this design is very forgiving. Don’t get too nit-picky with having exactly the right number and spacing of rays. Just make sure your lines are drawn straight and then start quilting!
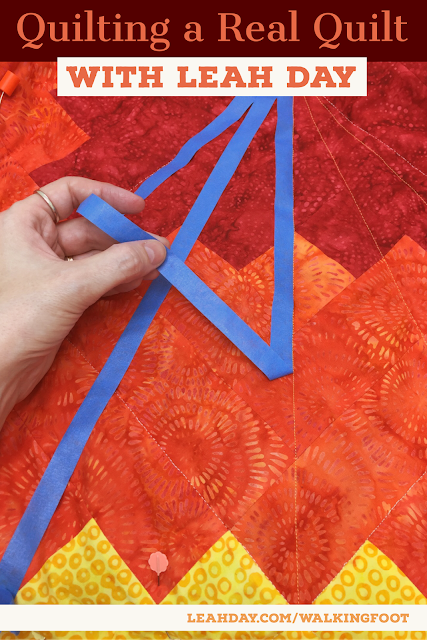
You could also use masking tape to mark these lines. This is a quick and easy way to mark straight lines, and it especially works well over busy fabrics or busy patchwork. Click Here to find a much newer tutorial on masking tape quilt marking.
Soft Bed Quilting Style
This first machine quilting idea for a log cabin quilt will be perfect for soft bed quilts. You’ll have lots of space between the lines of stitching so the quilt will hold together nicely without being “overquilted” or “hyperquilted” where the quilt feels more like cardboard than a cozy quilt.
As far as where this would fair in a quilt show, it’s hard to say.
Just quilting the straight lines is probably not going to win you any ribbons, but the judges will look favorably on you stitching different designs in different areas of your quilt and not doing all over quilting over the whole surface.
A cool variation of this design that would definitely put you in the running for a Best Machine Quilting award would be to first stitch the lines, then go back and fill the space between every other ray with dense free motion quilting fillers.
Which fillers would I suggest? The rays are what I would call uncomplicated quilting spaces so you can quilt just about any of the quilting designs we’ve learned so far.
Another Straight Line Quilting Design
The first quilting idea was pretty, but this is really just scratching the surface! There are so many other patterns and designs we could do.
In fact, when I was designing the first version of this quilt top, I thought the original border idea was a bit boring. I played around with it again and only changed the border design:
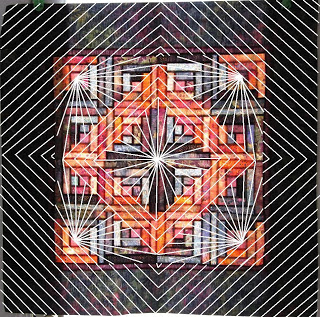
It just goes to show that you can change ANYTHING on a quilt and come up with something totally different. I personally like this better because it makes a dramatic difference between the quilt top and the border. This design will be relatively easy to mark.
First starch and iron your quilt top. I personally use Niagara brand spray starch which comes in a squirt bottle (not an aerosol can).
You want your top to be as stiff and straight as possible, so be careful not to stretch or skew your quilt top as you iron it. Then take a clear, rotary ruler or just a yard stick and mark your lines. For a bed quilt, space them around 1-2 inches apart. For a wall hanging or show quilt, space them no bigger than 1/2″ apart.
Again, this will work great for quilting a bed quilt. It’s soft, simple, and will be easy to quilt with free motion quilting, walking foot quilting or ruler quilting.
Third Quilting Design for Log Cabin Quilt
So far we’ve had two possible quilting designs, both with the same center pattern, but with different borders. Here’s another possible border design that’s a bit more complicated, but has a really pretty effect:
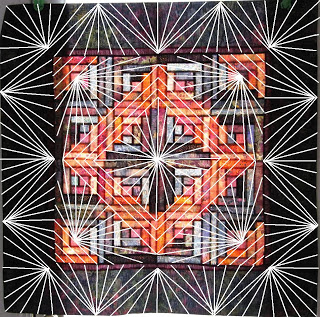
What’s the main difference with this design? The center of the quilt is quilted the same. The border is quilted with radiating lines like Bright Star in sections. I think this turned out a bit busier than I expected, but it’s good to see the difference just a small change in a design can make.
This is a lot busier than the other two designs, and would take more time to machine quilt. As always, there are pros and cons to any quilting design and the important thing to ask yourself is – what do you like best?
We learn and grow as quilters by trying out different designs, seeing what it looks like, and developing an opinion about what we like best.
Selecting Thread Color for a Log Cabin Quilt
Linda asked a question about thread color when machine quilting a log cabin quilt. On all 3 designs I’ve suggested, the lines of quilting extend over several different colors and Linda wondered what thread to pick in this situation.
Here’s three options for selecting your thread color:
- Blending Thread – For a log cabin quilt like Meredith’s quilt, which is mostly dark colors: black, purple, and red, if you wanted your thread to not be very noticeable, the best color will probably be black. Even over the red and purple, black thread will tend to recede into the background and be less visible.
- Contrasting Thread – Likewise if you wanted to contrast sharply with the quilt top, you could choose white or silver thread and really show off your quilting lines.
- Subtle Contrast – A third option is to partially show off your thread. Dark purple or red thread that matches the values in the fabric colors would work fine and show off slightly over the black areas.
My best advice for picking thread colors is to buy a little extra fabric and stitch several colors over the fabrics to see what looks the best. You never know, a dark green may end up being the best choice for this quilt.
Fast and Easy All Over Machine Quilting Idea
All three of the machine quilting ideas I’ve shared will require moving the quilt a lot through the machine. This will take more time and will feel more challenging, though it can feel easier if you’re quilting with your home machine dropped down into a sewing table.
So is there a way to machine quilt a log cabin quilt faster and easier on a home sewing machine? Yes, of course. This is called All Over Quilting:
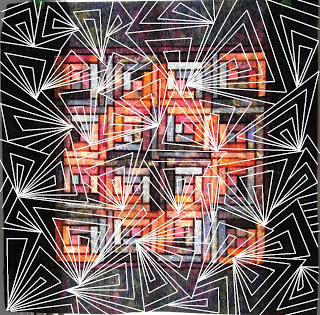
This is the same quilt with Pointy Paisley quilted with All Over Style quilting. Haven’t I always said that you can expand the filler designs from the project to cover large areas of your quilt? Well, here’s a great example of it!
In this case we’re taking the Pointy Paisley quilting filler design and stitching it over and over to cover the entire quilt. This will give your quilt a beautiful texture and secure the layers together very quickly.
Would you like to learn how All Over Quilting works? Click Here to find a video quilting tutorial!
Quilting a Log Cabin Quilt for Show
So how would All Over Quilting Pointy Paisley on a log cabin quilt fair on a bed? This is the basic idea behind large scale meandering – a very popular quilting style that secures the quilt very minimally so it can be used and enjoyed.
In this case, you’re securing the top, batting, and backing down to the quilt top, but not really working to enhance any particular areas of the quilt. This will work great on a bed because it will hold the quilt together and definitely survive washing hundreds of times.
Unfortunately this design won’t fair as well in a quilt show. Judges see All Over Quilting all the time and are not very impressed by it. Most likely a quilt show judge will leave you a comment like, “Quilting doesn’t accent the patchwork. More quilting, please.“
Even in a small, local show, a large scale meandering pattern over your quilt will not likely win a ribbon. And let’s face it, if you’re going to bother piecing all those pieces together, you might as well draw attention to them! Why meander over the whole thing when you’ve obviously gone to the trouble of picking different colors?
If you want to win ribbons at quilt shows, you’ll need to have a different goal. The quilt can’t be quilted as fast and simply as possible. It should be quilted with the idea that the quilting design accents and elevates the patchwork design.
Quilting Your Log Cabin Quilt Up a Notch
What if you were to take your quilt top and quilt it like a wholecloth quilt? To add quilting designs to the patchwork design that are only formed in thread, not applique or piecing. Look and think! Start planning your designs for quilting just like you plan your designs for piecing. It’s fun and challenging, but so rewarding in the finished quilt.
One request from Sally on this post was for more quilting ideas with curves, not straight lines. Of course, you can take the first three quilting ideas I shared so far and instead of drawing straight lines, use a curvy ruler to make wavy lines. Click Here to find the Super Slide Quilting Ruler which would be a great choice for this idea!
You could also swap Pointy Paisley for a curving free motion quilting design like Paisley? Paisley would work exactly the same as Pointy Paisley except this design uses curves rather than sharp angles.
The key take away with all of these machine quilting ideas for log cabin quilts is to pick a design and try it! Your log cabin quilt top will not quilt itself. You will learn nothing if it stays folded on a shelf for years.
Pull it out, get your quilt top basted, and try one of these machine quilting ideas! You’re sure to learn a lot and have a beautiful finished quilt to enjoy.
I hope you’ve enjoyed this quilting tutorial with machine quilting ideas for log cabin quilts. These quilts are so fun and easy to piece and this traditional quilt block will likely remain one of the most popular patchwork patterns.
Links to More Log Cabin Quilt Tutorials
It’s been many, many years since this log cabin quilting tutorial was published on the Free Motion Quilting Project in 2009. Since this time I’ve shared many more quilting tutorials, including an entire series on quilting log cabin quilts. Click the links below to learn more and quilt along with me!

Excellent idea to take some regular time off, Leah. I was wondering how you were able to do all this to consistently–like Wonder Woman! I'm glad to see that you are taking care of yourself. 🙂
And even better idea to post ideas on how to USE the designs. Yours is my favorite blog at the moment. I can't wait to see what you come up with next! That certainly doesn't mean you'll be letting us in blogland down if you take a weekend off.
very nice… I just happen to have a log cabin sampler that needs to be quilted!
Wow, what a great idea putting your quilt photo in Paint and trying different designs out…gotta try that!
Thanks!!
Beautiful!
Thank you for sharing this. I don't think I would have thought of quilting like this. I've pretty much stuck with "in the ditch", but I'm looking forward to learning from you!
=-)
Excellent! I just finished machine quilting a disappearing 9 patch scrappy quilt in all straight lines following the seams, and using my walking foot. I don't have a free motion foot but would love to get one. My Singer is about 26 years old so I think I'll have to do some searching. Also I think the gloves and the teflon mat would be very helpful too.
Thanks for the great ideas!
MGM
Great idea, Leah! Another way to mark a quilt like this is with a ruler and a Hera marker; I love that there's nothing to erase once the stitching is done.
I have only recently found your blog and I am thoroughly enjoying reading it. You are really good for putting all this effort into this and I know this is well appreciated, even though sometimes folk forget to say just how much! Dont try to be superwoman!
Hugs
Anne
WOW you are so so right Leah – we blast on and get all our blocks done, humm and ha over sashing, borders etc (if it's not a complete pattern) then when it comes to the usually dreaded final finishing stage of quilting most of us freeze – I'm one – I've got this delicious hand pieced Round Robin quilt, it's been sandwiched and basted for about 18 months but can I get to the next stage and start machine quilting. No, not quite yet. As it's a RR top there are no regular block formats to follow and I just can't make up my mind on how to do it justice, but I'll keep watching and maybe with your inspirition get some idea and courage to start (it's now a year too late engagement present).
Hi Leah, this is your Shelby neighbor, I just love thoses wrays, and I think that the Hoofy F;s would be great, but I'm having the same problem and need help, I have made a Star Quilt top, and am working on the back, but trying to figure out how to quilt this, I dont want to do regular, I want it to look different but great, do I make an echo of the star, or what….any idea would be helpful. I just love your ideas……thanks Donna