
Collaboration: Machine Quilt Straight Lines with Quilting Rulers
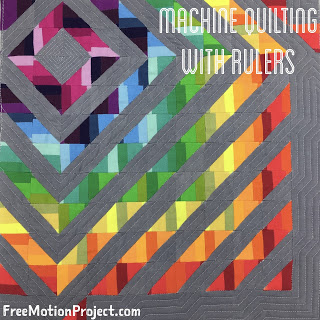
Collaboration Time! Stephanie Soebbing has pieced a gorgeous mini quilt called the Strippin’ Mini and she’s sent it to me for quilting.
Click Here to find Stephanie’s Tutorial on piecing this mini quilt
Obviously when you look at this quilt, the fabric is the absolute winner. These beautiful hand dyed fabrics are created by Wendy Paskus from Stipples Etc.
Stephanie has created a pattern and kit for this mini quilt so if you’d like to make one too click here to find the kit and pattern.
So I had a few challenges with this quilt – I wanted to add a bit of texture with the quilting design, but I definitely didn’t want to distract from the star of the show – the beautiful fabrics and awesome piecing. Watch this video to see how I worked with both challenges:
Click Here to find the quilting ruler I used in this video. It’s apart of the Dresden Plate Template Set which also cuts Dresden Plate blocks, tumblers, circles, and can be used for ruler work quilting!

To make the quilting easy, I stitched in the ditch between the gray spaces throughout the quilt first. I did this with my walking foot mostly for speed, but I could have done this in free motion or with ruler assistance as well. There’s no wrong way to ditch!
When it comes to quilting with rulers, this is something that looks like it shouldn’t be done on a home machine. The first time I saw it, I thought “no way, that looks crazy!”
But then I tried it with a small ruler and found it actually works great. It’s almost a mix of the precision of walking foot quilting with the freedom of movement of free motion quilting.
However, you must use a ruler foot. This is not something you can do with a regular darning foot because the rulers will not have a safe surface to slide against and you’ll end up quilting over the edge of the hard acrylic and CRACK! SMASH! BANG! There goes your needle, your ruler, and probably the timing (or something more expensive) on your machine.
When it comes to the design, I just lined up the edge of the ruler with the ditch lines on the quilt. Because my needle was in center position in the middle of the ruler foot, it gave me exactly 1/4 inch spacing between the needle and the ditch line. So long as I kept the ruler foot sliding along the edge of the ruler, and the ruler pressed to the edge of the ditch, the line remained straight and perfectly spaced.
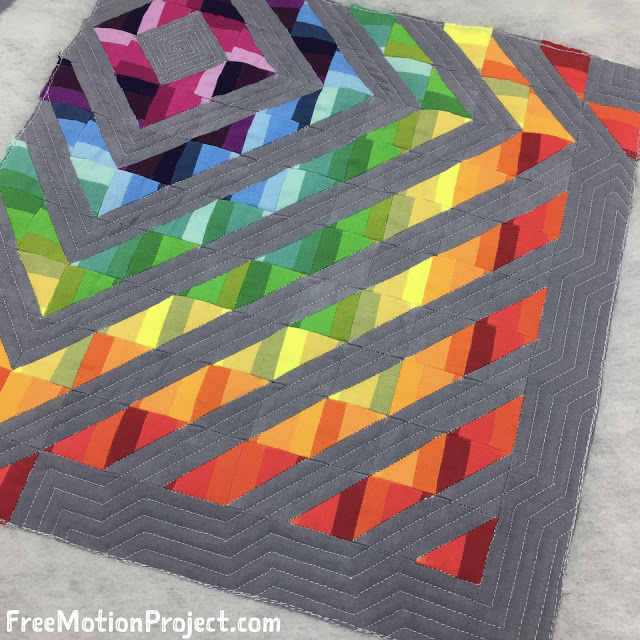
The straight lines through the gray areas were very easy, but the borders offered a challenge. How do you quilt this little space? I could have done something more adventurous, but I really liked the lines. I kept the lines straight and continued them over the border, just echoing the piecing shapes or the previous quilting lines, always spaced 1/4 inch apart.
This created an asymmetrical, angular design that’s very pleasing. It looks just a touch more complex in this area, a bit like a maze, and I really love that effect.
Thank you again Stephanie for a wonderful week of collaboration! You can learn more about Stephanie by listening to our podcast episode about tracking your business income.
Learn how to piece this beautiful Strippin’ Mini quilt in Stephanie’s Piecing Tutorial right here.
You can also check out the Sit and Sew Radio podcast with me and Wendy Paskus and learn a bit more about all three of us!
Let’s go quilt,
Leah Day
I have a Bernina 1090 and it is now 29 years old. It is very similar to your 1230 in your video. I've asked my local Bernina dealer, and there are no ruler feet created for our older models, and they don't plan on making them. Where can I get the foot and adapter?
I've never seen this type of quilting done before! Thanks for sharing and also the tip about the correct type of foot. I was about to go try it without!!!
I love this Leah! Awesome job on the borders!!
We're planning to begin carrying adapters and feet soon because of this need. Basically it's a Bernina low shank adapter screwed to a low shank ruler foot. I have heard dealers grumble about it and say that if it somehow hurts the machine, it's not covered by warranty. Just FYI on that. I've not had any problems so far and this fits perfectly!
Eek! I'm glad you didn't! Get a ruler foot first and then go play.
The power of echoes! It's so pretty!
I just got a ruler quilting set. Was glad to see your video. I plan on using until my free motion gets better. Thanks. I was able to get one for my Baby Lock Crescendo.
hello leah i love to watch your quilting videos i have bernina 1230 and this video really interested me….can you send links to the low shank ruler foot and the adapter used on your bernina 1230 in this vidoe or even picture of the adapter and ruler foot so i know what i need to look for?….thankyou sheila
Hi Sheila! For an older Bernina, this low shank foot will work: https://leahday.com/products/ruler-foot-low-shank For the adapter, you’ll need to go to a Bernina Dealer and explain you need a low shank adapter for a Bernina 1230. They probably will have to order it for you, but they will help you get the right thing for your machine.