How to Piece the Half Square Sun Block
Wow! Josh and I have been totally blown away by the response to the Machine Quilting Block Party! We’re so excited to be teaching so many excited quilters how to piece and machine quilt this year!
This weekend I shared a special tip video on how to prepare your fabric and cut it accurately. If you’ve been debating whether to use scraps or buy yardage, definitely check out this post for extra fabric cutting tips.
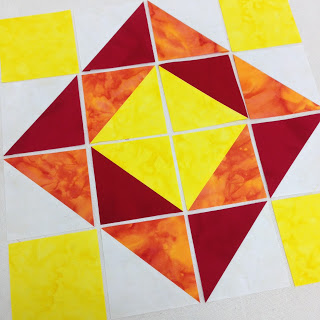
Today we’re jumping right in with piecing our first block – Half Square Sun. This block is created almost entirely with half square triangles so you’re definitely going to get a lot of practice piecing and cutting precisely.
Learn how to piece the block in this video:
Click Here to find the pattern for Block #1.
Extra Tips for Pretty Patchwork
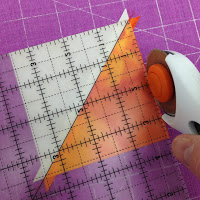
When working with half square triangles, I have added extra fabric to the squares so you can cut the shape down accurately after the triangle unit has been pieced.
To trim the half square triangles properly first make sure to align the 45 degree diagonal line on your ruler with the diagonal seam on the block. Rather than trim a large bit from two sides, instead trim a small amount from ALL sides of the block so you’re sure that all the edges are straight and square with the diagonal line.
Arrange and Piece Carefully
I got a bit turned around while piecing Half Square Sun so make sure to lay out all the pieces on your table, then piece the units together carefully into rows, then the rows into your center block.
As I mentioned in the video, it’s a great idea to develop a system of pinning so you always know which edge you need to stitch next. I can’t count the number of times I held two pieces together and in the time it took to walk from the cutting table to the machine I’d forgotten which edge I was supposed to stitch!
The Seams Pressed Open Debate
Yes, we’re pressing our seam allowances open for this quilt along because it will make the block flatter and easier to machine quilt. Trust me, you don’t want to hit a layer of 6 seam allowances with your needle!
Many quilters have expressed concern that this could weaken their quilt because batting could poke through the seams, or the seams could be damaged when we stitch in the ditch later.
I’ve never seen an issue in my quilts created by pressing the seams open because I lower my stitch length for piecing. Lower your stitch length to 1.5 mm so the stitches are tiny, tight, and extremely secure.
I also think your piecing thread plays a roll too. I used Aurifil 50 wt. mako cotton to piece my blocks because it’s super thin, very strong, and has virtually no lint.

Now it’s your turn! Piece your block and share it with the Block Party Facebook Group! Post any questions you have about the piecing process either to the group or in the comments below.
Up Next – Tomorrow I’m planning to share another extra tip video on how to mark your block with the quilting diagram so it’s ready for machine quilting. Click Here to watch all the videos posted so far about this project.
Let’s go quilt,
Leah Day


Leah, what color backing will you be using
I'm using cream as my backing because I saw a lot of show through when I tried a darker color. It's not usually not first choice, but it's working for this quilt!
Leah, what kind of iron are you using? I like the size of it.
I am enjoying and learning sooooooooo much from the videos. I have purchased your book too which is just full of great information! This is the year that I had planned on working to improve my piecing skills so your sew along came at the prefect time.
Wonderful! The little iron in the video is a Rowenta Travel Iron, but I actually don't recommend it. They used to be great irons, but this redesign with a purple handle just doesn't stay hot the way it used to. I'd recommend instead buying a $20 iron from the grocery store. They last around 6 months, but they definitely get hot and the price is so low you can keep 2 on hand when one goes out.
Thanks you for the information 🙂
I always forget to lower my stitch length. Thanks for the tip.
When I cut my fabric, can I cut a strip all the way across and cut my squares from the strip? For the red fabric it says I need 3 4-inch squares, should I just cut a 4×12 inch strip, or cut across the whole width of the fabric? I feel like it would be easier to keep my fabric squared if I cut the whole strip, but without knowing the rest of the pattern, I don't know if that'll end up working out in the end. Suggestions?
Great question! I would cut a full selvage to selvage strip, cut the squares you need for it, then place the remainder in a bin with a little note of the size. This way when you get the next block you can "shop" your little bin of strips and likely cut the next pieces from a strip you've previously cut. Does that make sense?
Perfect! Thank you, that makes things much easier. I've already learned so much from these first videos! Do you have any tips for squaring up large pieces of fabric? Like for the cream and backing?
When I'm cutting my fabrics, like for the 3 4-inch squares of the red, should I cut a 4 inch strip when I square up my fabric? Or should I cut a 4×9 inch strip and just cut exactly what I need?
I'd like to cut strips so I can keep my fabric as square as possible, but without knowing the rest of the pattern, I'm not sure if that'll cause me to run out of fabric down the road.
Would that go for the 2 1/2" border strips as well?
Yes. All of the blocks in this project will be pieced with 2 1/2 inch border strips so it makes the most sense to cut them selvage to selvage.
I set my stitch length to 1.6 (closest my machine allows to the suggested 1.5). I have adjusted the tension all the way up and all the way down. I am stuck. I don't know what to do at this point. What is the standard with the stitch length being lowered? What is a good starting point for the tension?
1.6 or 1.4 will be just fine. The tension on your machine should be fine in the middle setting. You can check it by placing red thread in the top and white thread in the bobbin. If you get little dots of thread pulling to the top, you're tension is a bit high. If the dots are pulling to the back, increase the tension by one number.
Hi Leah, what thread wt and type do you recommend for piecing?
I really like Aurifil 50 wt cotton for piecing. Really any thin, low lint 100% cotton thread will work great!