
72. Designing with Mini Hexies
We’re getting towards the end of the year and it’s time to start wrapping up all the loose strings of Express Your Love. Today we’re going to learn the first part of 3 videos on English Paper Piecing mini hexagons to create the intense piecing effects like this:

Of course, this is most definitely not the only way you could piece her face, and I believe I choose the most time consuming, fiddly method possible! Still, it was a fun project to work on over the summer, and once you’ve planned and graphed out your project, it’s definitely portable and a terrific project to work on standing in line, waiting for meetings. If I was still in school, this is what I’d be doing in class!
This first part focuses on the design side of things. How did I know how many 1/4″ hexies to make and turn the edges? The answer is in this video:
Here’s the steps again with links to everything mentioned in the video:
1. Choose a hexie size – Paper Pieces offers sizes ranging from 6″ to 1/4″ and there’s probably hundreds of sizes to choose from. The size is measured by one of the sides of the hexagon, so the 1/4 don’t look nearly as small as you would expect.
My advice? Do not even look at the 1/4″ papers. They are like little kittens, so cute and tiny, and they don’t look like they’d be THAT time consuming, and then you’ll end up justifying a completely ridiculous project that takes the rest of your life to complete. Please! Trust me! Beyond there be dragons!
Okay, don’t say I didn’t warn you!
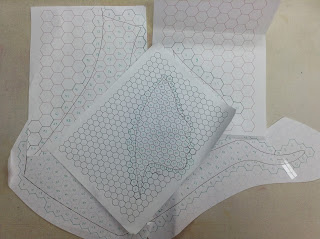
2. Print hexie graph paper – This wonderful site allows you to print hexie graph paper according to the length of one side, exactly the same way Paper Pieces measures their hexies. Choose a size, convert to decimals by dividing the fraction (3/8 = 0.375) and plug it into the system and print as much paper as you need.
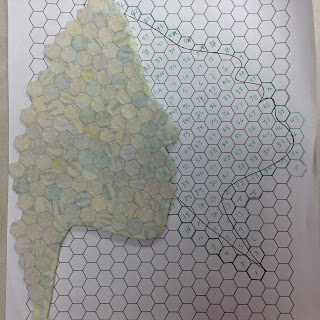
3. Create your template – Lay the graph paper over the master pattern for Express Your Love and play with the arrangement until you find a position that minimizes the wasted hexies (those you will turn to the back). Then trace the master pattern shape (i.e. the face outline) onto the hexie graph paper.
4. Outline your project – Go around the shape and outline all the hexies around the shape. You’ll want to have at least 1/2 hexie shape to turn, if not more, especially around areas like her mouth and neck.
5. Count the hexies – Once you have an outline you’re satisfied with, count and number all the hexies within the shape. You have a number! This will be your goal! Now the process is very easy: cut, pin, turn, and connect that number of hexies to create your shape. We will be learning how to do this in Part 2 and Part 3 coming up next week.
So that’s it for this part of the design process! This planning process can work for any quilt, art quilt or traditional, and will allow you to plan, design, and create any shape with pieced hexies.
Let’s go quilt,
Leah Day
Great post! Love sewing the hexies..but I've only sewn the one inch! You are brave but your end results are wonderful!
Leah, I love your honesty and willing to share your pain, but I have to say… the 1/4" hexies look FANTASTIC on the face. Really like a mosaic work of art, so despite the agony of miniaturity (I think I just made up that word), it totally WORKS! You should be very proud of yourself, I aspire to your level of creativity, artistry, diligence, and craftsmanship!
My Grandmother's favorite was Hexie's and I'm trying to get into that frame of mind – Ha Ha! Not sure if I'll make it but, you've got some great tut's here and I'll keep working on getting there.
Going to be beautiful.
On a somewhat related note, as I do love hexies, I'm hoping one day you'll touch upon ideas for how to do FMQ on various size hexies. I sewed some 1" together using batiks, but am not happy with any ideas I've come up with so far for FMQ on hexies. I think some designs will get lost in the batiks and others seem too simple for the hexie shape. Trying to find a good balance, but stumped on ideas.
And, of course, I'll be curious how you do FMQ on the beautiful piece you are working on where it still shows off the detail of each tiny hexie.
SewCalGal
http://www.sewcalgal.blogspot.com
Sew Cal Gal – My best advice for any area, especially quilt places that have you stumped, is to shoot a picture, or in this case print out some graph paper, and spend a lot of time drawing and doodling different design ideas. There is no wrong answer here, but your dissatisfaction is something to definitely pay attention to. Don't rush the process. Sometimes I take weeks to come up with an idea and then BAM! it hits me in the face and it's totally obvious how to fill that space. Take your time and have fun!
one tip, I am doing 1/2 hexies and I use a glue stick to put the paper pieces on the fabric, cut around 1/4 scant seam allowance and like you just make a stack of them. Then just sit and baste while watching tv or traveling out of town to visit inlaws. I've also seen where some glue the seam allowance down instead of thread basting but personally have not tried it. Your tiny ones are amazing!! Maybe if I ever finish my 1/2 i'll tackle the 1/4! lol
Thanks for sharing the hexie info. I made some hexie blocks about 15 years ago. I don't like whipstitching, so even though I liked the look of the blocks, I hated the process. I will be starting a new hexagon project, but will be hand stitching on traced seam lines. I like it much better.
There was no link for Pinterest but I did pin it. Please let me know if that is Not OK. I don't know that I will ever try this technique but I put it on my Quilting board rather than on Inspiration 🙂