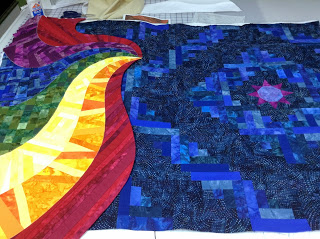
60. Secure Appliques to a Quilt Background
So we’ve turned the edges of our large applique pieces and it’s time to connect them together and secure them to the quilt background!

Now this process is one that you want to take your time on. Just like turning the edges of our large foundation pieces, this is a multi-step process that does take time. So make sure you have a few hours free to work on connecting all the pieces together and securing them to the background before you get started!
Let’s learn how this process works in this video:
So the basic steps are:
1. Spread your master pattern right side up over a pressing surface.
2. Line up two pieces at a time, making sure to overlap the turned edges on top of the raw edges so you have a smooth, perfect finish on the right side.
3. Glue the pieces together using Elmer’s Glue or Roxanne’s Glue Baste it. If you don’t have a fine tip on the Elmer’s glue, definitely use Roxanne’s because it does come with a fine tip and will be easier to control. Too much glue will make this process messy and uncontrollable! Fine tips for the Elmer’s glue can be found at Sharon Schamber’s website right here.
4. Remove the freezer paper from two pieces you have connected. Rip the tips rather than remove them from the appliques. A little freezer paper left in the tips won’t hurt anything!
5. Using water soluble thread, zigzag the two pieces together. This thread is temporary and I used it to secure the pieces together solidly, but with the understanding that this thread will wash out. You could use regular thread here, but you will need to stitch slowly and carefully in order to maintain a good looking stitch.
6. Repeat connecting your hair sections two at a time, then connect these pieces together until you have one large chunk of hair.
7. Position the background of the quilt over the master pattern and use pins to line things up. This doesn’t have to be perfect. Some shifting may have occurred in the large appliques.
8. Pin in place, then hand baste to bring the background and hair sections together securely. Also run lines of water soluble thread using a wide basting stitch for extra security.
9. Zigzag the edges of the hair to the background with more water soluble thread. This can easily be picked out later when we insert the face and body sections underneath the hair section.
That’s it! As you can see, I used a lot of water soluble thread here. Mostly I did this for stability, and also because it allowed me to stitch the pieces together rather messily, but still get away with it because that thread will wash out later. I will need to go back and machine or hand applique these pieces together with real thread.
But you really can’t beat water soluble thread as a basting thread. I love how securely it holds, but I never have to pick out the thread later. It will wash out easily with lukewarm water, so these stitches can stay in the quilt through to the very end with no problems.
Alright! At this point, what is next? We still have a face and body section, and of course the goddess’s swirling spaces for words.
You may remember from many posts through the summer, that I used English paper piecing to piece over 150 1/4″ hexies together to make her face:

To make this piece, you basically hand piece enough hexies to cover the section, then turn the edges and secure it to the quilt background exactly like we did our foundation appliques.
Yes, it’s super cute and definitely goes with the pieced theme of the quilt. But good lord this was INSANE!
I’m almost tempted not to use this pieced face because…well…even having done all that work, I’m tempted to piece more tiny hexies for her body and arm, which would be RIDICULOUS!
Still, sometimes a specific quilt design requires insanity. I’m going to set this pieced version aside for a bit and focus on creating new free motion quilting designs. I need to step away and consider my options before jumping into more crazy handwork projects right this second.
If you want to jump into the hexie piecing insanity pit, you’re welcome to take the awesome Craftsy class Pieced Hexies and catch the bug. It’s an excellent class and definitely addictive shape to piece like crazy!
Let’s go quilt,
Leah Day

ciao Leah
ma la carta dietro alla stoffa la togli?! o togli tutto alla fine??
che tipo di carta è?
bel tutorial
a presto
Well today I hope to assemble my hair pieces. And bast to my quilt top. I do hope you use the hex pieced face. I am running with an idea that you said in a previous blog that you may do tiny squares and stripes for the arms andbody. I loved the idea.. When I first started this project I planned on following your every move but as I have gone on I realized that I love what you're doing but my creative side just wants to take over. So I am breaking away and going to see where it takes me and I can't wait to see your finished project!!! And hope to share mine with you…. Off to quilt!!!!!
Did you ever get these pieced sections of hair machine quilted? I've been waiting to see how you quilted these sections.
Nope, this project is still unfinished. However, I'm going to be sharing videos on quilting a different goddess quilt next month and it will be a 100% start-to-finish project with 5 videos on building the goddess body, then 3 videos on quilting. Hopefully seeing how I quilt the hair of this new quilt will help answer the questions about Eternal Love.