59. Turn Applique Edges for Foundation Piecing + Applique
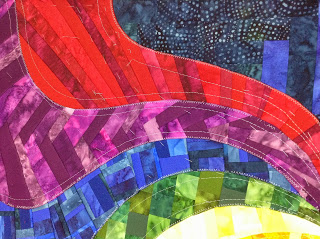
It’s time to turn! Our ragged foundation appliques are ready to have their edges turned to create smooth, beautifully scrappy locks of hair:

This is a two step process that we’re going to learn. First we’re going to learn how to turn the edges, then Thursday we will learn how to connect the pieces together and secure them to the background of the quilt.
So let’s get started by watching the video to see how this works! Kick back because this video is twice as long as usual and very detailed:
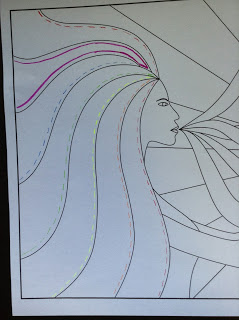
When I shot the video, I was still a bit unclear about which edges I was turning through the blue, purple, and red hair sections. Here’s a handy diagram to clarify that point:

Basically I decided to turn all sides of the purple section, overlapping both the blue and red sections for the easiest way to conceal all the raw seam allowances. The blue section was the thickest of them all, so there was no way I was going to get a sharp point out of that piece!
Here’s the steps again just to review:
1. Prepare 4 large pieces of freezer paper by pressing with a hot dry iron to your pressing board. The purpose of this step is to shrink the freezer paper, and get it flat and ready to connect with the other pieces to create a solid, stable template.
2. Connect the freezer paper pieces together. Simply layer the pieces and press with a hot iron to fuse them together. You’ll always want to layer wax side down and they bond together nicely into a thick template. No, this technique will NOT work with a single piece of freezer paper. It’s too flimsy!
3. Mark the design on the freezer paper by flipping the master pattern over, and placing the freezer paper on top with paper side up and marking the design. Mark guidelines for connecting the pieces back together at the end. Also it might be a good idea to label each piece with the color you used for piecing it.
4. Cut out all the hair templates with scissors.
5. Working with one piece at a time, press the freezer paper template to the wrong side of the foundation with a hot, dry iron. Trim the seam allowance you are turning to 1 inch and clip where necessary in curves.
6. Using spray starch and a paintbrush, paint starch along 4 inches of the seam allowance, then turn the edge and press with a hot, dry iron. Work in 4 inch segments at a time and work slowly and carefully. This isn’t a race and the more time you take, the better your turned edge will look.
7. Now the very last step with each piece will be to layer them together and take a look at the points where everything comes together. On some points, you may have to turn up the edge slightly and I was very careful to show this two times in the video.
My best advice with turning points is don’t get too nit picky. Don’t clip down your seam allowance too tiny too soon. You can always clip more later, but the more you fiddle with the points, the more they tend to misbehave.
Now if you’re interested in learning more about Sharon Schamber and her Piecelique technique which uses the same turning method, but as a base for piecing, not applique, definitely click here to check out Sharon’s excellent website. I highly recommend her videos on curved edge binding as well!
So have fun turning your edges! We’ll be connecting all the pieces together and securing them to the background of the quilt on Thursday.
Let’s go quilt,
Leah Day
Other Foundation Piecing Posts:
Prepare Your Foundation
Red Diagonal Section
How to Create a Scrappy Mix of Colors
Orange Triangle Section
Yellow Log Cabin Section
Green Mosaic Section
Blue Double Scrappy Section
Purple Braid Section

Dear Leah,
thanx for this great video! I've got only one question: Which kind of glue are you using? Doesn't it "ruin" your iron, when you are pressing over the wet glue?
greetings from Germany!
Rike
Hi Rike – Nope, I haven't experienced the glue ruining my iron. It is washable school glue (elmers) so it is basically a thick version of starch. I use a non-stick iron so nothing really sticks to it in the first place, and I've never had to wash glue residue off. So far so good at least! That is my experience so far.
Cheers,
Leah Day
I too have used Sharon's method…you explained this process perfectly and I think I'll use it in my next project!!! Thanks so much for sharing your knowledge and expertise with us!!!!
You are sooo incredibly generous with your time and experience. Thank you for making this extended video. Now I will combine what you do with what Sharon Schamber showed and make it my own!!