
49. Foundation Piecing Triangles
It’s time to jump back on Express Your Love and foundation piece another section of hair! This time I’m working with orange fabric and attempting to piece triangle shapes.
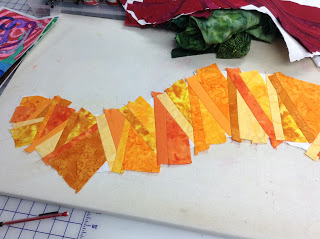
I say “attempting” because this entire hair section was really a situation of cross-your-fingers-and-hope-your-idea-actually-works! In the end it worked out great, but this is one of those situations I should remind you of three simple rules I’m using for this version of Express Your Love:
1. This will not be perfect. I’m not even trying for an exact shape
2. So long as it’s pieced and nothing is falling apart, it’s just fine.
3. Ultimately I just want to make some cool orange fabric for the hair.
So you can see, from my rules, agonizing over perfection is not the point!
But a question cropped up this week about the red hair section where we foundation pieced diagonal strips and it’s probably something several quilters are wondering:
I was wanting to get some clarification on your foundation piecing “red hair” video. My issue is that first of all I’m a beginner and I’ve only seen piecing done when you stitch on the paper side. This way it ensures that I’m stitching a straight line but you stitch on top of the fabric so I was just wondering why you do it this way? What’s the difference / purpose? ~ Tanya
This is a great question and it’s one I’m often asked and find myself asking of different teachers – WHY did you do that? Why did you choose THAT method?
The simplest answer is: because that’s the way I felt like doing it!
I know how maddening that answer is, but it is the most truthful. That section of red hair and this orange section we are learning today could probably be pieced in 100 different ways. Which way is the “right” way?
The truth is this is not something that can be broken down in to right and wrong methods. Think of tying your shoelaces – there’s the rabbit-ear method and the loop-over-and-pull-through method. Which way is right? Well, both will get you a tied shoe in the end, so is there a right or wrong method to use? No!
Use what method you like, what works for you, what makes you happy!
Here’s an analogy for new techniques that might be helpful – every technique is like a tool in your tool box. When you’re first starting out, you only have a few tools. You learn one way to piece and that’s like a hammer.
A hammer can do a lot, but wouldn’t it also be nice to have a screw driver? How about a saw? Think of how many tools you could possibly have in a tool box, and that is how many techniques you might one day have to pick from when working on a quilt. Some techniques will be faster, some will stretch your abilities, and some will be time consuming and difficult, but the ending effect is worth it.
Now there’s two downsides to this technique / tool analogy – rigid thinking and excessive tools.
Rigid thinking is probably more common, and I like to think I’m helping to combat this by throwing so many different ideas your way. Basically it’s the idea that once you know one technique, that’s all you need to know, it will work for everything, so no thank you, I don’t want to learn fusing, painting, thread sketching, or any of those weirdo art techniques. MY quilts are made the RIGHT way with THIS technique.
This can also lead to rigid thinking about materials, which I’ve ranted about on more than one occasion. The Quilt Police would love for everyone to use the same 3 techniques and with all cotton materials all the time because everything else is WRONG WRONG WRONG!
Man, that would be a boring world to live in if they got their way! All I can say is I disagree with the Quilt Police and anyone trying to apply a right or wrong to quilting. There is no right or wrong because we are all arriving at the same place in the end – a finished quilt.
Having access to excessive tools – 10 different ways to piece the same block, 5 different ways to applique shapes, etc etc etc, is the opposite problem and it’s one I suffer from. When you have 10 choices for how to construct any particular area of a quilt, how do you make a decision?
Still, I’d rather have way more tools in my toolbox than have only a handful that bore me to tears!
So ultimately to answer Tanya’s question – I’m foundation piecing this way because it’s allowing me to piece a simple series of triangle shapes without excessive planning or prep work. If I did this with paper piecing, I’d have to design the template, scan it into the computer, fiddle with it, print it back out, tape it together, and then start piecing, be super accurate about placing the shapes and lining up the lines, and then have to fuss with tearing the paper out at the end.
I didn’t want to mess with any of that so I’m instead foundation piecing with the fabric face up so I can see what I’m doing and plan the design from the front. Really my choice to piece this way is more out of laziness and a desire for free-form piecing than anything else!
So understand if you like paper piecing, you can absolutely design templates and approach this from a precise paper piecing technique. That is perfectly fine. You could also cut out pieces and piece them together with accurate 1/4″ seams from traditional piecing and get the same result that way too.
Right here I’ve outlined 3 different ways you can achieve the exact same result. Which way is the right way? I hope you know the answer!
Now enough ranting about techniques and toolboxes! Let’s watch the video and learn how to foundation piece triangles:
Yeah, I did a little ranting in the video too. I’m just really wanting to make this point clear – any technique is RIGHT if it’s the one you want to use and it will give you the desired effect you’re looking for.
More than anything else I hope you will at least try this idea out to see what happens. It might become your next favorite technique and lead to multiple uniquely pieced quilts, but the only way to know is to try something a little different and cross your fingers that it all works out right.
Let’s go quilt,
Leah Day
Other Foundation Piecing Posts:
Prepare Your Foundation
Red Diagonal Section
How to Create a Scrappy Mix of Colors
Orange Triangle Section
Yellow Log Cabin Section
Green Mosaic Section
Blue Double Scrappy Section
Purple Braid Section
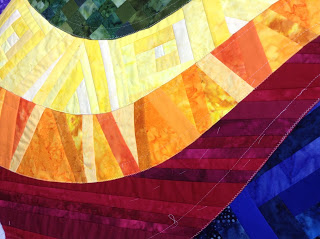
I really love this pieced version of Express Your Love. It's has gorgeous texture and I'm learning new techniques 🙂
I loved this video. I really want to try out this technique. It looks so freeing. Have a super day!
I've never seen "paper" piecing done this way and I really like it. It's free form…make it up as you go. LOVE IT!
This is fantastic Leah. I love your free form techniques. I think that's what makes creativity CREATIVE. Art and rules should never be combined. 🙂
what is the foundation you are using and do you intend to keep the foundation in the project as it appears on the video to be fabric. Do you have other foundations from paper that you prefer to use.
Linda – I've updated the post so it includes links to the previous videos so you can learn how to prepare your foundation. We're working with a fabric foundation and yes, it will stay in this quilt. Paper is always an alternative, but I didn't want to mess with tearing it out for this project.
Cheers,
Leah Day