
41. Designing a Log Cabin Background
It’s time to keep moving on with our log cabin background for the new version of Express Your Love! On Tuesday we learned how to piece the simple 6 inch log cabin blocks. Today let’s learn what other blocks are needed and how to put the whole thing together.
First off, you need 30 log cabin blocks as taught in this post. A quilter named Sunshine asked about fabric amounts and I think 5 fat quarters of various blues for the recessive section and 3/4 yard for the dominate section should be plenty. I didn’t actually measure this out, so it’s not exact, but I think it should be more than enough for this project.
Now to make a quilt exactly like mine, you’ll need to start with a fancy star block like this:
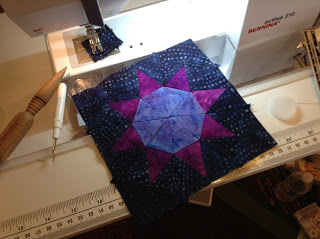
This is the Twinkle Star Jennifer Mathis taught at Sew South and has kindly posted for free for everyone to enjoy! So click here to go check it out at Jennifer’s blog Ellison Lane quilts!
Now to make this star work as the center of our background, we first need to make it bigger with small log cabin blocks to start the diamond effect radiating out from the center. I did this using 3 inch log cabin blocks like this:
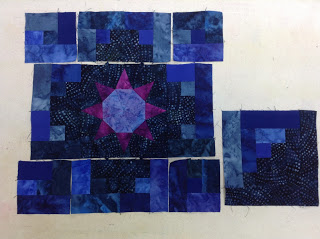
You will need to piece 8 blocks the following way:
1. Piece two 1.5″ squares together, press seam allowances open.
2. Piece 2.5″ x 1.5″ rectangle to one side (darker blue color), press open.
3. Rotate and piece 2.5″ x 1.5″ rectangle to one side (lighter blue color), press open.
4. Rotate and piece 3.5″ x 1.5″ rectangle to one side (lighter blue color), press open.
So in the end you will have a block that measures 3.5 inches and has more lighter blue than darker blue.
Next, you will need to piece 4 blocks the same way, except now you will use only the lighter blue fabrics. This will result in 4 “solid” reading, lighter blue blocks for the corners.
Once you get that whole thing pieced together, you should have a block that measures 12.5 inches!
Now we have one last thing to cut out. Rather than piece all the blocks directly under the goddess and her hair, we’re going to just cut 14 – 6.5 inch blocks of plain fabric. This can be any color you like because this fabric will be entirely covered up later.
So to sum up you will need:
– 30, 6.5″ log cabin blocks
– 8, 3.5″ mini log cabins
– 4, 3.5″ mini log cabins in “solid” fabric
– 14, 6.5″ squares cut from any fabric
Note: these are all listed in “unfinished” sizes before the blocks are pieced together into the background.
Now it’s time to lay this baby out! It will seriously help to lay all blocks out on a table or design wall so you get the correct placement of the log cabin blocks to create this diamond effect.

Follow the diagram to piece all the blocks together to form your background. The shaded blocks represent the 6.5″ plain squares cut from any fabric.
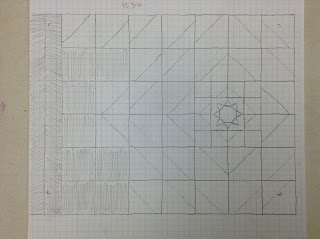
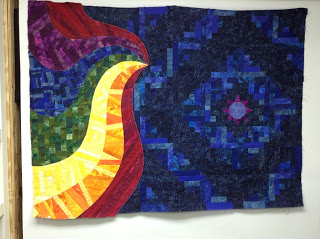
Now, how did I figure all this out? Really it was all planned on this piece of graph paper. Once I realized that the paper pieced star was the same size as the Earth (6 inches) in the original Express Your Love pattern this became very easy.
Basically we’re taking two things that are the same size (the block and the earth) and having that be the starting point for the entire background. Drawing this out on graph paper was essential for getting a good visual on how the quilt would layout, especially how to create the diamond effect radiating out from the star block.
Because the star and Earth designs were both 6 inches, when shrunk down to this smaller size, they are still on the same scale, which means 6 little blocks on the graph paper could represent the star block and line up perfectly with the 6 inch Earth circle.
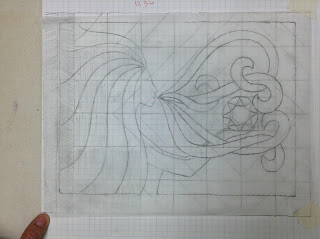
Using tracing paper, I also created this transparent version of the goddess drawing and layered it on top to get an idea of how the quilt was going to look on this new background. Using these two drawings together, I was able to calculate easily how many pieced blocks I would need based on how the goddess was lining up on the background design.
Now, the one thing that I did change was the overall size of the quilt. I knew I didn’t want to try to piece a log cabin in half or fiddle around with complicated logistics in order to piece the exact same size as the original. It was easier to simply let the log cabins piece out at the closest multiple of 6, in this case 36 x 48, and expand the original goddess design to fit this new background.
We will get into more of the nitty gritty of expanding the original design in a later video, but trust me, it’s far easier to expand to fit than try to squish stuff down!
The one over ridding lesson I hope you can take from all this is that design is fun! I drew on graph paper and tracing paper, planned my design, pieced up a handful of blocks to test the idea, and ultimately created a totally unique, extremely pretty background.
Yes, design is challenging, but it’s a FUN challenge! Look at it like a puzzle and you’re trying to get all the pieces to fit together. Sometimes a design like this will take me months of pondering a problem or fiddling with some small aspect of the design. Other times I can crank out a design in minutes just by seeing two things line up the perfect way.
So even if you’re not piecing along with us on this new version of Express Your Love, I hope you will give quilt designing a try. Just draw, play, try out different ideas, and if it totally doesn’t work, there’s always a fresh piece of graph paper to start over!
Let’s go quilt,
Leah
WOW! Thank you for this way over wonderful pattern
Thank you, not only for directions on making an exact background like yours, but also for the thinking process you used to get to where you are with it at this point.