22. Learn the Basics of Trapplique – Part 1
Yay! It’s finally time to teach you a super cool technique called Trapplique!
I mentioned way back in January that details on this technique would be shared sometime this year because I’ve been wanting to play with it for quite some time. The technique itself and the name comes from my friend Nina Paley, who got into quilting back in 2011 and knocked my socks off by creating the most awesome technique combining trapunto and applique together in one go!
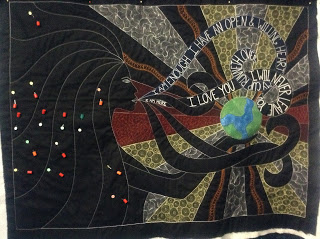
Now for reference, let’s see Express Your Love BEFORE trapplique covered up all those dark breath spaces:

This is actually an older shot from last month. Turns out I didn’t take a photo right before trapplique because I was so excited to see what she would look like with the pieces in place.
One important tip to remember is that the breath sections are all “on top” of the background and even the goddess body, so technically all these spaces need to be filled first. I’m kind of getting ahead of myself a bit, but we will sort it all out by the end!
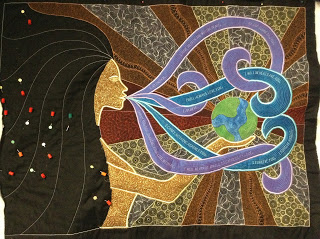
Now the AFTER shot:

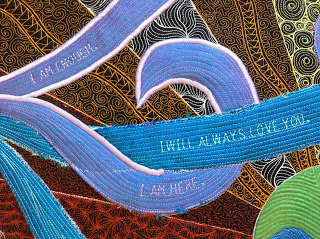
Granted, this did take a lot of time. And it’s not the easiest quilt design to start trappliqueing up a storm with because so many pieces over and underlap each other. My one suggestion after doing this whole thing is to use only 1 color of fabric for all the breath. That way you at least won’t have to change thread colors as you satin stitch around the edges.
Now I got a bit chatty in this video because I wanted to explain a bit about where we’re going with this technique, why I love it so much, and so on and so forth. Just stick with it as I do…eventually…show you the first step of this technique!
So that’s the first step! Mark the sections you want to trapplique on fabric, baste with 1 layer of batting (no backing), quilt the outline, then quilt something within if you like.
Cut out the pieces carefully, making sure to leave just a bit extra where a piece will be overlapped. I kind of forgot that step on some pieces, but it still worked out okay. Gotta love the way fabric can shift and the power of a wide satin stitch!
Now in the next video we’ll chat about auditioning fabric colors. That choice of gold above for her body was actually a tricky decision and I’d like to show you how it came about.
The next video will be on using the built in alphabets in your machine to stitch the phrases, then FINALLY we will finish up in video #25 with trapplique part 2.

So this month might be a bit of back and forth. Understand that if you don’t completely understand what I’m talking about NOW, you might in a few videos. Always test and sample an idea first so it makes more sense. I think the first time I read Nina’s blog about trapplique I was left thinking “huh?” but after stitching it out, it definitely works and is super, super cool.
Let’s go quilt,
Leah

I'm so happy you are showing us this. I discovered you a few weeks ago and have devoured your videos. I'm getting ready to start the Express your love quilt and i've been racking my brain about color choices because I wanted the breath/words to stand out. This looks like fun!
I just finished the hearts and feather whole cloth and had so much fun doing it.
I'm addicted……..
OMG! You covered up all that work on the words inside the breath swirls. I would cry. . . . But, this technique looks fascinating. I can see using it, especially after looking at a completed top and deciding it needs just that something-something, that little extra, some oomph to take it out of the ordinary. I can't wait to see the next video.
Cool! I like this. I think I may try it out on a special quilt I'm making my boyfriend for his birthday. Thanks so much for sharing everything that you do!
When I first started my ribbons I had a similar idea and wanted to use silk, but my attempt did not work out. I could not keep the fabric from fraying. Now I know a way. Wow, love it
What a brilliant solution!! I love applique and this way I can "adjust" things I don't like too!!
Went over to Nina's page and beside her fabulous work I also found her blog about ♡Copyheart. I LOVE this view on things and copyed the whole thing on my own blog too. I'm a big believer in Copy and Share, so this was just something I want to share with others too. Couldn't find her email adress to ask, but I guess she would like this….. Well, looking forward to the next video. Keep 'm comin'!!!
(and I love how you share your talent too!!!)
That quilt was was beautiful before, and it's beautiful now. What a cool place to use trapplique! Thanks for the shout-out.
I have yet to make a quilt that would qualify for a show, because the backs are…the backs! They're especially imperfect because I use thin white bobbin thread (I know! I know! But it works fine, I don't have to change or wind bobbins as often, and it's cheap) and I don't hide my threads (I know!) in spite of buying cheater needles for that purpose. Also, my binding sucks. I plan to get better at binding, but I think I'd go crazy worrying about a show-worthy quilt back. Then again, I'm told that "art quilts" aren't expected to have perfect backs, so if I ever do enter a show, it will be in that category.
Neat!
I appeciate this blog an sent a comment hope it didnt get deleted I tink its pending approval. Thanks for keeping me n the circle of quilters in need of help; you're great. Your techniques are clear and concise.
Thanks for keeping me in your online circle of friends. The Trapplique was scary at first, but I love new things and was quite amazed that I understood it at the end of part one. I really appreciate all your efforts to enlighten and teach the art of freemotion quilting, you are a God sent angel. I really enjoy quilting and didnt have any courage until I started watching how you approach quilting. I hope to see you in Chicago at the International Quilt Festival in June. I know you cant make every show; but this is my area and maybe their is a chance. I am sure a lot of people would benefit and your books would sell. DVD's are onlight are great quilting tools, and I recommend your site to anyone that that has questions, you have a great speaking presence. Back to sewing!!!
I thoroughly enjoy watching the Trapplique video. Without knowing it,I think I did trapplique on a baby quilt with a monkey applique. I wanted the monkey to stand out more so I put a piece of batting behind, stitched it down, cut around the batting then sandwiched top,extra batting, batting and backing. I then did my top stitching around monkey and added eyes mouth nose and extra embellishments to the monkey. He turned out great, standing out distinctly as he should. Would you consider that just trapunta or trapplique? Anyway, I know how to do it!! Thanks for all your help. I love you, Leah