
Question Thursday #9
It’s Question Thursday once again and so far I’ve seen lots of UFOs, and quite a few new, quickly pieced projects getting quilted up wonderfully with stippling!
Of course all this activity at our sewing machines has stirred up quite a lot of questions so let’s tackle them so we can all get back to quilting.
The first question comes from Pat at Color Me Quilty:
Why do I get puckers when I use a walking foot?
Here’s Pat’s full question:
I rarely get puckers or tucks when I FMQ, but I always get them when I use a walking foot. The top fabric always pushes ahead no matter how hard I try to ease it in. Last week when I was joining QAYG blocks, the bottom strip was always fine, but my top strip always “grew” or pushed ahead by nearly a half inch in the short distance of one block. I am using a Baby Lock Ellegante with the proper Baby Lock walking foot. I have checked and rechecked the manual to see if there are any adjustments I can make to the foot, there aren’t any. I always thought that this was something I was doing wrong when I would straight line quilt, because I ALWAYS get tucks. I had my machine serviced/cleaned in November (it has done this before and after service), could the problem be the machine???
Now a walking foot is designed to even out the fabrics under it, evenly feeding all the layers together so they’re stitched together without pleats, puckers, or ripples.
The fact that Pat is only experiencing this when using her walking foot makes me wonder if it’s caused by the pressure of her presser foot.
Most presser feet have a little knob above it that can be adjusted slightly to increase or reduce the pressure of the foot down on the fabric or quilt. Try adjusting this knob a bit, maybe a 1/4 turn at a time to see if that helps this problem.
If you don’t have a pressure knob or adjustment option on your machine, any adjustment will have to be done by a repair person when you get your machine serviced.
Next Anne over at Anne’s Threads asked:
Do you expect to be stopping to reposition your hands very frequently?
Oh yeah! I stop and reposition my hands at least every 3 inches when quilting on a 1 inch scale, and around every 2-3 inches on a smaller scale.
Moving your hands often and always feeling comfortable is a key to free motion quilting. Don’t be afraid to stop.
At first, you might hesitate to stop because you’ll likely wiggle a bit as you get going again, and this can be noticeable on the surface of your quilt. Avoiding this, however, will really not get you anywhere as almost all quilts require the ability to stop, slow down, start again, speed up, slow down, all smoothly and fluidly.
Make a practice quilt this week and play with stitching a wiggly stippling design and make sure to stop and start smoothly at least 10 times. You’ll get better each time you try it until it’s as easy as stopping at a red light!
Next MC from Slair’s Lair asked:
Do you wash your quilt after finishing it?
MC’s full question:
My question for Leah this week is about wetting an unfinished quilt. I have this irrational fear of getting it wet, but you mentioned that you soak yours. Could you provide a little bit more information about when and why to do that? Will it help the basting pin holes close up?
For bed quilts, throws, baby quilts – essentially any quilt that I will wash and use on a bed, couch, around the house, they go straight into the washer after binding.
This is very important as I use a lot of starch before cutting my fabrics and it’s good to wash all the starch out as it can attract moths. It’s also good to throw the quilt right into the washer because that’s where it’s going to be cleaned from here on out – if it can’t take the torture, I’d like to know immediately than in a few months when the quilt gets thrown in with a load of clothes.
For wall hangings and show quilts – quilts that will not get drug around the house, but will hang on the wall or compete, I fill the bathtub with warm water and soak the quilt for 30 minutes. This removes the starch and any markings left on the fabric, and yes, it will shrink up most holes that basting pins or big sewing needles cause.
After soaking, I squish the excess water out of the quilt, then throw it in the dryer to tumble for a bit. I take it out when it’s still WET but not dripping.
Then it’s time for blocking. This is basically the process of stretching the quilt out back to it’s original shape and squaring each side. I do this by pinning the wet quilt on top of Styrofoam boards. Each side is pinned securely and as the quilt dries, it will lock into this shape, keeping straight lines straight as they should be.
Please note that blocking is absolutely not required or necessary for all quilts. I do it for wall hangings and show quilts because otherwise these quilts tend to hang terribly and never have straight lines where they’re supposed to.
As for fear of getting quilts wet – there is really only 1 reason to have this fear, and I’m going to be rather blunt about it:
It might not happen immediately, it might not happen for many years, but eventually the powers that be will gift you with red fabric that runs, and runs, and runs, all over your gorgeous white sashing, or blue fabric that dies your entire quilt a nasty shade of light gray.
Prewashing eliminates most of this headache, heartache, and absolute soul crushing devastation that cam come from leaking dyes, and it gives you the peace of mind you need – you really can just throw a quilt in the wash and rest assured that it will look as good when it comes out as it did going in.
***Slight disclaimer – prewashing eliminates MOST of leaking dye issues, but sometimes you’ll get a random piece of fabric that just wants to bleed, bleed, bleed. It’s always a good idea to throw a Shout Dye Grabber into the wash along with your quilts or fabric to round up that excess dye so it doesn’t latch on to something it shouldn’t.
Now for a great question from Dea at Quilt Idea:
How do I make sure the design continues onto the other parts of the quilt so it doesn’t show that the quilt was quilted in four separate pieces?
Easy! Mark lines where each piece needs to match up!
Lol. This is not easy at all. Sorry, but this is kind of a lesson in frustration, perfection, and honesty, it really isn’t necessary. No one is going to stare at your quilts so closely as to check whether they’ve been quilted in pieces or all together, and the binding holding everything together, whether it’s on the front or back, is always going to be a visible issue.
But if you really want to torture yourself, here’s how to do it:
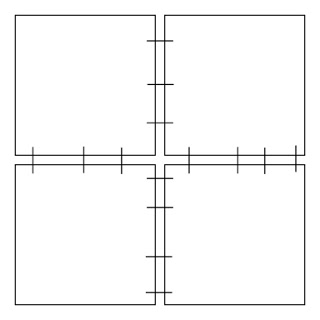 Let’s say you have a quilt with 4 sections as above. Lay all 4 pieces together and mark lines where the quilting lines will “jump” over the divide.
Now quilt each section, making sure to hit each of those points as you quilt it (this is the point where you will be driven insane). Yes, you will more than likely quilt yourself into a corner a few times to do this, and yes, you will have to quilt off the edge of your pieces many times:
 If you’re not suicidal yet, connect the pieces together. Cross your fingers that they haven’t shifted, the marks haven’t changed, and that all the lines match up perfectly.
Another note about this idea: if the lines don’t match up, this will likely be far MORE noticeable than if you didn’t attempt to match them in the first place. You will be able to tell that matching was ATTEMPTED, but didn’t completely work out, which in my opinion is far worse than just not trying it.
I hope that makes sense! Now on to a comment question from Anne:
I see that Quilters Dream comes in different thicknesses – which do you use?
Do you switch between them and if so, how do you decide which is the most appropriate for a particular quilt?
With Quilter’s Dream Polyester Batting, I use the Request thickness for any quilt I plan to use in the summer, or if I’m in the mood for the quilt to be particularly lightweight.
Select thickness is really the best All Arounder – it works great for almost any project and is my usual favorite.
While I like a bit of loft, I usually only use the Deluxe (thickest) thickness when doing trapunto. Using the thickest batting for the first layer of trapunto, then select thickness for the second layer is really the best balance of batting for this technique.
Finally Mike Pearson asked in the comments:
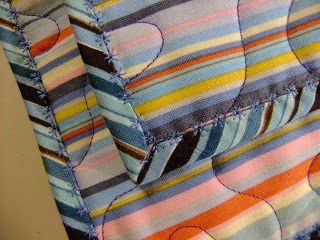
How did you do the stars on the binding of that quilt?!
Mike really asked: I haven’t played much with decorative stitches on my machine, but it has over 100!!! I want to try to do that, but I have a couple of questions first. Was that the front or the back of the quilt in the picture? I machine bind, back, then fold over to the front, so I was hoping it was the front. That’s where my binding stitches are visible (or at least supposed to be LOL). Also, are the stars connected? Or, did you stop and start each one?
Just in case you missed the awesome shot of the special star decorative stitching on Crazy Pepper, here’s a photo:
 This was accomplished by:
1. Stitch binding onto the BACK of your quilt.
2. Fold the binding to the FRONT.
3. Select a decorative stitch.
This is actually trickier than it seems. You really want a decorative stitch that is wide, but not too wide, otherwise you might stitch off the edge of your binding. You also want it to be repeating close enough together so that big gaps are not left in your binding.
And a third thing you have to look for is simplicity. A complex stitch can get really finicky in this area because you’re stitching through so many layers.
4. Once you’ve picked a decorative stitch, start in one corner and stitch down towards yourself, allowing the machine to do it’s thing. (No, Mike, I definitely didn’t break thread between each star!)
5. Take your time and go slowly. Because decorative stitching is time consuming, you may find it takes several hours to stitch this single line of pretty stars on your quilt.
The finish, however, is definitely worth it!
That’s it for today! I’m off to get a tutorial ready for next week’s Heart and Feather Wholecloth! Can’t wait!
Let’s go quilt,
Leah Day
Regarding the puckering with the walking foot, I read somewhere on some blog that using a zipper foot is an excellent alternative and puts less pressure on the sandwich. I've never tried it but found it an interesting suggestion.
Thanks for the binding tip. I'd been taught to sew binding on the front & turn it to the back. Of course, that left me hand sewing all that binding down if I wanted my front to look nice. Your tip has come at a great time as I'm finishing off my UFO's. I was not looking forward to all the hand sewing. This will be much faster and I'll get to play with all those fun stitches. Thanks so much for all your great tips! You're a quilter's true inspiration!
Here are a couple of other ideas to try on the walking foot dilema if Leah's idea does not fix all~ experience talking… things I have learned….
Make sure the arm of the walking foot is attached correctly to the needle shaft nut,one time I had the walking foot arm ABOVE the needle shaft nut instead of on the nut and it was TOO MUCH pressure.
Is there an adjustment you can make on the feed dogs? My machine only has up and down, but you have a beautiful computerized machine…
Check the foot ankle height to make sure it is in the correct place
Thanks for answering my questions, Leah. I'm now practising those stops to reposition my hands! I have a terrible habit of forgetting that I'm allowed to stop!
Congrats Leah! And your nomination is well deserved. I have already voted for you :-). Lets keep our fingers crossed.
Good luck!
Malini