It’s time for another Question Thursday post full of your questions all about quilting, specifically this week a lot of questions about stitching on a line and filler quilting.
To start, please understand that I didn’t mean to confuse anyone about this wholecloth by teaching outline quilting and filler quilting separately.
I did this simply because it was easier to teach within the 15 minute time limitation set by YouTube. I also thought it would be less confusing to see the two steps separately.
Keep in mind that I’m still learning how to teach this, just as you’re learning how to quilt it, and each week I learn more about what works and doesn’t work online when it comes to teaching. Give me a year of working out the kinks, and I promise things will get easier!
So please understand that no, you definitely don’t have to quilt your quilt the way I demonstrated.
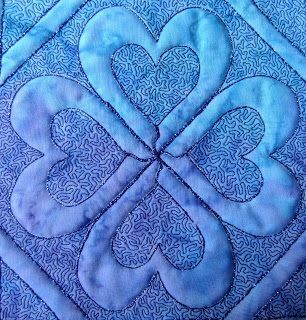
It’s far easier and less time consuming to combine the two techniques together and outline and fill your quilt at the same time, or at least fill and travel stitch to new areas so you don’t break thread a million times between small pockets of space, like the hearts.
So for the heart area – first stitch the outline, then fill the heart, then travel stitch into the next heart, outline and fill it as well.
Keep in mind that we will return to this Heart and Feather Wholecloth in the future when playing with more designs so even if your first attempt left you ready to throw your quilt in the trash, trust me the next time around will be far less time consuming or confusing.
Now let’s answer some questions from this week’s quilt along:
What is the right speed for quilting on a line?
Her full question is: So my first question to Leah this week is about practicing. I know that you said to go slow to stay on the line, but I ended up just crawling. My lines, curves and stitch length got really wobbly. Is it better to practice with a little speed and work on precision or stay slow (and wobbly) and work to gain speed as you get more confident. (Am I asking a chicken and egg question?)
This is kind of a chicken and egg question because speed is going to be something that’s different for everyone. I’d say work to whatever feels most comfortable for you. That might not be the answer you want to hear if you’re looking for exact instructions and specific steps.
So work to find a speed that is fast enough that you don’t wobble a lot, but slow enough that you don’t totally loose control.
Another reason why I split the two lessons is to give you the opportunity to see how you can trace and outline quilt the wholecloth pattern just to practice outline quilting. You don’t HAVE to fill this wholecloth if you don’t want to, and simply stitching the outline can be very helpful for finding that perfect speed / movement ratio.
The key here is to keep stitching! The more you do this, the less difficult it will seem until pretty soon you’ll be able to do it in your sleep.
Pat had another question about travel stitching:
What is the best stitch length when travel stitching?
Pat’s full question: My second question is about stitch length and travel stitching. If you travel stitch, it covers up your stitches, so that the single stitch looks totally different than the traveled stitches. If a piece has a lot of travel stitching, is it better to keep your stitches really small/short? What is an optimal stitch length for FMQ?
This is another thing that’s different for everyone, but generally free motion quilting stitches are on the smaller side.
Smaller stitches generally look better over all areas of the quilt, and in curves specifically because the longer the stitch, the harder it is not to go choppy with it and produce a zigzaggy line rather than a curve.
Pat’s definitely right about a travel stitched line looking entirely different from a single line of quilting. This effect can be so noticeable you can subtly change the effect of a quilt just with extra travel stitching, as
MC from Slair’s Lair demonstrated this week. This is something you have to play with personally and ask yourself “what look do I like better?” If you like the effect of travel stitching, do more of it, and experiment to see how the stitch length effects the finished design.
Because stitch length in free motion is entirely created by your movement / speed ratio, this isn’t something we can “set” with a dial or a button on our machine so we can’t really argue with what is the “right” way to do it.
You will definitely find as you get more comfortable with free motion quilting that your stitch length will naturally even out and become consistent. It will do this on it’s own, simply as you gain more skill at this technique.
As always – play, have fun, experiment!
Can we travel stitch between motifs instead of breaking thread?
Malini’s full question: You had mentioned that we need to break threads 16 times. My question is that instead could we travel stitch on the lines of motif if we’re using the same thread for the microstippling as we did for the outline of the motif? This way I can get away with breaking the thread.
Yes! As I said above, most definitely travel stitch between the hearts or fill between the triangles so you don’t break thread so often.
Why did you use that thread color?
Full question: Did you choose to use different color of thread for microstippling for video and picture purpose? Or do you suggest to use different color thread than the one used for outline because the motifs will pop more?
I had to kind of laugh at this one because I really can’t get away with anything online! I have to remember that! You guys are even better than my 5 year old – you miss nothing!
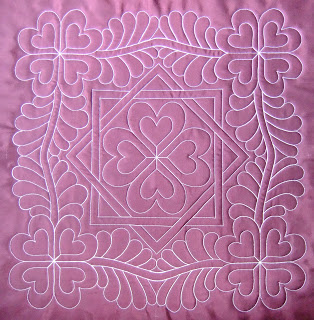
I’ve stitched out 3 Heart and Feather Wholecloth Quilts to create this tutorial. The first red one I created normally: used a lightbox to mark, layered and stitched the design in a logical fashion.
I started to mix things up a bit with the purple quilt, which was actually created from some form of silk – I don’t remember the actual name of the material. It was slippery and silky and certainly wanted to shift, but provided an extra challenge for quilting on a line. I decided after outline quilting that the purple silk fabric looked best with just an outline and didn’t need filler quilting. I plan to bind this quilt as is.
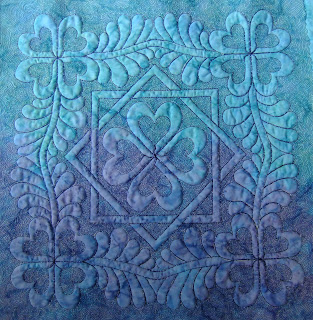
For the blue quilt, I marked this one using tissue paper just to see how that technique worked. Rather than quilt with regular thread, I stitched the outline first in water soluble thread just in case the tissue paper gave me fits and I wanted to wash the whole thing out.
Quite to my surprise, the tissue paper came off nicely, leaving only the white water soluble thread as an outline. When I sat down to quilt the video for this week, this quilt was the one I picked up simply because it was prepared and ready to go. I have another 3 marked wholecloths, but they required more work to prepare and I was running out of time. Those I’ll save for another tutorial later this summer.
After filling the entire quilt yesterday, I remembered the water soluble thread which will still come out when I soak the quilt. I needed to stitch the outline again in real thread and decided to play with another challenge.
I put a bobbin of Razzle Dazzle thread in the bobbin and navy blue thread in the top, flipped the quilt over, and using the water soluble thread lines as a guide, I quilted the outlines a second time with the back of the quilt face up.
This is a pretty easy technique, though the travel stitching can be very hard to line up properly. I did make quite a few mistakes in the feathers, largely because it was almost impossible to see my blue thread on the blue backing fabric. Next time I’ll use a lighter backing so I can see what has been stitched and what hasn’t.
I just had to remember to turn my top tension all the way up to 9 to make the top thread really pull that thicker bobbin thread in place securely. If you have a side loading bobbin, you might have to adjust the tension to feed the thick Razzle Dazzle evenly.
A few hours later, this wholecloth is finished with funky metallic thread as the outline:
So Malini – you probably go more than you bargained for with this explanation, but that’s exactly why I was using two different thread colors on the blue quilt this week!
Always remember that there are multiple ways of doing EVERYTHING. You might see me do something here online and not understand why it worked that way, so ask, ask, ask and I’ll always explain why I did what I did and how I did it.
Now for a question that came in via email:
Did you buy a machine specifically for piecing?
Full Question: Frequently I read blogs about how experienced quilters and sewers have multiple sewing machines that they use for different purposes (piecing, appliqué, etc.). I can understand that certain machines may be better for free-motion quilting, but a separate machine just for piecing? Are some machines really better at sewing a consistent 1/4″ seam than others? (I thought it was all my fault! LOL!).
Yes! I truly believe that some machines are better at piecing than others.
Mostly this has to do with the foot that either comes with the machine, or is sold separately, that is designed by the company as the 1/4″ foot.
There are many piecing feet on the market, but few are well designed. In my personal opinion, the very best 1/4″ foot made today is the Bernina Patchwork Foot. Unfortunately this foot is only made to fit Bernina machines.
Keep in mind that I’ve never pieced on a featherweight and I understand those machines are exceptional at piecing, but right now my absolute favorite machine for piecing is a Bernina. I don’t care what make or model it is – I always keep a Bernina in the house, and it usually has a patchwork foot on and is ready to piece.
So far I’ve owned a Bernina Record 830 (old model), Activa 240, Activa 210, Bernina 807, and now a Bernina 1230.
While the Activas were current models until last year when they were replaced with the E series, my personal preference has been the older machines. My favorite of all of them is the Bernina 1230, truly a dream machine! You can find these older machines on Ebay, and if the seller doesn’t know what they have, you can often get a very good deal on a very good machine.
Now that’s it for this week! I’m heading into the sewing room to start binding some of these quilts so I’ll have something to show you next week.
It’s time to shut up and go quilt!
Leah Day

I read your posts fairly quickly so I may have missed it BUT I didn't see an explanation of what "ruined" The Duchess. Is that a stain on the front or simply the lighting? I wasn't sure.
I agree with you, Leah. I have a Bernina 130 and it's the greatest for piecing. It's also the one I use for FMQ as it has a 7.5 inch throat. I'm thinking of a Janome Horizon and wonder how you like yours?
Thank you, Leah for your detailed explaination on using a different thread. I just curious like "Curious George" eager to learn FMQ :-).
You're are wonderful teacher.
I always thought there was something more into what you're doing. That's why I even wanted to wait for your tutorial on microstippling to finish my quilt.
Thanks again!
Malini
I have the Bernina 1230 and bought the new 57 foot for it. My seams were too scant and the pieces of blocks don't fit together. I went back to the 37 foot.
I prefer piecing on my Janome Gem Gold with their patchwork foot. Comes out right every time.
Hi Leah, Oh no….I was hoping you would answer the question I e-mailed to you in this week's "Question Thursday". I'm going to ask it again here in the hope that you might have a moment or two to respond:
I have a question about FMQ. I noticed you, as well as, a few podcasters I listen
to, mention that you do free motion quilting without dropping your feed dogs.
I don't understand how that is possible. When I set my machine up for FMQ the feed dogs automatically drop. I don't have a choice & I did review my
manual to see if that was an option and I don't see anything about it. I have a Pfaff Creative Vision.
If I try to FMQ when the machine is not actually set for FMQ
(as it would be for regular sewing) I can not move the fabric even if I set the presser foot
at the lightest pressure.
Help! What am I doing wrong? Or is my machine just not capable of doing this.
-debby
crowefan0517@yahoo.com
Hola Leah, soy Jacquelin (link no.2) y si vas a ver mi blog verás que yo usé el papel de seda (método que tu proponías como uno de los muchos posibles) y funcionó muy bien. El mayor problema con el que me he encontrado ha sido que al pasar por donde ya había cosido, a veces, el papel se rompe y se levanta un poco impidiendo ver exactamente por donde hay que pasar. Aun con esto creo que ha quedado estupendamente y cuando te lo muestre con microstippling ya verás. Gracias por tus consejos, tus diseños y todo el tiempo que nos dedicas a los que estamos ansiosos por aprender más, más y mejorar nuestras habilidades en el acolchado libre.
Hi, I have been sewing for over 40 years. I sometimes see ideas and try to make it I'm pretty good at seeing something and can duplicate it.
I had an experience making a childs quilt, I made it of course it wasn't exactly like the one I sewed, as everyone has thier own technique. The person saw it on the selling site, and wrote me a nasty gram to stop making them as it was her IP, can they stop me from selling my own design, although it was inspired by a picture someone showed me. I Love sewing challenges so I made it. It came out great. Now what do I do in this case.
how hard is it to do trapunto quilting and does it take a long time?
I don't think trapunto is very hard or very time consuming, but you need to understand that I really love it! It does add an extra 2 steps to quilting your quilt – quilting the motifs and then clipping the batting. I've updated the Heart and Feather project into a much more detailed workshop which you can find here: http://leahday.com/products/heart-wholecloth