
Quilt Along #2 – Quilting in Rows
After a full week of playing with simple stippling shapes, how are you feeling? Confident? Energized? Frustrated? Ready to chuck your sewing machine at me?
If you’re frustrated and annoyed, of course take a break, pour yourself a glass of wine and relax by piecing or appliqueing. Just do something that really puts you into a good mood.
But don’t give up completely. Come back to your free motion quilting when you’re calm and have managed to bring your shoulders down from around your ears. Come back to it when another thread break won’t send you into a screaming fit.
That might sound a bit hysterical, but I certainly remember the many times I had to step away from my machine in the beginning. When my thread repeatedly, and for no apparent reason, continued to break over and over and over again. Or if it didn’t break it just made a god awful mess on the back of the quilt.
I would step away, but I would always come back because I refused to let free motion quilting beat me. You have to have this attitude too: tenacious, determined, teeth gritted against the scary sight of ugly stitches.
In the words of my marching band teacher in high school: “If you’re not there now, GET THERE!” (That goes for both your location in relation to your sewing machine AND your attitude!)
Now that’s enough of a pep talk, let’s get down to business!
Last week in Quilt Along #1 we started out by going right back to the very beginning of free motion quilting with the first design most beginners stitch: stippling.
This week, we’re still working on Stippling, but now let’s focus on two things:
1. A more complex version of the design – lots more random wiggles.
2. Quilting this complex version two different ways into a quilt.
Let’s see how this works in this Quilt Along Video #2:
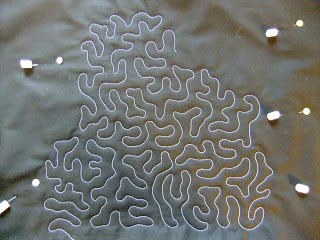
First let’s talk about creating a more complex version of stippling. Essentially all you have to do is combine the simple shapes we learned last week into a comfortable pattern. If that means repeating the same Peace Sign shape over and over and occasionally throwing in a Lobster Claw, so be it!
Everyone’s pattern is different, and just like writing your name, this is a personal thing. How many shapes you combine together and how complex your stippling looks is really up to you.
The point is to start PLAYING with it. Keep doodling at the kitchen table. Keep playing with these wiggly lines until you find something comfortable you can draw and stitch consistently.
Now let’s talk about using this more complex version of stippling in a real quilt.
How do we use stippling in a real quilt? How do we take this wiggly design and get it on the surface of a quilt so it’s consistent, it covers evenly, and we don’t end up backed into a corner or stuck in a weird area?
Now a complex side of my brain points out that there are MILLIONS of ways to do this. As I said on Sunday in Quilting in a Real Quilt #1, there is no limit to the number of ways you can use these designs in quilts.
But a more rational part of my brain informs me that I can’t teach you a million ways to stipple in a quilt in a 10 minute video. I’m going to have to simplify it!
So let’s start with the two simplest ways to quilt stippling in a real quilt:
1. Randomly – Just wiggle around. No rules. No rhyme and definitely no reason. Just wiggle.
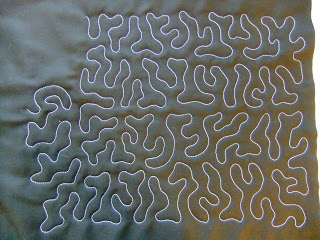
2. In Rows – Still wiggling, but in a comfortable row moving from the center to the edges of your quilt in a logical way.
First, let’s talk about randomly stitching a design. For this method, you start in the middle of your quilt and you just stitch. Wiggle anywhere you want, in any direction you want, and with any combination of shapes that will look good on the surface of your quilt.
For many quilters, this method works wonderfully. The freedom to move without rules or restrictions is very freeing. It also allows you to fill random spaces
Now for the downsides: When you don’t know where you’re going, or how you’re going to get there, how likely is it you will get lost along the way? Very likely.
Random stitching is just that – random. No rhyme and no reason, just wiggling around where the wind takes you. This means you can easily look down and find yourself stuck in an area you can’t stitch out of without noticeably stitching over your lines. It’s not the end of the world, but it’s also not something most quilters will accept forever.
I’ll honestly admit that I’m biased against this method. When I began free motion quilting, I only knew to stitch randomly over my quilts. I did this for years and I found it very tedious and very time consuming.
To prove this, I checked the recording time on both videos. I filled about 1/4 of a 24″ block with both styles of quilting and the random stitching took 10 minutes while the rows stitching took 5.
Who wants to spend double the time AND risk getting lost or stuck along the way?!
But it’s more than just speed, with random stitching I never knew where I was going. I never knew what was next, and I remember ripping out a lot of stitches when things didn’t work right.
In essence, randomly quilting a design over my quilt didn’t work for my brain.
I wasn’t doing anything WRONG, it just wasn’t working. It wasn’t easy. It wasn’t flowing. You may feel the same way when you try this, or you may not. The point is to try both methods and see what works best for YOU!
The wonderful thing is there is another method to this madness. A way to stitch designs over your quilt with a logical progression that always makes sense.
This is quilting your quilts in rows.
When you quilt in rows, you’re taking your design, in this case a more complex version of stippling, and you quilt a row starting in the middle of your quilt and running to one side.
How big is this row exactly? It is as wide as you are comfortable with.
This really depends on the scale of the design. On a 1 inch scale (1 inch of space between the lines of stitching), I’m comfortable with a 3-4 inch row.
On a smaller 1/2 inch scale, I can only handle a 2 inch row as you saw in the video.
In an even smaller 1/4 inch or less scale, I usually stick to a 1 inch row.
The first step to practicing this method of quilting is to stitch some rows across a quilt. See what you’re comfortable with.
Because you’re quilting in a row, this means you now have a consistent direction to stitch in. If you’re starting in the middle of the quilt, you can stitch to the right, moving the bulk of the quilt out of the machine arm, creating a solid row of stitching all the way to the edge of your quilt.
On the edge, you can wiggle your row down a bit, then stitch back, this time working to the left, or if that’s uncomfortable you can rotate your quilt and stitch straight down, interlocking this 2nd row with the row before it.
Once back in the center, you know exactly where to go next. This is an A, B, C method where you always know where you’re going and how to get there and what to do when you get there. There’s no guess work with this method, and almost no risk of getting lost or stuck.
Here’s a diagram of the way I stitched stippling in 1/4 of the practice quilt I was working on:
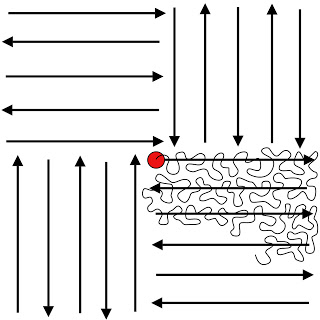 This particular method is called Quadrant Quilting, where you break the quilt down into 4 quadrants and quilt each one with rows of the design.
I’ve only filled a bit of this diagram so you can print it out and finish drawing over the lines. The arrows are intended to show you which direction you’re moving in across the quilt. See how this feels as a drawing, then try it on a real quilt.
But this is not the only way to quilt with rows!
What is the sashing on your quilts? That is a space that can easily be filled with a single row of stippling.
What is the border on your quilts? Another space that can be easily filled with rows of a design.
I’ve been brainstorming quite a bit on this and so far found many ways you can apply the rows to you quilts. We will most definitely play and experiment with this more, but for this week focus on Quadrant Quilting and see what it feels like to quilt a quilt or a block from the center in rows.
This lesson also goes beyond just Stippling or Independent Designs.
More than 80% of the designs I’ve posted to the project can be stitched in rows.
This not only makes the designs easier to quilt, it also makes your quilting faster and more logical.
Again, not everyone needs this form of control or step-by-step breakdown for free motion quilting. For those that love it, randomly quilting in any ole’ direction is great fun.
But for those who need firmer directions and paths to follow, quilting in rows is the most logical method to use.
So I hope you’ll enjoy playing and experimenting with this this week! Now let’s link up everyone’s blog and get this quilt along officially started!
Directions for Linking Up:
1. Write your blog post. Publish it on your blog.
2. Copy the link of the specific blog post. This is not just the link to your blog itself (www.freemotionquilting.blogspot.com), but the link to the specific post: https://freemotionproject.com/2012/01/quilt-along-2-quilting-in-rows.html
3. Click the blue link up button above and paste your link into the box.
Keep in mind that you’re posting your progress from LAST week on THIS week’s post. This is why we didn’t have a link on Quilt Along #1. This way you have time to watch the lesson, quilt in your studio, then post your progress to the next quilt along. I hope that makes sense!
As always, any questions you have, please post them in the comments below or on your blog and I’ll answer 5 tomorrow on Question Thursday.
Let’s go quilt!
Leah Day
I never realized I did this but I do mark the quilt into quadrants. I don't really use a marker but in my mind I decide just what I want to cover for that session. I usually start in the middle and then work my way around but I leave the borders for last. I like doing the borders when the interior is complete. I've never read it anywhere but seem to prefer to quilt this way. I only meander over the quilt. I'm trying to learn new designs. Thanks for justifying my sort of method!
Hi Leah,
A friend and I were just talking yesterday about this very subject! Although I love 'randomness' when piecing, having a fmq plan (i.e., stippling in rows) works best for me.
As always, thank you for your guidance 🙂
Best,
Jae
Thank you Leah, I have learnt something new today. I´ll try to work in rows ☺
Liebe Grüße
Bente – Germany
Oh, I so very like this quilt along series! I've been traveling for work, so I've not been near my machine, but my fingers are itching to practice away. I have a pieced quilt that I've put aside for a while and its just begging for me to play with. I can hardly wait! This series is just what the doctor ordered. THANK YOU SO MUCH.
Hi Leah,
I'm trying to figure out how to create my own blog so I can post my progress. Just catching up on my practice pieces as I have had a bug so did week #1 yesterday and will practice, practice, practice. You are making this so fun and I love learning FMQ. Thank you.
Marianne
Hi Leah..thanks for breaking this up for us beginners. Makes FMQ so much less overwhelming! Was wondering if you have a button for 'Quilt Along Wednesdays' that we can put on our blogs?
Best wishes,
Tina
Happy Scrappy – It's coming! I'm running behind on getting the grab a button up, but I'll try to get those details hammered out this weekend.
Cheers,
Leah
This Quilt Along #2 video is one of your best. You have a great way of breaking down the steps and emphasizing what is important. Thank you again.
Leah,
Thanks so much for this series! I finally worked up the nerve to fmq a whole quilt. A small one, mind you, but a whole quilt. I marked it off in quads and did straight row stipples just like you showed. Next time, I'm going to add the variations you showed us in lesson 2.
I can't seem to figure out how to link my blog to your post Leah. I'm not sure what blue button to click on to link my blog to show my stippling. Any help would be appreciated. Thank you. Marianne
This is very interesting! I will have to try this "rows' method as you call it. What I have always done, when stippling a large quilt on my DSM, is go around in circles. . starting from the outside edges than working my way to the middle. Round and round. Now that i think about it, this method Would take longer than doing it in 'rows" because i have to reposition my quilt much more.
Again, thanks for the tip.
I just wanted to say thank you. I have been freemotion quilting since my second quilt, but have avoided Edge to Edge quilting because of my first attempt. I did a stippled quilt in a random pattern on my third quilt attempt and did an AWEFUL job. I just now tried doing it with your idea (drawing on paper – plan to buy a longarm next year) and it looked 10x better than my practice with a random pattern. THANK YOU FOR THE AMAZING TIP!
Thank you for the great blog! I am attempting free motion quilting. My question is how do you get your quilt to move so smoothly. I use the gloves but seem to get little spots where my quilt gets stuck or "hesitates." When this happens it is definitely noticeable in the quilting. Help!