
Playing with Speed
Speed really seems to be the key with free motion quilting. The speed of your needle moving up and down has a large effect on how comfortable free motion quilting will feel and how good it will look.
If your machine is moving too slowly, your stitches will become very wide across your quilt. The wider your stitches, the less smooth and soft your curves will be.
Running too slow can also cause “tension” issues where your machine lags behind your hands so badly the bobbin thread pulls the top thread to the back of the quilt, creating loops that appear to be a really funky tension issue.
 Likewise if the machine is running too fast, your stitches will become very small and dense. Anyone that has ever had to rip out stitches like this will know just what a pain in the butt they can be. They’re so small they practically embed themselves into the fabric and have to be ripped out one by one.
 Running too fast can also cause you to feel very out of control and overwhelmed by free motion quilting. If it feels like the machine is about to take off and run out of the room with you clinging to the back, hanging on for dear life, it might be a good idea to slow down.
So where is the happy medium?
Honestly this is different for everyone. Some people stitch with the machine running very fast, others stitch at a medium speed, and still others stitch at a slow speed.
The key with all of this is FINDING the speed you feel comfortable with, then matching your hands to that rhythm.
So here’s a little exercise you can play with along with those lines of stippling:
Use your foot pedal like the gas pedal in your car. You don’t just slam your foot on the gas do you?
SLOWLY put your foot down and SLOWLY increase your speed until you feel you’ve reached your comfortable limit.
While stitching your row also play with slowing down the machine, slowing down your hands and stopping with the needle in the down position. Reposition your hands, and slowly start stitching again.
Starts and stops are NECESSARY! You can’t just stitch a whole quilt without stopping! You have to be able to slow down and stop, slowly speed up, maintain a steady speed, then slow down again.
The first time you got behind the wheel of a car, chances are you mashed down the gas with a 16 year old’s exuberance, but because you didn’t have a lot of experience controlling the car and the speed at the same time, you quickly had to stomp on the brakes.
Sewing machines don’t have brakes like a car, but here’s a really cool secret:
you will STOP stitching!
Shhh! Don’t tell anyone I told you!
My silliness aside, this is a pretty important point. If you ever feel overwhelmed, like your machine is getting away with you, just take your foot off the pedal.
Now the second part of the equation is what your hands are doing: Moving your quilt under your needle.
Again, just like how fast you run your machine speed, how fast you move that quilt over your table top is a personal thing. Some people move it pretty fast, other people move it slow.
The key here is to get to the point where your hands and foot are in sync and creating a balanced stitch that isn’t too big, isn’t too small, and isn’t getting wild during any particular part of the design.
The great thing about this practice exercise is this is the perfect week to play with this!
Take the simplest form of U shape stippling and run that across a practice sandwich in rows.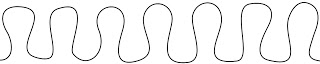 This form of stippling is very simple, but it still might take 5 rows or so before you become really familiar with it.
For the 6th row, stop focusing so much on your hands and instead focus on what your foot is doing.
At the beginning of the row, start slowly, pressing the foot pedal down slowly and steadily until you come to a comfortable speed.
Halfway through the row, slow down your machine speed and ask your hands to accommodate this speed change by also slowing down.
Stop with the needle in the down position and move your quilt around so you can see better. Begin stitching again, slowly increasing the speed of your machine and the speed of your hands until both are back up to normal flow speed.
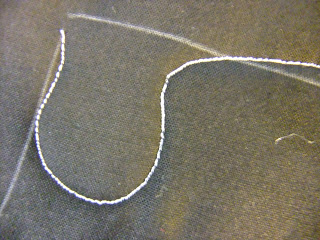
Your aim here is to get comfortable with starts and stops and eventually get to the point where they are not obvious on the surface of your quilt. You might notice right now that when you stop and reposition your quilt, you have a bit of a wiggle or a jerky line as you get started again.
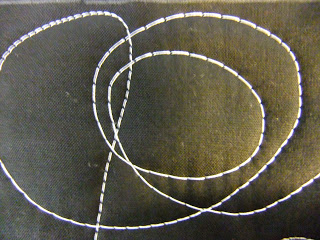
These are all normal signs of needing to stop and reposition your quilt. Don’t let it bother you or frustrate you. It’s normal to struggle with this until you get more practice.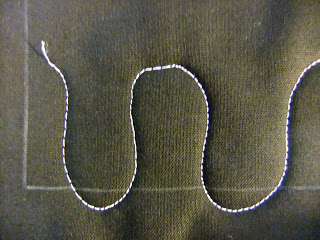 Can you tell where I stopped and started? Yep, on the top of that big wiggle!
When you get to the end of your row, slow down again as you near the final stitch. How much better are you stitching this time?
Do this for several more rows! Getting more comfortable? Keep stitching the same line over and over again.
Get so comfortable with it, you’re bored with it.
Then stitch it some more, always practicing your speed control over the design.
Eventually you will become so comfortable with certain aspects of the design that your hands will start moving faster through certain sections. I see this a lot, even with beginning quilters who claim to never have touched free motion before.
Certain shapes, certain angles, certain curves are going to feel very natural for your brain to create and your hands will automatically speed up in these areas because they’re happy.
It’s like your hands are saying “YES! I know this part! See, I can do it fast!”
You will notice these sections if you look at your rows and see wider stitches in the same areas through each design element. The wider stitched areas mean your hands were getting happy.
So try to make your foot happy too! Speed up your machine slightly to accommodate the speed of your hands in these areas, then slow back down as you stitch out of them.
As always, practice these ideas, but don’t drive yourself nuts with them.
If you’re feeling very confused and overwhelmed, just shut up and quilt and figure it out on your machine. It’s really just thread and fabric and batting after all – it’s nothing to get too worked up about understanding every minute detail before you try it.
Now I’m going to shut up and quilt too!
Leah
I love how you help keep things in perspective. It is just thread and fabric and batting. I know it all costs money, but most of us have scraps and I am trying to practice with ugly thread colors I have leftover from clothing projects of years past. I was so afraid to jump in that I finally took classes and it really helped me. What you have said here makes me think of learning to drive with a clutch and the time it takes to coordinate the clutch and gas pedals. That is how I feel it is learning to coordinate your hands and foot in FMQ. You start out really jerky, but with practice it becomes second nature.
Can I say I love the humor you put in your info! It makes it so fresh to read! I am that gal, too! As always thank you for your insights!
Very detailed post. You have a great way of explaining the job.
I bet there are some readers who would love you in their sewing room with them while they are trying this.
I have found problems with this from switching from quilting small designs to a bigger scale. When I was doing the little FMQ sandwiches and quilting more densely, I hardley ever has eyelashes and my stitch length were neither to big or small. Now that I'm going for the bigger scale, I'm having the eyelashes. It looks like I will have to rework my rythem depending on the scale I use, which is typically the last thing I would think about. I have been worrying about everything else, like changing needles, thread, tension, oiling and lent cleanup. I didn't even think of this. Thanks for posting on the subject. I hope this makes sense!
thanks for the great tips. I am practicing.
Hi Leah, I find your silliness refreshing and relatable, your explanations & photos wonderful. I'm finding worn cotton sheets are providing the perfect practice fabrics I need for these exercises 🙂
Leah!!! First I would like to say thank you for being a guest on my blog. http://www.sallysquiltingcorner.blogspot.com I have gotten some very positive feedback… 2nd this post is spectatular. I always learn something new everytime I read your blog… Thank you for helping out with all these tips…
Dear Leah, thank you for your refreshing change in sharing your knowledge of FMQ, I love it, its great.
There is a difference, when it comes to stopping, depending on the machine you're using. I sew on a vintage machine, which is great for FMQ, except that it does not just stop right when you let off the pedal–the motor actually winds down and will take a few more stitchs. You have to anticipate that in how you're moving the quilt and it can be a small challenge.
oh, thank you so much for all this detailed information! This is exactly the kind of help I was looking for!