Quilting Around an Applique or Motif
Every once and awhile, I’ll receive basically the same question by 3-4 people in one day. Whenever this happens, I know it’s a sign I should write an article answering this question because it’s obviously on a lot of people’s minds!
So here’s the question I’ve recently received from two awesome quilters today:
I am making my grandson an alphabet quilt and I’m also just learning free motion quilting. I have a problem imagining something beforehand and need your opinion for what stitch to use around the letters in the quilt, and how this will work to quilt it. – Debbie
My question is, and this may sound stupid (sorry) but you never show quilting around an embroidery design or applique. I’m very into those and am unfortunately the type of person who has got to “make pictures” in my mind to be able to do it. I, for instance, like your simple quilting designs, like the straight up and down’s or the ‘side to side’s’ and they don’t seem to ‘fit’ in with a block with a embroidered design or applique which mustn’t be quilted over. Am I rambling or do you understand what I’m getting at? – Margaret
Oh, I definitely know what you’re getting at Margaret! I’ve actually kind of covered this in the Section Quilting Tutorials, but here’s a refresher on just quilting around an Applique or Motif:
For illustration I’m going to use Debbie’s idea above and show quilting around an appliqued letter shape in a block:
 1. Stitch the block and applique in the ditch. This will secure the edges of the block and the applique shape in the quilt so you can take any pins out that could get in your way.
This will also give you useful Boundary Lines that you can travel along if you get stuck in an area.
It will also look better on the back of your quilt. While many people say they don’t care about this, I know EVERY time someone looks at my quilts, they flip them to the back to see what that side looks like. Stitching in the ditch makes the backs look better.
 Let’s pretend this block has been stitched in the ditch (that’s the white lines around the edges and around the letter. I had trouble getting this perfect in my graphics program.)
2. Pick a Design – There are a few design types that work best for this style of quilting: Independent Designs, Pivoting Designs, Echoing Designs, and Stacking Designs.
Pick just 1 design and practice quilting it in a plain, open block. Get some practice quilting it first, then you’ll be ready to try it around the applique.
Some good designs to start with are Stippling, Wandering Clover, Paisley, Echo Shell, and Pebbling.
3. Fill the area around the applique – There are no rules for this! Just start somewhere and stitch the design you’ve practiced, filling the space evenly around the applique.
I find working from the left corner of a block, to the right works best for me. I generally work in rows when I can, or I just try to fill each weird area completely so no pockets of open space are left.
For this block, I started on the red dot and finished on the blue dot.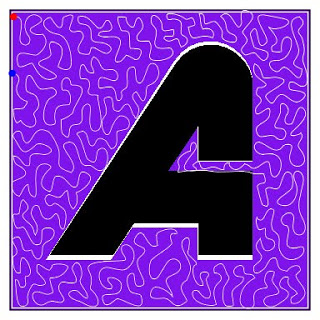 See how I filled that center area of the A, even though it was really narrow? It might not look great here because I can’t draw as well as I can quilt, but you can see how I used the stitching in the ditch line to help be get into and back out of this area easily.
4. Fill the applique with another design (optional) – If the applique shape is big, like a Dresden plate, you might want to go inside and stitch another design within it. It’s really up to you and what you think the quilt needs to look beautiful!
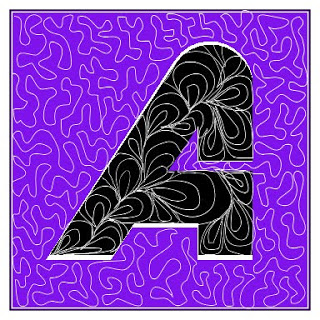 I hope these horrible little pictures help. I’m really terrible about drawing on the computer, but maybe you can see what I’m trying to show here.
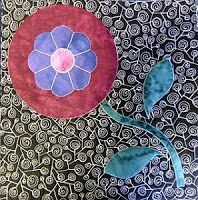 For more photos and a few videos showing you how to stitch Lollipop Chain around some cute applique blocks, click here.
This is something I do plan to show a lot more of in the future – quilting and using the designs from the project in real quilts that have applique shapes, pieced shapes, or drawn shapes, which I call motifs.
It’s really not that hard to master this, but it does take practice knowing the design you’re stitching, how it works, and how it can best be manipulated to quilt into and around complex areas of your quilt.
Just start with one design, play with it for awhile over an empty block to get the hang of it, then stitch it in your next quilt around the appliques. It’s really a lot easier once you try it!
Let’s go quilt,
Leah Day

Great post! I've also been trying to figure out how to use designs around applique. My favorite quilts are pieced with applique in borders, or in blocks, so this is something I really need to master.
Leah you are concerned about your drawing skills using the computer – why not try a tablet and draw your designs on the photo that way
I know that some quilters design their whole cloth quilts that way
Ethne – That WAS on a tablet! I'm simply terrible at it.
Yes, I know more practice would make me better, but honestly I just like drawing on a piece of paper with a pencil the old fashioned way.
Cheers,
Leah
Leah, your timing with this post couldn't have come at a more perfect time for me. I'm working on a quilt right now that has flowers and vines appliqued over a pieced trellis (diamonds) pattern. I've been debating just how I'd quilt it. Thanks.!!
I love this post 🙂 and would be very happy to see more of them – even if you think your drawing skills are crappy.