
My Cup Runneth Over – Part 3
Isn’t this amazing? My Cup Runneth Over is now more than 50 % pieced!
 I couldn’t help myself last night. I stayed up until 1:30 am because I was just having so much fun fitting the pieces together.
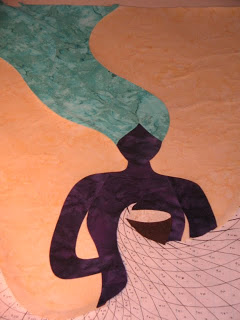
I ended up piecing this girl in sections:
First I glued and pieced her hair together with her face. Using an applique piecing technique I was able to glue, then stitch these curved seams so there will be no annoying applique lines over them.
There are actually 6 separate pieces to the hair, which isn’t obvious now, but will be after the quilting. I choose to use the same fabric, but will change the look using dense quilting stitches in a darker, turquoise thread.
Next I connected her body pieces together. These were a little tricky and I started having some issues with the purple batik making an obvious line across her chest area where the arms connect.
If you look on the right arm you’ll see what I mean. Maybe I’m just being picky, but after playing with that area for a little while I just decided to fix it during the quilting process.
I already know she will be quilted with contrasting lime green thread so variations in the fabric color aren’t going to matter much.
While I normally don’t believe the saying “It will quilt out” in this situation, it will because there is going to be so much thread on the surface of her body, the purple fabric really won’t show that much when she’s done.
Finally the cup section was the last to work on and I ended up redesigning it. The pieces were just too small and they weren’t coming together well at all.
Also the cup area is pretty weird with how the water is going to swirl up and into it, so I could get away with minimizing the piecing in this area.
I did manage to actually seam the cup to the body section, so both the hair and body sections could then be glued in one solid piece to the yellow background.
The edges of her hair, face, and body will now need to be appliqued to the background.
As you’ve probably picked up from my blog posts before, I’m not the biggest fan of machine applique. I just don’t like the very noticeable zigzag running along the edges of my pieces.
Call me weird, but even in invisible thread, the look just drives me crazy!
So I’m going to try something new. I’m going to try straight stitching these edges down about 3/32 away from the edge. This is a space that’s a little bigger than a 16th and a little smaller than 1/8″.
I think a straight stitch will give me more of the look that I want and less of the bulky zig zag. Or if that doesn’t work I’ll hand applique these sections down.
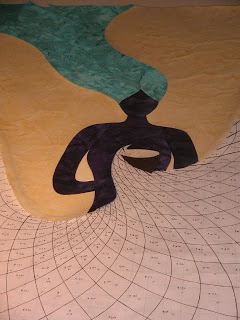 I still have a day or two to figure out what I will do because I still need to piece the blue water together.
These pieces will gradually shift from light colors to dark colors. Using Sharon’s piec-lique technique again, I think this will actually go together very quickly once I get all the itsy bitsy pieces finished.
I’m off to go play with glue, starch, and fabric!
Let’s go quilt,
Leah Day
If you're up until 1:30am, you must be creatively obsessed! Nothing wrong with that! It's a wonderful place to be.
It looks very good to me, I will follow your progress
mia from the netherlands
I like how she is coming out!! Beautiful already!!!
McKenna Ryan does some awesome applique with straight lines. Her web http://www.pineneedles.com/Company/help.asp
I am absolutely bowled over by your talent for these goddess quilts. Your cup truly runneth over!
I've been curious to see how you are going to do the water. That's very challenging. Are you going to use piecelique for that too? That would do it.
Leah, I think the single stitch on the applique looks a lot better than the zigzag and I'm sure you'll like it better too.. I'm practicing your tutorials on my mid-arm and they look great… Can't wait to order your dvd. You're the greatest!!
Gail from Rock Hill
Looks lovely! I'd love to make something like this! Nice work…will be great to see more!
Wow Leah this is just awesome…
She is coming alive before my eyes! You are so talented Leah!!
You certainly give inspiration Leah. Since following all your techniques the sewing machine is like a magnet. Many thanks for sharing.
Oh how I agree with you re the zig zag or blanket stitch or even satin stitch – unless they are meant they are way too heavy – as you will be quilting the straight stitch to hold the pieces in place – and they will most likely disappear into the design with or under the FMQ
It's looking brilliant so far and we will all be looking forward to the next installment – great work Leah
I keep catching on your progress i cant get over this it so neat. YOu are so talented.! Thanks for letting us watch.