
My Cup Runneth Over – Part 2
Gosh! My cup really is running over today! Super thank you to everyone who has pre-ordered copies of Free Motion Quilting Basics.
It really makes me feel great that all this hard work is really paying of and is appreciated.
Today I’ve gotten back to work on the quilt My Cup Runneth Over because she’s now clamoring to be made and won’t let me sleep.
I seriously laid in bed last night arguing with myself on how it’s going to be pieced. Ugh, of all the things to worry over!
So I woke up this morning ready to get this girl together, or at least get it closer to together.
But there are always those days in any project where you just need to take your time to gather materials, prepare fabric, and set up your space for the quilt.
Most of the day I’ve ironed, ironed, and IRONED fabric. I always starch one side, then flip it over and iron the opposite side so the starch really bonds to the fabric.
I want the fabric to be really stiff and firm so that while I’m piecing the 300 little pieces of blue fabric together they don’t shift out of shape and turn into little fabric blobs.
And how do I know it’s 300 pieces?
Because in order to do this technique I needed to number each little piece, draw an arrow on it to indicate the grainline, and a color code letter (l for light, m for medium, and d for dark fabrics) so that I know what order these little pieces go in, positioning, and color choice once I’ve cut them all apart.
I’m using Sharon Schamber’s Piec-lique technique, so I’m not going to share the specifics of how this is done exactly because Sharon does such a great job of that herself. I learned this from her new video on making the Quilt Fairy.
While watching the video I was very skeptical and kept asking “Do I really HAVE to do all that?“
But after pondering that very question all night long, I’ve decided to just take her advice and follow every direction exactly. I can change things up with the next quilt I try, but for now I’m just going to play by the rules.
And part of the rules is numbering and labeling every little piece until I’m sure Martians could put this quilt together. Ha!
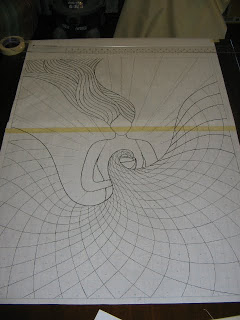 But the master pattern and templates are finally done, the fabric is ready and all that’s left is to set up and start putting the pieces together.
The final thing I had to prepare was a larger pressing surface. This quilt is 36″ wide and the widest pressing surface (ironing board) I had was 24″.
Because this quilt is going to be so meticulously pieced, I didn’t want to run into any problems so I spent the evening building a new ironing board.
I learned this technique also from Sharon Schamber and it’s really not difficult. A large staple gun, hammer, heat and bond, plywood, cotton batting and canvas is all you need to make a really solid pressing surface for piecing and applique.
So that’s really all of part 2 – taking the whole day to get the pattern done, prepare my workspace (I’ve finally moved back downstairs and out of the living room, much to Josh’s relief), and get all the fabric ready to go.
Now hopefully I’ll sleep really well tonight so I can get this whole quilt together tomorrow! Ha!
That’s probably wishful thinking, but I’m just so excited about working on this quilt.
Let’s go quilt!
Leah Day
Leah – what a great day! I too stay awake figuring out things but my best inspiration seems to come in the shower, I regularly run out of hot water! I too a piecelique class from Sharon and she is very meticulous but the results are worth it if that is what works for your project. I am finally learning that sometimes you just got to do it no matter what.
Leah, you are sure a ball of energy!! And so inspiring to many.
Congrats on your new DVD's. Of course I will be ordering mine..
I've got Sharon's book and love the technique (though I've only played a little with it so far) – I've also used her video to make my own little ironing mat and really love her way of basting as I can't grovel around the floor to baste a top, plus the stitched basting makes it so much easier to move a top around at the sewing machine – no catching up on projecting safety pins etc.
I hope you are going to share some photos of your WIP with us, pretty please.