
Quilt Along #21: Filling a Modern Quilt
Are we having fun yet?! I really hope you’re having fun with this modern quilting project!
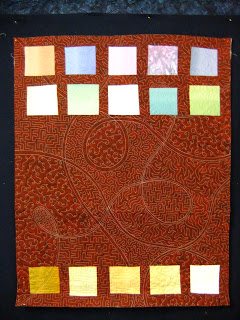
This week we’re going to finish up this project by filling each section of our Zen Break with a different design. So far this year we’ve learned Stippling, Sharp Stippling, Zippling, Circuit Board, and Loopy Line. Each of these designs can be used to easily fill a section of the quilt like this:
But photos only do so much. Let’s see how this works in a video!
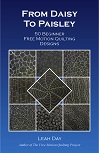
If you’re looking for even more easy, beginner level designs to play with, check out the ebook From Daisy to Paisley which features 50 beginner level designs! Click Here to check it out now.
Let’s start with a quick review:
In Quilt Along #19 we learned how to piece our blocks in a super wonky fashion.
In Quilt Along #20 we learned how to put them together and break them up with a simple Zen Break – a wiggly line that divides the quilt randomly so it can be quilted with multiple designs.
This week we have a very easy job: fill in each section with a different design!
Because the quilt is largely secured thanks to the Zen Break, you can start quilting anywhere you like. No, you don’t have to quilt from the dead center of the quilt, unless you really like to.
It’s a good idea to take a minute before jumping on the machine to look at your quilt and decide how you will move over the surface. With this quilt, you really can move from section to section easily by simply travel stitching over the Zen Break lines.
 |
| Easily wiggle from the Stippling area to Zippling area by stitching on the Zen Break lines |
Another thing you might want to put some planning into is where each design goes. Yes, this quilt is supposed to be a lesson in imperfection, but I still get obsessive about having two identical designs smacked right next to one another. I penciled in names of the designs so I wouldn’t end up with a Stippling section right next to another Stippling section.

Once you get that small bit of planning out of the way, stick that quilt under your needle and get started! The goal here is to fill each space consistently, but in a logical fashion so you don’t end up locked in a corner.
Of course, if you do get locked in a corner, what do you do? Travel stitch back out! Find the nearest Zen Break line and use it to get out of a tight space if needed.
The only design that’s a bit tricky to apply is Circuit Board. This design isn’t wiggly, and it’s based on straight lines and right (90 degree) angles. This particular design is trickier to apply to wiggly wobbly areas, so it helps to mark some straight lines that serve as a base for this design.

So that’s it for this quilt. Just take these five designs and stitch them in each section of this quilt. Now I’m going to shut up so you can go quilt it!
Instructions for Linking Up Your Blog:
1. Write your blog post. Publish it on your blog.
2. Copy the link of the specific blog post. This is not just the link to your blog itself (www.freemotionquilting.blogspot.com), but the link to the specific post: https://freemotionproject.com/2012/01/quilt-along-2-quilting-in-rows.html
3. Click the blue link up button above and paste your link into the box.
Keep in mind that you’re posting your progress from LAST week on THIS week’s post. This way you have time to watch the lesson, play with the ideas, then post your progress to the next quilt along. I hope that makes sense!
Let’s go quilt!
Leah Day
This is fun! Leah, congrats on your machine quilting article in Quilter's Newsletter. It was awesome to see you in there. It was a very well-done piece 🙂
What kind of drape does the quilt have? It is looser than your dense fillers, but still seems pretty dense for a throw.
Absolutely gorgeous though. I haven't been quilting along with this, because I have too many projects, but now I want to do my zentangle quilt for sure (I got the book awhile ago, and love your take on it.)
Leah,
I'm plodding along…got the quilt based yesterday (the 4th) and untaped from my floor! Onward
The zen breaks were the final piece I needed to make FMQ click. Now I see the BEAUTY and the freedom of the entire process. Thank you so much for sharing.
Reminds me a lot of Zentangles! I am working on a quilt where I think this approach will work well. Thanks!
Hi,
I'm doing my echo "channels" but everytime I stop the needle (needle down) to move my hands – every 6-8", I get a "wobble" or a "v" or the needle double stitches when I start up again. How do you prevent this?
@ Suzanne, if it helps, I use a basic machine to do FMQ and what I've learned to help prevent wobbles and mis-alignments with stops and starts is after I have put my needle down, I adjust my quilt then I make another stitch just turning the wheel by hand and bringing the needle up, move the quilt a tiny bit in the direction I am going to stitch and putting the needle down again. I've found some machines tend to abruptly start or get stuck because you haven't finished the stitch completely on the machine or the machine considers the needle down position an incomplete stitch. It seems like a bit of a pain but after awhile it becomes habit and it makes a much smoother transition during the stop/start.
Leah, QUESTION THURSDAY THINGS
Well, I'm nearly finished with my quilt…only two sections left to go so here are my questions for tomorrow…
1. Before I asked how to you keep from showing your stop/start marks when you switch hands (on the straight lines)
2. Now I see that I'm having trouble with jumping big stitches at places where I change directions – like across the top of a straight place in "circuit boards" or when rounding a curve on meandering
3. I have trouble with keeping either a straight line (circuit board, for example) or a smooth line (meandering) because sometimes I soften a line when it should be curved and vice-versa.
4. I simply cannot seem to stitch some designs at 1/2"…my circuit boards and loops are all at 1/4" or smaller…suggestions?
5.Even though I'm nearly finished with the quilt (I made it about 60×60), I still cannot get my stitches to be consistent…some teeny tiny and some long and loopy
6. I can't seem to get the hang of what I call your "flame" stitch…it is the one that meanders with pointy ends….is it possible for you to post paper patterns/drawings so I could print them out and follow along (I remember in jr. high school following along a straight line pattern printed on paper until we got it right.
That's it.
I'm looking forward to moving along to another stitch. I've found that I'm a lot better off stitching on a REAL project instead of just samples….even though the quilt isn't going to be going anywhere were it will be on display! It makes me feel better.