Quilt Along #19 – Piecing Modern Quilt Blocks
It’s time for a new Quilt Along and this week we’re NOT free motion quilting!

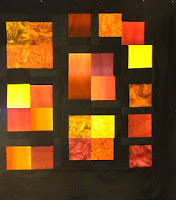
Instead we’re going to start piecing a fun, funky modern quilt top. Josh has named this quilt the PoMo Angles Quilt, and that name was just silly enough for me to fall in love with it!
The first step is to gather your fabric. You will need:
1. Background fabric: About 1 to 2 yards of one color of fabric. This could be a solid, this could be a fabric that reads solid (batik), this could be a large pile of scraps, this could be an old window curtain.
Yardage will be easier to work with, but if you’re willing to work harder, a scrap stash could definitely work!
Cut this fabric into strips between 2.5 – 4 inches wide.
2. About 15 – 30 squares of some other color. You can cut these around 6 to 7 inches, or you can cut them bigger or smaller, depending on your mood.
As you can see, this materials list isn’t very exact.
The piecing instructions that follow will also not be exact.
Your finished blocks will not be square or perfect or exact in any way. That’s what trimming and squaring is for 😉
Understand going into this project that you are traveling down the Road of Wonky where Imperfection is not only your friend, it’s your BEST friend. Let’s push our edge to create something new and fun and without all the typical rules of matchy matchy blocks and perfect seams!
Of course, the best place to start is with a video:
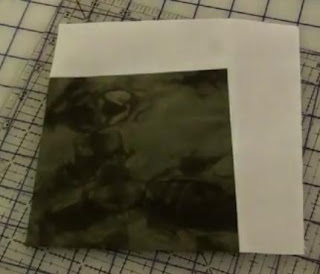
Here’s the basic steps to piecing your modern L shaped block:
1. Piece a strip of your background fabric to one side of each square.
2. Press the seam however you like and square off one side.
3. Piece another strip of the background fabric to a perpendicular side of each square.
4. Square up the blocks to one single size (i.e: 7 inches, 4 inches, 10 inches, etc). Feel free to play with the angle of your ruler to make the inside square super wonky!
That’s it! Try not to obsess or over-think this process. Just sew on the strips and then square up the blocks to create simple wonky L shaped blocks like these:

Instructions for Linking Up Your Blog:
1. Write your blog post. Publish it on your blog.
2. Copy the link of the specific blog post. This is not just the link to your blog itself (www.freemotionquilting.blogspot.com), but the link to the specific post: https://freemotionproject.com/2012/01/quilt-along-2-quilting-in-rows.html
3. Click the blue link up button above and paste your link into the box.
Keep in mind that you’re posting your progress from LAST week on THIS week’s post. This way you have time to watch the lesson, play with the ideas, then post your progress to the next quilt along. I hope that makes sense!
Time to Shut Up and Go Quilt,
Leah Day

Hi Leah,
Just stopped by to say hello and let you know that……no matter how many times I've tried to link up it is beyond my computers technology to do so. I just purchased 3 of your books at Amazon and can't wait for them to get here. I've seen the patterns here many times but it will be so nice to have them close at hand. Keep on quilting and teaching Leah. You do good work. One of your cyber friends. Jeani Kroos or jeani2u
Leah, I am super excited about this modern layout. I have seen a couple pictures of different ones foating around on internet sites and thought this would be perfect type of project for some purpleish multi colored batik fabrics I was given in a secret sister swap last year. I have choosen a dark purple fabric for setting it together. I can't wait until I get home from work tonight to get dear hubby to help me cut it all out so I can get started!
Thank you so much for making all the tutorials you do as I am sure they are very time consuming. You are so creative and expressive in your designs.
Amy in Colorado