
Upgrading to Quilter’s Creative Touch 5 (QCT5)
Click Here to learn more about QCT 5. This package includes the creative touch motor to drive your machine, belts to attach to your frame, and the software to pick designs and place them on your quilt as you saw in this video.
Click Here to check out the tablet I’m using (affiliate). This is the only thing not included with QCT 5 and it must be a Windows based tablet with a full sized USB port.
How to Upgrade to Quilter’s Creative Touch 5
I usually keep my tablet in airplane mode, but one day last week I was online and saw there was a new update for Quilter’s Creative Touch 5. If you already own QCT 4, then this upgrade to Version 5 is free.
To download the update, open the software and tap on Help, then Software Management, then Check for Updates.
** Make sure your tablet is connected to the internet so you can download your Quilter’s Creative Touch Update! **
I selected “Update now from online files” and the download began. After the first file downloaded, the program shut down and the tablet prompted me to agree to installing the software.
After clicking “yes” the software opened up a download wizard to set up the QCT5 software on my tablet. Basically keep clicking yes, or next until you reach the end and it will do another lengthy download with little green bars filling up a rectangle.
Now for the Confusing Part!
After clicking “finished” on the download wizard, the icon for Quilter’s Creative Touch had changed to be QCT5. I double tapped to open it and then it ran through a new series of computer gobblety gook.
Then it did something confusing. The software prompted me with a button to “load drivers.” Umm…
When I clicked on that button, it sent me to the QCT files on my tablet, but I had no idea what I was looking for! I ended up just clicking the “X” button in the top left corner to close that down and then “okay” twice to close that out.
I’m still not sure that was the right thing to do or not, but the next thing the software did was load the drivers by itself. The program restarted itself, then asked me to say “yes” to a firmware update.
The QCT5 Upgrade Dance
After clicking that, it prompted me to turn off the longarm, but leave the carriage on.
After another short wait while the software downloaded more magic, it prompted me to hit a button on the side of the QCT motor on the carriage. This will be located on the same side you have 2 cords coming out of the motor and plugging into the back of the longarm.
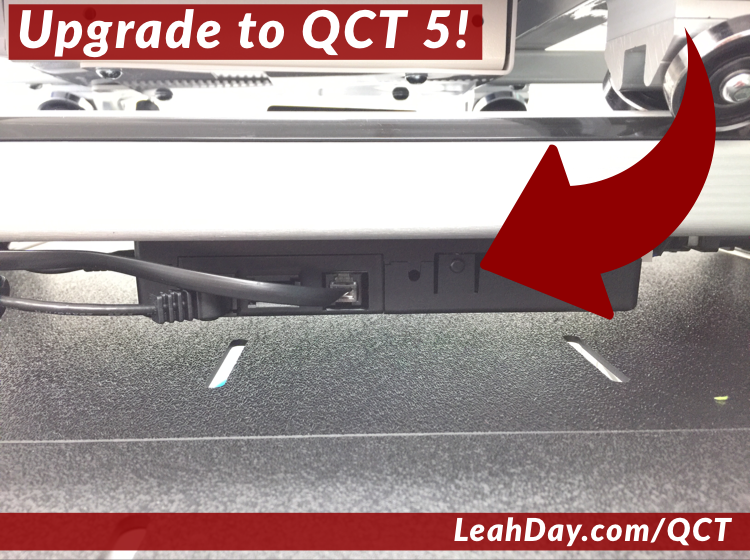
There’s the button to update your QCT firmware!
After dancing around to the back of the machine, I danced to the front and clicked “okay” and more blue boxes slowly filled a long rectangle.
When that got finished, the screen prompted me to power cycle the motor carriage, then turn the longarm / machine back on. I had to quickly run and ask Josh what “power cycle” meant. Power Cycle means turn it off, then turn it back on again.
So I turned off the carriage using the surge protector on the back of the carriage, then clicked it back on. Then I clicked on the longarm.
After confirming I power cycled the carriage twice, the program shut down completely. I then double tapped to open it back up and YAY! It’s updated fully to QCT 5!
Select the Correct Frame for Quilter’s Creative Touch 5!
It went through the usual start up and moved the carriage around a bit and made some noise. A few things changed immediately upon opening the software. If you click on “Select and Sew” the first thing the software asks is if you have a Hoop Frame or a Rolling Rail Frame.
A Hoop Frame refers ONLY to the Q-Zone Hoop Frame. This style of frame works very differently for the QCT software because of the way you have to clamp the quilt and shift it through the machine. Yep, I’m planning to share videos on this soon!)
So unless you have the Q-Zone HOOP Frame – do not click that button! Apparently that is causing a lot of issues for a lot of users.
How do you know what frame you have? Read the name printed on the side of your frame! If it says HOOP, then click on the Hoop frame icon.
If your frame doesn’t say HOOP, you must have a Rolling Rail frame. The Q-Zone Queen Frame and Continuum frame are rolling rail frames, along with all other Grace Company frames made in the past. Please take the time to check!
New Platform for Select and Sew Designs
Yes, the entire platform for select and sew designs has changed. I’d only used QCT4 for a month, but I was pretty attached to the way it worked and I wasn’t all that happy about the way it had changed.
So after going through the five stages of grief, I pulled on my big girl panties and got to work. Basically all the capability is still in the program. But some features have changed names and locations as if they don’t want to know we know they’re still there! LOL!
Picking a design is still very much the same, but how you place it has changed. Roll the longarm over to the corners of the space you want to quilt in, then tap the tablet over the corresponding corner of the design. The corner bubble will go from gray to green when it’s selected:
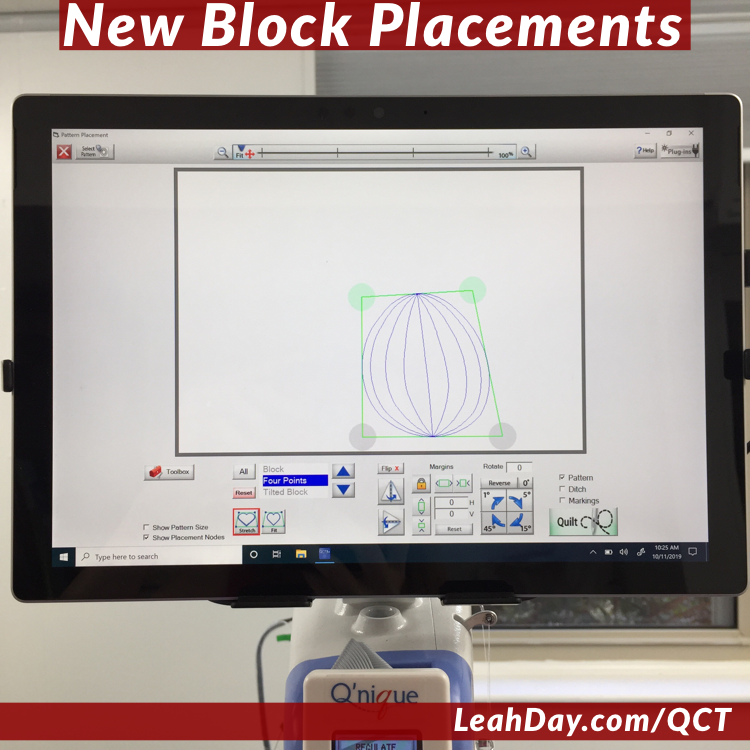
The gray dots represent points that haven’t been placed yet. They go green when tapped to indicate the position of the longarm.
Repeat moving the machine around to select all the points depending on the placement method you’ve picked. One thing I don’t like is how tiny the buttons have become. I picked up this pen for my tablet (affiliate) and it’s working great, but yeah, why are the buttons so small???
Stitching in the Ditch and Echo Ditching and Drawing Lines
Another thing that changed is the way stitching in the ditch works. It is entirely dependent on how you place the design now. You cannot adjust the ditching line independently of the design. So if you resize a design to 5 inches, the ditch will stitch 5 inches around it.
So if you like echo ditching like I do, which means stitching 1/4 inch away from the ditch instead of IN the ditch, you’ll need to use the Marking Tool.
This is a new tool, so you’ll find it in the toolbox! Tap on that icon on the left side, then scroll down to “Marking Tool.” You’ll need to select “Add Marking” and then name it. I called my “ditch” but you could name it Fred if you wanted to because it honestly doesn’t matter.
Now you move the longarm to where you want the echo ditching to begin and tap “add.” Keep moving the longarm and adding points like this as much as you like. You could create your own designs in a very rudimentary way using this feature. Anything with straight lines and sharp angles would work great!
More Design Capability for QCT 5 Beginnings
Once you’re happy with your design marked with the Marking Tool, go back to the Toolbox and select “Placements” and this will take you back to the settings for placing your block.
We have a lot more capability with QCT 5 Beginnings such as being able to flip and rotate the design around. I don’t know if this was available before… I hadn’t found the buttons yet if it was something we could do!
You can also select whether you want the design to stitch, the ditch, or the markings by selecting the check boxes above the “Quilt” button. If I want to only stitch the pattern, only have the check box for the pattern filled. If you want to stitch the pattern and the design you marked, make sure those two boxes are filled before hitting “Quilt.”
Quilting New Designs with QCT 5
The first thing I do to start quilting a design is hit “Pull Bobbin” and the machine goes through the same set of steps as before. You want your bobbin pulled to the top of the quilt so you can easily tie off and bury your thread tails. It also stops it from making a mess on the back of your quilt.
Once you get the bobbin pulled up, just hit “sew.” The design will stitch out according to how you placed it on your quilt on the previous screen.
After quilting the design, it will then prompt you to “move to next” which means it will be wanting to stitch the ditch or the marked design you created with the marking tool. Before moving, you really need to break thread again, so make sure to hit “pull bobbin” again.
Now I find hitting this at this stage makes the machine be a little weird. First it moves out, then it moves back, then it needles down / up, then it moves back again. Just kinda clunky, but it works.
Once I have the bobbin thread pulled to the top, I hit “move to next.” Then “Pull Bobbin” a second time to pull up the thread on the new starting point. Then “sew” and the next part of the design, the ditch, or the marked design will stitch out.
More QCT 5 Videos to come!
Whew! So that’s it for this upgrade to Quilter’s Creative Touch 5. I had a lot of help from Janet George and her awesome videos.
I have many more videos planned and I definitely like the new Pantograph tool even better than before. If you have suggestions for new videos please let me know in the comments below!
Let’s go quilt,
Leah Day
Leah,
I’m so excited to see that you are using and teaching the QCT software. My question is this: If you UPGRADE from QCT4 Beginnings to QCT5 Beginnings, does it in anyway restrrict your ability to upgrade to PRO or use the Gold features in the future? Or is it just like having bought QCT5 Beginnings to start with?
Stay safe and keep on quilting! Thanks.
Great question Elsie! No, you can update to QCT5 and then upgrade to PRO or Gold anytime. It’s just like having purchased QCT5 Beginnings from the beginning (lol) and you are free to grow with the software whenever you need to.
In spacing I don’t have the option to space horizontally. What did I do wrong when updating?