
Border Quilting Design – Heat Wave #522
Do you need a super fast, super easy border quilting design? Learn how to quilt Heat Wave in this tutorial and finish your borders with a beautiful texture that will leave the edges of your quilt smokin’ hot!
Please Use Border Quilting Designs!
In my opinion, if you bother to piece a border to your quilt, it should be quilted nicely. And by “quilted nicely,” I mean stitched with a border quilting design that transforms this narrow strip of fabric into a texture wonderland. A yellow brick road of flowing stitches… A wall of feathered dreams…
Too flowery? At the very least, please quilt your borders with something.
Naked borders give me the chills. How is that quilt going to wear if there isn’t a single stitch securing the outside 6 inches? What is the batting going to do after it’s washed the first time? Probably shrivel right up and turn the edge of the quilt into a mushy mess. I don’t even want to test this to prove my point.
All Over Quilting PLUS a Border Quilting Design
Here’s an idea for quilting your quilts with two designs:
- Use an All-Over Quilting design for the blocks / sashing area of your quilt. Let’s call that the “inside.”
- Then the border quilting design for the border or “outside.”
That’s a pretty way to quilt your quilt, and the best thing about it is you’ll get practice quilting two designs!
Border Quilting Design Video
It’s time to learn how to quilt Heat Wave. This design is so easy and fun to quilt! See what I mean in this new video:
Heat Wave is a lot faster and easier to quilt than the Pyramids in the Sun border design from earlier this month. This design can be free hand quilted and the result is a flowy design that adds nice movement to your quilts.
I did use the Ditcher Ruler again to help me control the longarm and travel stitch between the Heat Wave shapes. With practice and patience you won’t need to grab a ruler for this straight line stitching. But I still need to in order to have control over the longarm and stop it from wobbling way off the line.
Turn the Corner with this Border Quilting Design
Border Designs are tricky because you have to turn corners and keep the design consistent. Here’s a sketch of some different ideas for turning the corner with Heat Wave:
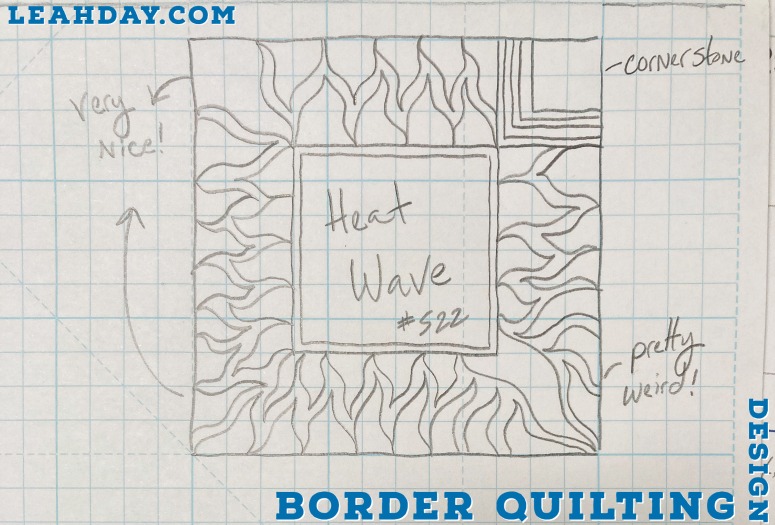
The issue with turning the corner with Heat Wave is fitting the flames together nicely. Corners add more space to the outer edge of the design, but shrink the space to the inner edge. You can end up with some really weird effects if you don’t plan ahead. It always saves time when you have a clear idea of how you’re quilting this area.
My favorite option out of all of these is the design in the upper left corner. Fill in the corner with an extra large flame shape that reaches all the way to the inner edge of the border. This fills in the extra space and with two smaller flames on the outer edge, you can get back into the flow of the design quickly.
The weirdest option is the lower right corner. Here I drew the opposite of my favorite corner with a large flame coming out of the inner edge of the border. This really didn’t work. It’s inconsistent with the rest of the design and it takes several flame shapes to get the border back on track. Basically a design train wreck!
Cornerstones are always an easy option to turn a border. Box off the corner, separate it from the border design with some straight lines and fill it with a different design. Easy Peasy!
Let’s go quilt,
Leah Day