
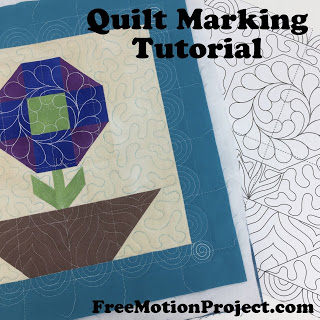
Quilting Basics 4: How to Mark Your Quilt Three Ways
Whew! We’ve made it through all the basics of quilt piecing with a Quilting Basics tutorial on:
We’ve also learned how to piece a Blooming Nine Patch quilt block so you’ve been able to put these new quilting skills to the test.
Today let’s learn how to mark our quilt block so it’s easy to machine quilt. This will help you machine quilt each design easier so you can focus on balancing the speed of your machine with the movement of your hands.
When it comes to marking the most important first step is to find some marking pens or pencils that mark thin lines you can see and follow while machine quilting. Equally important is that these marks wash out of your quilt after you’re finished quilting. Always test your fabric marking pens on scrap fabric to be sure they wash out completely. Click Here to find my favorite fabric marking pens.
For this quilting basics tutorial I’ve shared three different ways to mark your blocks so try all three to see which works the best for you:
Click here to find the quilting design in the video in the Block #1 pattern.
Note: I’ve included some affiliate links below to help you mark your quilt blocks successfully.
I found an interesting question on the Block Party Facebook Group last week about marking our blocks. Here’s a paraphrase of the question:
If you mark the design, is that still free motion quilting?
The answer is yes! Free motion quilting only refers to quilting with a darning foot and moving the quilt in all directions. Whether the quilt is marked or not marked doesn’t matter. If you’re quilting with a darning foot you are free motion quilting.
Free hand quilting refers to quilting without marks. In this case you’re quilting without marks to guide you so your quilting designs are based on memorization rather than marking. This is a bit more challenging, especially for beginning quilters so that’s why I always emphasize marking the design for the Machine Quilting Block Party.
Which method of quilt marking did you like best? My favorite by far is lightbox marking because it’s fast and easy. Turn on the lightbox, tape down the pattern and quilt block and start marking.
One downside to lightbox marking is they are expensive and can be big and clunky. My favorite lightbox is a Light Master LED lightbox that’s super thin and comes in a box with a handle. I pull it out, plug it in, mark my block and then put it away. It’s thin enough I can stash it between two desks in my office so it’s out of the way when I’m not using it.
Another downside of lightbox marking is when you’re working with particularly dark fabrics that even a lightbox can’t shine through. Areas of seam allowance are always tricky to mark through and it’s not always possible to see your lines through multiple layers of fabric.
In cases like these, template or stencil marking from the surface is usually a better option. This way you’re marking from the surface and it doesn’t matter what color the fabric is. You can see and mark your design right on top.
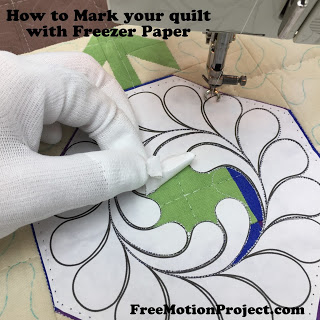
The last method that I shared in this video is freezer paper marking which is something I haven’t used a lot, but plan to try more this year. Basically you print the design full size onto the paper side of freezer paper, then pin it or press it to your quilt top. Stitch on the lines through the paper and the quilt, then carefully tear the paper away.
The one challenge with this form of marking is removing the paper after the design has been stitched. The first time I tried this, I pulled too hard on the paper and it tugged my stitches a bit so I had some long loops left on the surface of the quilt. This balanced back out again after I soaked the block, but it still wasn’t nice to see.
So make sure when you mark with paper on the surface to stitch with really tiny stitches and tear the paper away very carefully. You may still end up with little bits of paper between your stitches which will likely wash out after your quilt is complete.
As you can see, none of these methods is 100% perfect, so by using them together you’re bound to find something that will work well for you. Do you have questions about quilt marking? Feel free to ask in the comments below!
Let’s go quilt,
Leah Day
Just wondering what would happen if you perforated the freezer paper first before ironing it in place. If you have more than one block with the same design, you could run a stack through the machine with an old needle and no thread…
It's definitely worth a try! A lot of quilters will stitch through just the paper, then use that as a stencil to mark the design from the surface. Clearly I have lots of marking methods left to test!
RICKY TIMS in his DVD, GRAND FINALE, uses a washable product ( RICKY TIMS STABLE STUFF but C&T has a similar product for applique that can be used.) The product can go thru the printer and print on your fabric. You then put the product on the back side of your block. Using washable thread you FMQ the block… this gives you PRACTICE at the FMQ, allows you to truputo if you desire. THIS marks your quilt. BE SURE TO DO ALL YOUR BLOCKS. You then turn the quilt to the right side sandwich as usual and FMQ your quilt. Soak your quilt …. the washable thread disappears. RICKY shows a lot more good tips in that dvd. I like this method for special high end heirloom style quilting… OR when I am putting names / words on the quilt.
What are the dimensions of your light box? I cannot find one with a work surface large enough for the whole 16" Square block.
The one I'm using is 12 x 17 so you will have to re-position a bit to mark the entire block.
I have a large a3 light box which I bought from Amazon.
I use 2 sheets of plexiglass that I bought at Menards and pull the extra extensio from my dining room table. I put a light or a lamp underneath. This has worked pretty well for me. The plexiglass is thin and easily slides beside or behind a dresser or cabinet.
My husband blessed me with an awesome 30×40 homemade light box he put together for about $20
I’d love to know how your husband made you a light box. Could you please post tge instructions?
I’ve built several light boxes and the basic premise is build a box out of wood, add bright LED lights, then cover it with a material that lets light out – like acrylic plexiglass. The only thing is these days wafer thin light boxes are super cheap and really big! You can find the one I use now here – https://amzn.to/3SHsXCX
I would cherish the ability to pin your info easily on Pinterest!! Sooo much useful information.
What can I do to help with that Rochelle? There is an app you can add to your web browser to make pinning easier. Any other suggestions?
Do you mark your lines on each block before you add batting and backing.
I use a projector for marking my full size quilts. If you want to you can also do it by the block. Using the same techniques as pattern designers use for projectors it is a Very Quick & Easy Method. Take a photo of your quilt, put it on to you pc, in adobe, check your sizing, then using sewing chalk you trace your design out. Chalk comes in all colors, 100% washable and very inexpensive. I have found this technique is 100% accurate, quick and very flexible!
Thnk you for your in-depth teaching. You make it sound so easy and fun.
Hi,
I’m wondering about just sewing through the freezer paper without any thread. Once you remove the paper there should still be “stitch lines” to follow and sew over. I have a quilt top I want to use feathers on but am not confident enough to go “freehand”. I think I’ll try the stitch the design without thread method and see if it works?? Wish me luck!