Quilt Along #25 – Cucumber Vine
It’s time to quilt along again! For the last two weeks we’ve learned Bare Branches and Tree Roots, two Independent designs that have pushed us beyond the simple rule of Stippling (don’t cross your lines) and into a new world where travel stitching is a key component of the design.
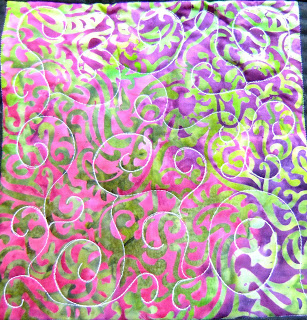
Today we’re going to learn one more design that works very similarly. Cucumber Vine is very similar to Tree Roots in that you’re working with a wiggly line, but this time you’ll swirl into closed spirals to create a curling, twisting, vine-like appearance:

The travel stitching on this design is quite noticeable and stands out beautifully on the surface of any quilt. Here’s a block of Winter Wonderland filled with Cucumber Vine:
Now let’s learn how to quilt this design first starting with simple repetitive shapes, then expanding into a free-form random design:
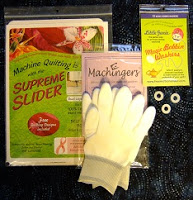
 Just in case you’re just joining the Free Motion Quilt Along, in the video you see me quilting a small fat quarter sized practice sandwich. On the machine is a Free Motion Glider, which makes the quilt easier to move and covers the feed dogs on the machine.
On my hands are Machingers quilting gloves which allow me to grip and control the quilt as it moves under the needle and within the machine is a Little Genie Magic Bobbin Washer, which is helping the bobbin to feed more smoothly which results in fewer thread breaks and birds nests.
Find all three tools for free motion quilting in the Ultimate Quilting Kit right here.
Now let’s see what all those lines of Cucumber Vine looked like stitched over the practice quilt sandwich:
For this design, it’s a bit more difficult to create repetitive patterns of shapes. It’s almost like the design wants to be free form and bend and twist randomly.
Still a good way to practice the simple spiral shape is to stitch rows were the spirals first curl outwards, then inwards. See which way feels most natural for you and if you like to turn the spiral clockwise or counter clockwise.
Ultimately it’s a gorgeous design that can be used anywhere on your quilts so get on your machine and have fun with it this week!
Instructions for Linking Up Your Blog:
1. Write your blog post. Publish it on your blog.
2. Copy the link of the specific blog post. This is not just the link to your blog itself (www.freemotionquilting.blogspot.com), but the link to the specific post: https://freemotionproject.com/2012/01/quilt-along-2-quilting-in-rows.html
3. Click the blue link up button above and paste your link into the box.
Keep in mind that you’re posting your progress from LAST week on THIS week’s post. This way you have time to watch the lesson, play with the ideas, then post your progress to the next quilt along. I hope that makes sense!
Let’s go quilt!
Leah Day

• • • I've tried both links, and get the same response "private video". I've never had a problem with your videos, so I thought you would like to know.
Very sad that I can't see your video. It's private and I don't have access.
🙁
Leah: the link to the video isn't working. It say's it's "Private".
Wanted to let you know!
Video is private
Thanks
I tried to open the video and it says private.
Thanks!
Lucretia
Hmmm…I get a message saying this video is private.
SORRY! My brain is obviously not working today and I forgot to update the video to public this morning.
It should be working fine now!
Leah
Working! Thanks.
this is a GREAT video. You sew very quickly and neatly! I really like this design!
I am going to try to do this on a small quilt today
Thanks, Leah ~ This is such a pretty and versatile design 🙂
I learned this shape early in my longarm quilting career. It's one of my favorites! This filler can go almost anywhere.
Question Thursday – or should I say "problem thursday"?
I have some back to basics questions, but first you should know that I completed the "modern" quilt and sent it off. Now I'm working on finishing the quilting on a quilt I started 8 years ago and nearly done quilting it but I'm having some FMQ issues and I'd like them to stop with this quilt.
I bought the Janome Horizon based on your recommendation a year or so ago and love it and I use Isachord thread and a size 75 (or sometimes bigger) quilting needle or sometimes one called Microtex sharp or something like that. I can see little dots of the top (beige)thread on the back and on the top I get dots of black (from the back)showing up at my "points" in the pointy quilting I've done. I imagine it is bobbin tension or top tension, but I'm not really sure how to adjust the bobbin or which way I should dial the top tension, if at all. I have tried it with dropped feeddogs and with feeddogs up – no difference. My bobbin thread isn't Isachord, it is a polyester and thin, like Isachord, but I made a mistake and bought some prewound bobbins and it wasn't Isachord…..so I don't know if that counts (I'll send you a couple if you like because I bought about 30 of them and you could try this problem out, if you would). Next problem – my needle frequently pokes holes in the fabric which you can see…they may wash out, but I don't like the "holey" look. Remember that I'm still trying to break my habit of quilting to tightly – so it is about 1/4-1/2".
The only thing I haven't done yet, which you also recommend is put in bobbin washers…but I thought I'd email you to get on your problem thursday list. Lastly, I do have problems traveling and stitching in the ditch…I try to slow down but if I get distracted for a split second, my stitching goes off…I assume that will get better.