
How to Applique a Quilt – Beginner Tutorial
In this beginner quilting tutorial, you’ll learn how to applique a quilt using fusible appliques cut with the Accu Quilt Go! fabric cutter.
I have found using this fabric cutter really saves time when cutting fusible applique shapes. Leaves, vines, circles, and even hexagons are pretty time consuming to cut, especially when you need to cut multiple at a time for an applique quilt.
Step 1 – How to Prepare Fabric with Fusible Web
The first step to making an appliqued quilt – at least if you’re doing fusible style applique – is to prepare your fabric and attach the fusible web. My favorite type of fusible web is Lite- Steam-A-Seam-2. It’s lightweight, easy to work with, and it fuses securely and isn’t easy to mess up.
I’ve had mixed experiences with other types of fusible web. Some made my quilts too stiff and other fusible webs seemed very heat sensitive. If I held my iron on just a little too long they would stop sticking to the fabric.
Click Here to find the applique tools and supplies I recommend, including Lite-Steam-a-Seam-2. Click Here to find my quilting review of this fusible web.
To prepare my fabric, I followed my usual steps – wash, dry, starch and press so the fabric is flat and wrinkle free. If you press fusible web to wrinkly fabric, you will get a wrinkled applique! Click Here to find a quilting video to see how I prepare my fabric for all my patchwork quilts.
Step 2 – Cut Fusible Applique Shapes
Once the fusible web is attached to your fabric, it’s time to cut out your appliques! In this tutorial video, I share:
- my reasons for using Lite-Steam-a-Seam-2 fusible web
- how to press and fuse the material to fabric
- How to efficiently cut shapes using the (affiliate) AccuQuilt Go! fabric cutter.
Since sharing this applique tutorial in 2010, Accu Quilt has come out with many more fabric cutters and dies. I still use this device (more than 12 years later!) so I do think this is a good investment in your quilting craft. Here are a few links to the new fabric cutters and die sets available (affiliate links to Amazon which help support this project):
Accu Quilt Go! Me Cutter – This is a smaller, 6-inch fabric cutter that allows you to cut smaller dies and is more affordable to beginning quilters.
Accu Quilt Go! Cutter – This is the one I have had for years and years and still use!
Accu Quilt Go! BIG – This is an electric cutter (no hand crank) that is made to cut the largest dies and to minimize strain on your arm and shoulder.
Step 3 – Basic Applique Baby Quilt Pattern
Just in case you can’t watch this quilting video, I actually made this quilt a little differently. I actually pieced the blocks, sashing, and borders before fusing any appliques to the surface. Making it this way made it much easier to get exact placement of each shape on a completed quilt rather than on individual blocks.
Materials:
- 1 1/3 yards Black Fabric for Blocks and Borders
- 1/2 yard Blue Fabric for Sashing
- 3 – 4 fat quarters of different colors of fabric for applique shapes
Fabric Cutting:
Fabric A – Black
Cut 4 – 9 1/2-inch squares – blocks
Cut 2 – 6 1/2 x 24 1/2-inch strips – short border strips
Cut 2 – 6 1/2 x 36 1/2-inch strips – longest border strips
Fabric B – Blue
Cut 2 – 2 1/2 x 9 1/2-inch strips – sashing between blocks
Cut 3 – 2 1/2 x 20 1/2-inch strips – vertical sashing strips
Cut 2 – 2 1/2 x 24 1/2-inch strips – horizontal sashing strips
Applique Fabrics
Cut into 9 1/2 x 12 1/2 inch rectangles. Attach your fusible web of choice and then cut out your applique shapes as shown in the video above. I cut a variety of leaf shapes, vines, hexagons, flowers, and circles to play with.
Applique Quilting Tools and Supplies
Here are the tools and supplies I’m using for this baby quilt. These are products I carry in my online quilt shop at LeahDay.com:
How to Piece the Quilt Top
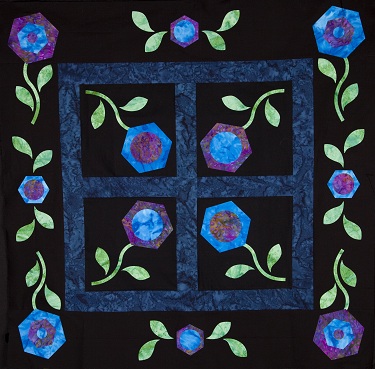
Here’s the basic applique quilt we’re making together. Decisions like pressing seams open or to one side are entirely up to you. I do recommend washing, pressing and starching your fabric before cutting. This stabilizes your fabric and makes cutting the longer strips much easier and less wobbly!
- First piece blocks to 2 1/2 x 9 1/2-inch sashing strips. You will have two sets of blocks with a strip of sashing in the middle.
- Piece one 2 1/2 x 20 1/2-inch sashing strips between the blocks to create the center square of the quilt. Your quilt should now measure 20 1/2-inches square.
- Piece the 2 1/2 x 20 1/2-inch sashing strips to the sides of the quilt.
- Piece the 2 1/2 x 24 1/2-inch sashing strips to the top and bottom edges of the quilt. The quilt should now measure 24 1/2-inches square.
- Piece the 6 1/2 x 24 1/2-inch border strips to the sides of the quilt.
- Piece the 6 1/2 x 36 1/2-inch border strips to the top and bottom edges of the quilt. This baby quilt should now measure 36 1/2-inches square.
Step 4 – How to Applique a Quilt
With your baby quilt top pieced, you can now start playing with your arrangement of applique shapes. No, I don’t have a specific quilting pattern or template or guide for these appliques. Instead I cut and arranged them using simple symmetry and creative eye.
Watch this video to see how I arranged the fusible appliques on my quilt using very simple techniques and symmetry:
By pressing the border and adding crease lines to specific areas of the quilt, I was able to create this simple layout and position all of my applique shapes. Remember – it doesn’t have to be perfect. It just needs to be pretty!
Machine Applique on a Regular Sewing Machine
Once you have your applique shapes fused in place, the next step is machine applique. This is a process of stitching around each applique shape with some form of stitching to lock the fabrics together.
We need this stitching to secure the fabrics together permanently. Yes, the fusible web does stick the fabrics together very nicely, but over time and multiple washings, the appliques may begin to pull off the quilt.
Stitching around each applique shape – yes, along every single edge of every single shape – is what locks everything together securely.
There are three main ways to machine applique:
1. Edge Stitching – Raw Edge Applique
With this method, you edge stitch around 1/8 inch from the edge of the applique. This leaves the 1/8 inch of the edge loose and raw – which is where the name Raw Edge Applique comes from.
This is the fastest method to secure your applique shapes. But many quilters find the raw, frayed edge… icky.
Personally I don’t like the extra stray threads or “fuzziness” this adds to my quilts. But I do like how quick this finishes! Just stitch a single line of stitching around 1/8-inch from the edges of each applique shape. I often incorporate this stitching when free motion quilting and call this Appliquilting because I’m machine appliqueing and quilting at the same time.
Here’s a quilting video I made much more recently than the other videos in this tutorial that features this Appliquilting and Cutaway Applique techniques:
2. Blanket Stitch on Applique
When you bother to applique a quilt, you may want a more decorative finish to the applique edges. Blanket stitching is very popular because it’s a simple, fast stitch and secures the edge so the fabric doesn’t fray.
The blanket stitch is simple and fast – your sewing machine will take a stitch forward, then a stitch to the left, then back to the right, then stitch forward. When stitching around your appliques, make sure to stop and shift the quilt only when your needle is off the edge of the applique.
If you reposition when your needle is inside the applique, you’ll end up with a “V” shaped stitch that’s more like a demented zigzag. Here’s a video to teach you how to do blanket stitching around appliques:
3. Satin Stitching or Decorative Stitching
This is the most labor intensive machine applique methods. Satin stitching is a very dense zigzag stitch – similar to the density of stitching around buttonholes on garments. This density of stitching takes time and it requires slow and steady pivoting of the quilt around curves and really careful handling of points and corners.
The benefit of satin stitching is the gorgeous satin stitched effect. No. Raw. Edges. In. Sight!
But you will still need to quilt inside your applique in addition to satin stitching. As odd as it sounds, I’ve experienced satin stitched appliques tearing off a quilt. While it looked super secure, the dense stitching weakened the edge of the fabric, even with fusible web.
When washed, the applique ripped away from the stitching leaving an ugly raw, flappity piece of fabric on the quilt. Exactly what I didn’t want to happen. So you’ll need to balance out the time it takes to satin stitch with how much work is involved.
See how to satin stitch around an appliqued heart shape in this quilting video:
More links to Applique Quilting Tutorials
Over the years, I’ve made many appliqued quilts, but my applique techniques have mostly stayed the same. I still use the same fusible web I was using 12 years ago and many of the same quilting supplies as well. Click Here to find more applique and art quilting supplies.
Here’s a few links to more recent applique quilting tutorials as well:
Eternal Love Fusible Applique Quilt Pattern
Perfect Turned Edge Circle Applique
I think that just about covers how to applique a quilt, plus you have lots of fun tutorials to check out too. If you have any questions, please feel free to post in the comments below!
Let’s go quilt!
Leah Day
This is going to be an amazing series, Leah! That question – 'how do I quilt this??? – is probably the main cause of stress in my quilting hobby 🙂 I'm making a table runner right now and am struggling with just this issue regarding quilting around the appliques! THANK YOU for sharing your knowledge and expertise!
Will a 15 R. With robot automation, quilt thru appliqué shapes and not gum up or should I plan on going around instead .
This is my 1st appliqué quilt also my first automated one so I wanted to head off as many problems as possible.
I love your site been a follower for yrs ! Keep up the great content .
I think it will work just fine! Keep in mind, your Qnique 15R is far more powerful than a home sewing machine. Maybe consider wiping the needle occasionally with a little alcohol wipe to clear gumminess. That should keep you working smoothly!
awesome! I always need help with where to use what design.
Yup – really looking forward to this too. I repeat this question ALOT!
Looking forward to the next installment…thanks for posting 🙂
I am so looking forward to see how you determine which design to use where. I have an idea in mind for a quilt with lots of little places to do different free motion patterns, but would love to get inside your mind and see how you determine what pattern to use where. I have a conflicting analytical / free-spirited personality which means I like to go with the flow but need to know exactly how to do it! Can't wait for the next installment!
Your blog are amazing