
Machine Quilting Ideas for Sampler Quilts
Let’s discover more machine quilting ideas for sampler quilts! I was recently sent a picture from Randi L of this gorgeous sampler quilt called Quilter’s Pallet designed and taught by Annie Smith.
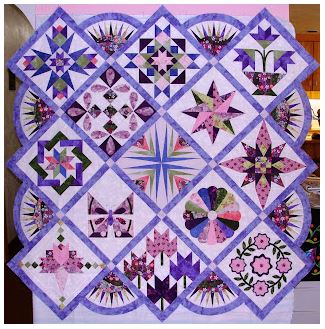
When I saw this quilt, I started getting super excited. This is a SHOW QUILT if ever I’ve seen one! Randi admitted she didn’t know how to quilt it and was considering all over quilting a single design.
That would have been a disastrous mistake as this sampler quilt, with a little extra time and attention and fun machine quilting ideas, is sure to become a show winner. Let’s learn why in this detailed tutorial:
Are Sampler Quilts Good Show Quilts?
I think sampler quilts, if machine quilted or hand quilted properly will make excellent show quilts. These quilts showcase a wide variety of quilting techniques and skills and if properly quilted with the same level of care and attention, they will make judges happy!
Randi’s piecing on this sampler quilt is top notch. Look at all those perfect points! Another reason I think this is a potential show winner is the color choices. The quilt simply goes together.
The arrangement is very pleasing to the eye, but it’s not overly busy or distracting. You have the space to see and appreciate each block by itself, but together they look like they were meant for each other, even though there’s a nice mix of sharp angles and curves.
I think we can all agree that an all-over meander would have ruined this quilt, and while I know show quilting may not be the focus for most quilters, it is something I love.
I printed out Randi’s quilt rather than try to illustrate my quilting lines in paint and instead hand drew my quilting ideas over her quilt. And here is my show quilting design drawn over it:
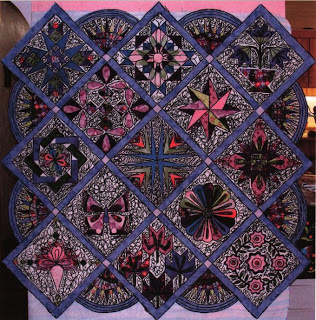
Sampler Machine Quilting Design
As you can tell, the background is completely filled with very dense stitching (I just used squiggles to represent the fillers). Yes, if you quilt this densely, your quilt will be stiff, but it will also be gorgeous!
Now, I’m going to go block by block and how and why I’ve made the decisions I have on this quilt. Once you read through each block and compare the pieced, unmarked version to the marked version, I thing you will be able to “see” beyond the piecing and into a new world of quilting design.
This is a quilt that could definitely benefit from trapunto. This is where you make some areas and motifs puffier so they stand out more in comparison to the background.
Would you like to learn how to add trapunto motifs to your quilts? Click Here to find my Heart & Feather Workshop which includes lessons on all the steps to trapunto!
Machine Quilting Ideas for Sampler Quilts Block by Block
To actually quilt this quilt on a domestic machine, I would start in the center block, quilt the 4 blocks surrounding it, then the 8 remaining blocks, always working from the center to the outside of your top. This will reduce the bulk of the quilt in the arm of your sewing machine. Of course, make sure your sewing machine is set in a table to make this feel as easy as possible on your back and shoulders!
Now let’s look at each block in turn and I’ll explain why I choose these particular quilting designs:
1st row, Upper Left block – In this block, the larger blue triangles immediately jumped out at me.
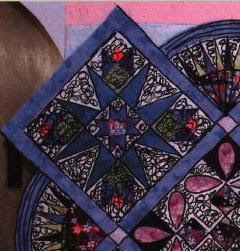
I wanted them to really stand out over the rest of the pieces and colors in this block, so if possible, I’d make sure to trapunto them and the star in the center.
To quilt it, you would first stitch in the ditch the center sawtooth star and blue triangles then fill in the background with any filler stitch. The inner background around the sawtooth needs a dense, independent filler, like Tree Roots or Wandering Clover.
I hope you can see in the photo that I drew over some of the colored pieces. This was intentional.
I would have the fillers cover those pieces just as completely as the background, making them recede so that the blue triangles are more visible. In essence, I’m ignoring the pieced shapes in favor of drawing out a slightly different design with the quilting.
Quilting Over a Complex Quilt Block
1st row, Middle Block – I didn’t like this block as much as the others. It just seemed a bit complex in color in comparison to the other blocks, and I was looking for a way to tone it down a bit.
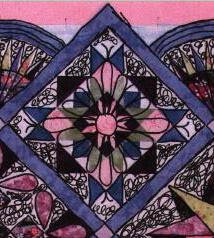
Rather than follow any of the piecing lines, I instead drew a modified Dresden Plate quilting motif over the block. It’s slightly different from a regular Dresden Plate because the petals fit into a square shape rather than a circle.
I choose this quilting motif because the quilt also contains a Dresden Plate Quilt Block and I wanted to ease some of the sharp angles within the quilt.
Once the quilting motif is marked, I then saw the placement of the blue triangles. These kind of looked like butterflies to me, and since this quilt also contains one butterfly block, I choose to play off that design as well. The triangles could be stitched in the ditch, then you can create a little antanea to make them butterflies.
The whole background would then be filled in with a dense background fill. Because this is more complex shapes, your filler needs to be a relatively easy independent or branching design. McTavishing, Lightning bolt, Tree Roots, and Wandering clover would all be good choices.
Notice that I make the same suggestions on fillers for both blocks. With a quilt like this, because every block is different, it might be a good idea to choose 1-2 filler designs to use in a small way on every block so that the quilt is more unified.
Since McTavishing is one of my favorite designs, I’d probably choose it to fit in the larger portions of the background and then use other fillers here and there almost as accents.
Quilting Ideas for a Carolina Lily Quilt Block
1st Row, Right Block – This looks like a Carolina Lily quilt block to me. Of course, I shared this mini block piecing tutorial years later, but you might have fun piecing it now!
This is a flower block with 3 big flower shapes. Again, I’m choosing to soften the sharp points of the flowers with a rounded quilting motif, very similar to the ends of the Dresden Plate Blocks.
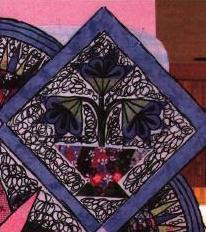
The flowers are made to stand out even more with small “petals” of dense stitching within the new quilted flower petals.
For the basket, definitely stitch in the ditch around the shape, then go inside with a slightly larger filler design, where the lines of stitching are 1/2″ apart and fill it with something funky like Basic Spiral or even Stomach Lining, our most recent design!
When show quilting, you will want to stitch in the ditch around everything, unless of course you’re choosing to ignore that piecing shape and fill over it with a background quilting design.
Continue reading this mini quilting tutorial series and find more machine quilting ideas for Sampler Quilts:
Leah thanks so much for your blog!! I am a novice quilter and I follow your blog and am learning tons!! However since I am so new could you please explain how you quilt in the ditch. I'll look maybe I can find it in your archives – Leah thanks again and again – what a huge help you have been to me!!!!!!!
Wow Leah, I'm working on a sampler quilt at the moment and was considering sending it to a long arm quilter to get it done…I am now inspired to work on it myself, slowly and thoughtfully to make the quilting worthy of the piecing, thank you so much.
Where do you get all these ideas from Leah?
1. you give us new filler designs on a regular basis
2. you give us a quick lesson on how to start considering and designing our quilting
3. you then challenge us and give us one great quilting design 'how to'
4. then you come up with this STUNNER
I agree with you Leah this is one stunning sampler quilt (so, so many are not) – what great work RandiL and Annie, I'm off now to check your site out.
Thank you all
You are doing an amazing job. I can't wait for the next installment.
Paula in Omaha
How would you start the quilting? Would you stitch in the ditch along the sashing to sort of hold everything together or would you actually start by quilting one corner block?
Absolutely beautiful quilt. I hope to see this quilt on display at an upcoming quilt show. Truly lovely.
SewCalGal
http://www.sewcalgal.blogspot.com
Leah you are a wonder. I would never think of the innovative ways that the quilt can be quilted, you are a true inspiration to me. One of these days I hope to be really proficient in FMQ.
Thank you.
You've made the quilt look like a beautiful stained glass window. I love it, I'm inspired to have a go at the Annie Smith class. I'm not a quilter as such, but love free machining and find your fillers inspirational. Thank you so much for giving your time and expertise.
Annie shared your blog with us in the class she just finished with us Quilter's Pallet, and I'm so grateful that she did because I feel like I can now talk with the person who will quilt my quilt top with some real information and confidence. You would LOVE Annie and I highly recommend you two get together. Her knowledge base is extensive and she is a remarkable teacher. Your blog makes me believe you two would enjoy knowing each other professionally. She's a delightful person. I enjoy your blog and have now bookmarked it!