
Question Thursday #22
Let’s get started with a set of questions from Malini via comments:
Should I paper piece my wonky blocks?
Full question: Does paper piecing help creating wonky modern quilt designs? I relate modern quilting to stippling. It can be crazy but having a plan and structure does help quilting stippling easier. Shouldn’t we approach the modern quilt piecing or wonky quilt piecing the same way. If we do make mistakes we shouldn’t make a big deal about it. But having a plan in place always helps.
Hmm…This is certainly something to think about and play with.
Honestly, this is really down to the way your brain works. It’s been interesting to watch you all make your modern quilts. Some are totally random, some are a bit more organized, and some have obviously been painstakingly laid out with lots of thought and obsession.
Here’s my take: I look at modern quilting (piecing wonky blocks with no matching seams, random layout, random effect) as a lesson to totally STOP thinking entirely. Stop judging, stop criticizing, stop analyzing completely.
Just throw the blocks on the table and piece them as they lay! No thinking involved whatsoever.
Stippling, however, isn’t a random thing for me. I quilt it logically in rows using shapes that have become as familiar to me as writing my own name. While I don’t have to actively think about what I’m doing, I still pay close attention to how the design is being applied to the quilt.
So really I think it’s down to the way your mind works. If you need more structure and control over the outcome, by all means paper piece your blocks. You could even plan the diagram for the exact quilt top on graph paper if you really wanted to.
If you choose to go the uber-plan route, what makes that quilt different from any other quilt pattern you must follow step by step, to the letter? All I know for certain is this: randomness actually must be random. If you try to micro manage this project, your quilt will show it.
Now for a question from Suzanne in the comments:
Why are my stitches still having issues?
Full question: Before I asked how to you keep from showing your stop/start marks when you switch hands (on the straight lines). Now I see that I’m having trouble with jumping big stitches at places where I change directions – like across the top of a straight place in “circuit boards” or when rounding a curve on meandering. I have trouble with keeping either a straight line (circuit board, for example) or a smooth line (meandering) because sometimes I soften a line when it should be curved and vice-versa. I simply cannot seem to stitch some designs at 1/2″…my circuit boards and loops are all at 1/4″ or smaller…suggestions? Even though I’m nearly finished with the quilt (I made it about 60×60), I still cannot get my stitches to be consistent…some teeny tiny and some long and loopy. I can’t seem to get the hang of what I call your “flame” stitch…it is the one that meanders with pointy ends….is it possible for you to post paper patterns/drawings so I could print them out and follow along (I remember in jr. high school following along a straight line pattern printed on paper until we got it right.
Take a deep breath Suzanne! Let it out slowly and give yourself a big hug!
I know you’re feeling frustrated about your stitches. It sounds like a lot of the issue comes from having the designs really memorized so you can focus more on your speed and hand movements as you create them.
The best advice I have isn’t terrific, but it’s the one thing I know will work: practice.
You’ve made one quilt. Make another. Then make another.
I’m sorry to say that you will not master every nuance of speed and movement of your machine with just one quilt. Just like I absolutely can’t master playing the piano by playing one song over and over again. You’re going to have to continually apply yourself to this craft, and yes, that means doing the same thing over and over again until it feels comfortable and begins to look the way you want it to.
When it comes to scale, here’s one little cheat I learned over the years: it helps to practice smaller.
On a smaller scale (around 1/4″), you will be able to pack more stitches into a smaller area, so you’ll use less fabric, but gain far more experience of moving the quilt and controlling the speed and creating designs.
While this might not be the scale you want to work on, it is a helpful scale for getting lots of practice with minimum cost of materials.
Finally, one last suggestion – give yourself a break! Stop analyzing your stitches with such criticism!
The only thing you should worry about these days is if a stitch is so huge you might catch your toe in it. Not only would that be painful, it would likely happen in the middle of the night, and no one wants to be tied to their quilt all night long. So rip out any offensive toe catchers, but give yourself a break on the smaller stuff.
Your criticism isn’t going to make your stitches instantly better, only practice will do that. And the only way you’ll want to practice is if you make this experience fun, not a torture session.
I do like your suggestion about worksheets for the designs. I’ll try to come up with something like that soon!
Now one last question from Pat at Color Me Quilty:
Should I keep the density of quilting consistent in my quilt?
Full Question: So my question for Leah this week is about balancing stitch density across my Expanding Possibilities quilt. In the white areas of this quilt I would like to stitch a somewhat dense design.
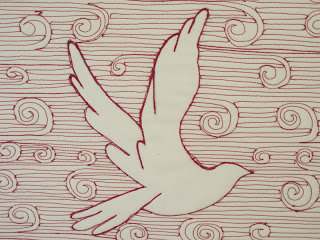 |
| Photo from Pat’s blog Color Me Quilty |
For the center section (squiggly lines part) I would quilt something a little less dense and then on the chevron section and around the flying geese just stitch in the ditch.
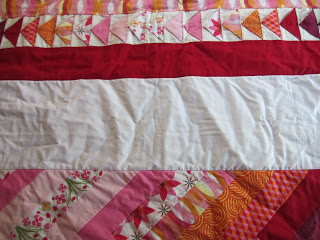 |
| Photo from Pat’s blog Color Me Quilty |
So the quilting would alternate dense, loose, dense sections, etc. across the quilt. Will that work or should I aim to quilt the same density on the whole thing? (I hope these makes sense :O )
Hmmm….I’ll be honest – I’m really not an expert on how far you can push a quilt when it comes to density of quilting. Personally if I’m going to quilt something dense, I quilt the entire quilt dense just to save the headache of worrying about whether the quilt will like it or not.
But let’s take a closer look at Pat’s quilt and see if we can try to figure out what might happen to it if some areas are quilted denser than others:
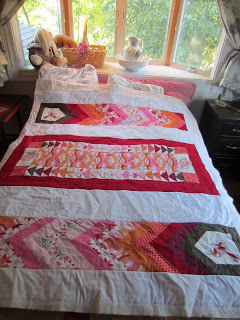 |
| Photo from Pat’s blog Color Me Quilty |
Now Pat indicated that it’s the white sections that would be quilted super densely. These white sections form the background and borders to the quilt, so the overall effect of the quilt is going to be rather dense and heavily quilted.
The one thing to understand is what might potentially happen: If the red sections are simply stitched in the ditch, there’s a good possibility that they will ripple and bubble up.
Why will this happen? First off, you have to always remember that fabric is a fluid, moving thing. If you stitch the snot out of it, you take the flow out. If you smack an area of flow next to no flow, it’s going to be noticeable.
Now the one way to counteract this would be to quilt some density into the red sections. Rather than just stitch in the ditch, stitch some straight lines, or another design, into those areas to balance out the quilting.
You don’t have to quilt the entire thing super dense, but you do need to balance the level of stitching over the surface.
Another alternative is simply not to stitch the white sections quite so dense. If you can open up the quilting in those areas, you won’t risk turning the quilt into cardboard and being forced to quilt the whole thing on a small scale.
Really it’s all down to playing and experimenting. You can’t know how the fibers will react until you start quilting them. If in the end, those red sections are bubbling and rippling, slap some more stitching in those areas and make them behave!
Now we have one last question from Christine from email:
Is cotton really the easiest thing to use in a quilt?
Full question: I’m a novice at free motion quilting, but I quilted a small throw with stippling a few months ago, so I know that I know how to do it. I’m quilting another small quilt now and wanted to do stippling again, but whenever I tried I got these crazy loops and knots under the fabric. I tried practicing more with two pieces of scrap fabric and batting, changing the thread, using different needles, and it never failed…my practicing went fine, but whenever I tried to do it on the quilt, I got incredible knots. I finally noticed that the segment of the quilt I was quilting on was made of something synthetic, like polyester. I tried doing some stippling on a part that I knew was cotton, and it went fine. That’s what I get for fabric shopping in a hurry with my kids – I grabbed the wrong kind of fabric!
Is polyester really harder to quilt through? Are there any tips to help it go better? Or should it make no difference at all?
Short answer: cotton really is the easiest thing to work with. It’s not that polyester is so difficult, it’s that the stretch and slide of different fibers are simply more tricky to work with.
Here’s an interesting story: a few years ago I taught a class at Myrtle Beach Quilt Party and one student had endless problems. Her machine seemed determined to eat her fabric, and no matter what we tried, she simply couldn’t produce decent looking stitches in class.
She went home and just happened to check the fabric her squares were cut from. It was black and looked like cotton, but with a bit of a tug, it became obvious this was stretchy swimsuit fabric!
I’m not sure why these materials are harder to work with for free motion quilting. It may be something to do with the stretch and pull of fabric against the needle.
No, I don’t think all poly blends are off limits, though they’re certainly not ideal. If you happen to have a lot of this kind of fabric, just make sure to starch it twice before quilting. This way you will eliminate most of the stretch out of the fabric and hopefully most of the issues as well.
That’s it for this week! I’m headed back upstairs to continue ripping the face and hair off Emergence. Hmm…that sounds a bit gruesome doesn’t it!
Let’s go quilt,
Leah
Thanks so much Leah! I will stitch that quilt into submission, even if I have to quilt the snot out of it! LOL!
You always make me smile, thank you for all of your help and support! You make me look forward to Wednesdays and Thursdays!!!
Thank you, Leah for answering my questions. You're always so sweet.
I know this particular project I'm not able to let go the structure because I was already exploring modern quilting and wanted to make a particular quilt I saw at one website. So, probably my thoughts are all wrapped around it and couldn't get out of it and be free for the wonkyness.
Thanks again!
Malini
I noticed the same thing about randomness when making blocks for my improv quilt. Every time I've tried to organize pieces so that they look random it doesn't look quite right compared to just grabbing them out of a pile. There is also something satisfying about watching something come together when you don't know in advance quite how it's going to turn out.
Leah ~
You make me smile 🙂 Love your answers… and that "quilt the snot out of it " Phrase, well, cracks me up every time~
Godspeed,
mary
Hi Leah, I also have probs with polyester. If I'm having stitch problems, it usually is on the poly fabric. I just quilted a quilt for someone and had a "dickens" of a time with thread shredding, breaking, skipping etc. On inspection, the areas of problems were when I went through a block that had mystery fabric (it was a log cabin made of old clothes so everything was in it) Here's my theory – take it or leave it.
When Polyester hit the market in the 70's, the polyester thread at the time was as tough as nails. You could not break it with your hands, so it sewed the fabric with no problem.
Over the years, the manufacturers have changed the poly thread to feel and behave more like cotton – a good thing. But, it also behaves like cotton when sewing poly fabric. My theory is that when I sew somewhat faster, the friction builds up and weakens the thread. Of course, I have no science behind this theory, but if I slow down, it behaves better, and if I avoid polyester (like the plague) it goes terrific. That's my theory, and it works for me 🙂
Hi Leah, probably a bit of a late response here (catching up on my reading post holiday), but thought it might be of value in some way… Regarding the question about contrasting quilting density, I have two examples of where I've done this.
I recently finished a quilt where I stippled in the white and then did a looser quilting design on the coloured parts. You can see the result here: http://mymessings.blogspot.com.au/2012/07/lauras-quilt-3-piecing-quilting.html The contrast in density probably wasn't quite as high as what Pat's talking about, but i think the effect was great – it did give a different texture but the difference was good, it highlighted the quilt design and added to it, rather than just happening along side it, as the coloured sections were a bit puffier than the white sashing.
The second thing i've done with different densities (which I've actually done three times) is a quilted advent calendar (which is from a tutorial by Elizabeth Hartman): http://mymessings.blogspot.com.au/search/label/Advent%20Calendar On those the sashing was very densly stippled and the pockets just stitched around the square in the ditch. It definitely has an effect on the texture, making the unquilted pocket sections puff up a bit, which is fine since they're pockets, but would probably look a bit weird if they weren't.
Not really an answer, but hopefully my examples may guide others as to what *might* happen for them