
Kicking Off the Dream Big Quilt Along!
Click Here to find the Dream Big Guidebook – This is an optional guide to help you get ahead on this quilt along. You can learn which petals I turned into Double Petals and how the designs will fill the quilt panel each week. This guidebook also includes information on making both the Dream Big Quilt and Dream Big Jacket!
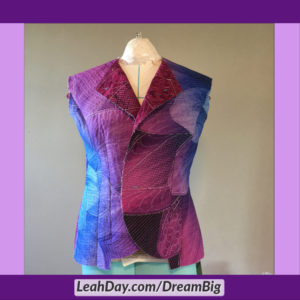
Click Here to find the Dream Big Fabric Panel in the beautiful purple / teal aurora colorway. If you decide to make a quilted garment too, you may need more than one panel!
Other Tools and Supplies for the Dream Big Quilt Along
I mentioned a lot of tools and supplies in the video to help you get started on this quilt along. Click the links below to find these supplies from my Quilt Shop and help support this quilt along!
Eversewn Sparrow 20 Sewing Machine – This little affordable machine is quite a workhorse. It comes with basic sewing feet and a nice variety of decorative stitches.
Deluxe Foot Set – This foot set includes both the ruler foot and open toe darning foot I used in this video.
Slice, Super Slide, Mini Slide, Ditcher, and Feather rulers – We’ll use all of these rulers to create the beautiful ruler work designs for the Dream Big Quilt Along!
Isacord Thread – I’ve been using this thread for eleven years and it remains my favorite for free motion quilting and embroidery. I first used the color Wild Iris, but it blended too closely with the fabric color for my liking. I switch to Hint of Blue which contrasted much better so you could see my stitching in these videos.
Cheater Needle and Pin Place – I use a cheater needle to hide all my thread tails. Click the link to see how this works to tie off and bury all your thread tails securely inside your quilt.
Flower Pins and Pinmoors – To baste my Dream Big quilts, I used flower head pins and Pinmoors. These are much easier to insert and remove as I’m quilting and so much easier on my hands.
Marking Pens – I also used these marking pens to mark lines on the quilt when needed. I liked marking the double petal shapes for example because it allowed me to plan the shape a bit better. Marking the center was essential for planning my path and figuring out how to make sense of all the strange shapes.

Quilting Homework for Week 1
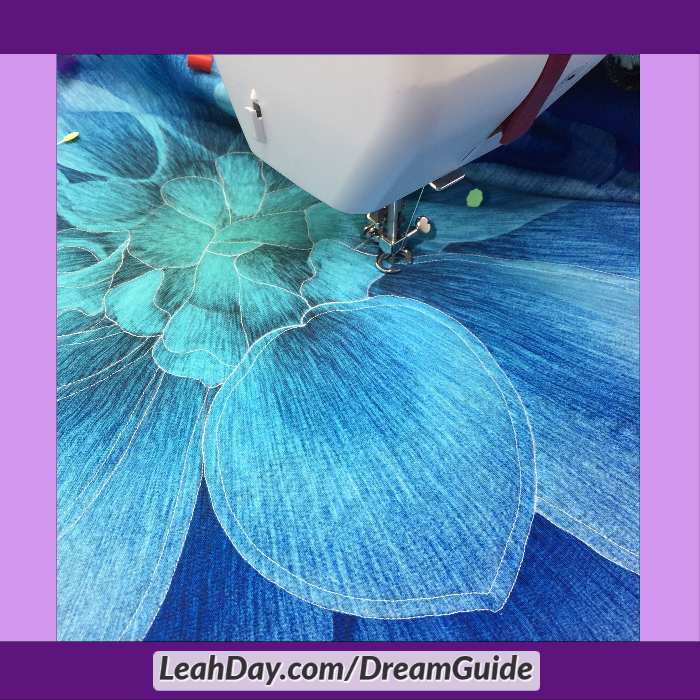
This week you need to gather your materials, prepare your fabric, and baste your Dream Big Quilt. The first step of the quilting process is to stitch around each petal shape.
To make the designs stand out better, also stitch an inner echo of each petal shape. This space can be 1/4 – 1/2 inch wide and will create a small gap between the different quilting designs. Without this gap, the designs would tend to bleed together over the quilt.
You can also turn some petals into Double Petals by stitching a much smaller petal shape inside. Aim to leave a 2 inch channel in the outer Double Petals. We will fill those spaces in with feathers later!
If you’d like to know which petals I turned into Double Petals and exactly what designs we will be quilting together, check out the Dream Big Guidebook here. This guide includes all the designs we will be quilting together as well and helpful diagrams to follow along.
Let’s go quilt,
Leah Day
hi Leah, thank you for all you do for us quilters. I have 2 panels and was at a loss as how to do them. Your creativity and forsight has made me very happy. I believe you are everyone’s cheerleader! However I have not done free hand quilting. I usually do panto’s. I wondered if I could just mark the petals and try my hand at free hand quilting? I have a juki 2200 stand up quilter.
I live in Alexander County, NC. Love to hear from you.
Thank you Anna! As for marking the designs or not marking, that is entirely up to you! You have to quilt it the way that makes the most sense to you and will also make you happy to see when it’s finished. I hope that helps!
Leah, thank you so much for responding! I will now load the panel onto the longarm. And try my hand at freehand quilting.
Wonderful Anna! That’s great!
what thread do you piece with? Thanks!
I like Aurifil 50 wt mako cotton best! https://leahday.com/products/aurifil-cotton-thread
I love the idea of this project during this social distancing time! Thank you! I’m assuming your videos will be available for awhile (forever??), as I need to finish up the baby quilt I’m almost finished with. It looked like you were out of the panel anyway, but would be getting more? I was going to wait and order it all together, unless it becomes necessary to close down the post offices! Thanks again.
Yes, all of our quilt along videos are available indefinitely. I hope to have more panels available tomorrow on my website at LeahDay.com/DreamBig.
Leah, watched Video #1 of Dream Big panel. You used flannel for your batting. I want my panel to be a wallhanging. Do I use one layer of regular batting? Two layers, one of regular and one wool? Or a single layer of wool batting?
Looking forward to all your terrific video classes.
For a wall hanging, a single layer of wool batting will give you very nice stitch definition and hang beautifully on the wall. You could also use a puffy polyester too. I would take a look at the quilts you’ve made so far and try to remember the batting within and pick the one you like best.
Hi Leah. I am excited to do this panel! It is a small enough project that will teach me many ways to quilt on my new sit down quilter. I have been afraid to tackle some of my larger quilt tops that are waiting..but this looks exciting to me, with different stitches all the way. With your help, I know I can do this.
I have a question…. In the list of supplies, the Feather ruler is not available. Will it become avail. soon? Will you let us know when it is in?
Hi Sharon – I’m sorry about that! Yes, this ruler is back in stock and you can find it here: https://leahday.com/collections/grace-machines-and-frames/products/feather-quilting-ruler-2-inch
Thank you! I’m starting on my panel. You mentioned using embroidery thread. What do you use for bobbin? Embroidery bobbin thread or something else?
If you wanted to do extra embellishment you could stitch with thicker thread in your bobbin and turn the quilt upside down so the bobbin thread ends up on the top. Do test this a bit on scrap fabric to make sure you get the right tension balance and I would recommend doing this after the quilt is quilted as a final step.
I do not have a quilting machine, is it possible to quilt it by hand and gave it turn out as pretty?
Yes, most definitely. In this case you’ll want to mark the designs on your quilt fabric and then stitch on the marked lines. The marking tools I recommend can be found here: https://leahday.com/products/mark-your-quilt-kit