
Machine Quilting Feathers on the Grace Qnique
Click Here to check out the Grace Qnique 14+ machine and learn more about it.
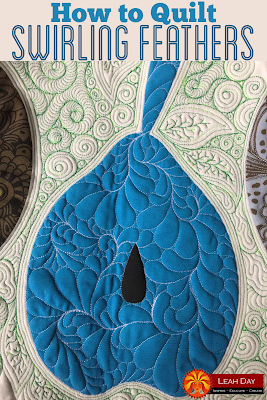
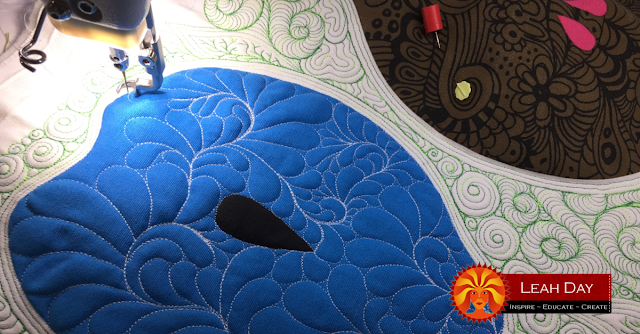
Swirling Feathers is one of my favorite feather designs because it allows you to stitch feathers in all directions and fit them together organically. Sometimes the design has to completely break the rules to fill a quilting space consistently like around the stem of the pear shape:
This feather design is also great for sorting out excess fabric issues, which is something I’m dealing with on this quilt. If you watch the video, you’ll see how the fabric begins to go baggy within the pear shape as I quilt towards the edges.
This was caused by two things – #1 Density – the background is quilted densely with collage quilting. The density of that stitching has made the fabrics very stable and secure, which causes the unquilted areas to bubble up a bit more.
#2 – Where are the pins? – I clearly basted this quilt quickly and didn’t leave the pins in the pears as I quilted the background. That allowed the fabrics more leeway to shift and puddle over the pear shapes.
Is this a deal breaker? Nope, I don’t think so. Quilting designs like Swirling Feathers will secure the open spaces and allow the excess fabric space to puff outward. If I end up stitching a pleat or two in the quilt top, it’s not the end of the world. It’s a table runner, not the Mona Lisa!
So that’s it for this video! I hope you enjoyed learning how I quilted this pear shape with Swirling Feathers. I have a few other videos of quilting on this project you may like to check out:
Collage Quilting Four Designs – Learn how to quilt the four free motion quilting designs in the background of this quilt.
How to Quilt on Marked Lines – How to quilt the marked lines on printed fabric to create a cool effect.
Let’s go quilt,
Leah Day
Leah, I can't do feather right now because I'm having breaking threads when I free motion. In your crafts class you showed us how to use a rubber band and change the foot, which I've done. Things were great but now as the foot goes up and down, the thread becomes fuzzy and thin until it breaks. I have babylock crescendo, which I love but now I'm unable to feee motion for any length of time. Any advice for me? Should I go back to a foot that has no rubberband? I'm using the auriful thread. Elanagoldberg5@gmail.com
Hmm…It sounds like you need to watch that segment of the Craftsy class again because the full modification of the foot would have the top bar bent back and the rubber band installed so the foot doesn't move up and down anymore.
If your thread continues to break it's probably the height of the foot. Remove a few loops of the rubber band from the top of the foot and try again. This is one of those things you have to fiddle with in order to get it 'just right' so it works properly on your machine.
Hi Leah! I've been watching your videos since you decided to create 365 different FMQ blocks and am still enjoying your evolution, particularly with respect to the various machines you've used in your journey :-).
It seems like you were satisfied with your decision when you moved back to the Juki 2210Q, especially with regard to your shoulder/back issues. Then you moved on rather quickly to the Juki TL-2200QVP sit down long arm and even more quickly to the Q'nique 14 sit down mid-arm. I'd love to know why and am wondering if I just happened to miss the video(s) where you talked on this.
I can understand why you moved to a sit down long-arm from your Juki TL-2010Q if you were wanting more quilting space. But I'm curious why you made the move from the larger Juki 2200 to the Q'nique. Please tell me if you've already addressed this in one of your videos and I'll definitely watch it! Thank you for your continued inspiration, Leah 🙂