
Stained Glass Lone Star Quilt
For the longest time I’ve wanted to make a Lone Star quilt, but I just haven’t had the time to learn how to cut and piece diamond shapes accurately. Then I started playing with stained glass applique for my new book on walking foot quilting and had a brilliant idea – what if I could make a Lone Star Quilt with this technique and not bother piecing a million diamond shapes together?
This idea must be tested so I grabbed a 45 degree diamond template and began cutting!
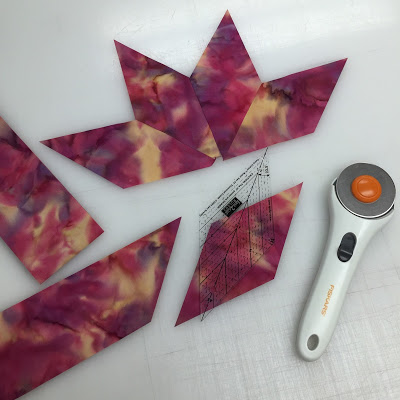
I started with scrap fabric to test, but it ended up being a very beautiful choice. Island Batik has several very beautiful hand dyed blender batiks that swirl from one color to another. I was working with Snowcone and Opal and started with this simple arrangement over a piece of French Fuse.
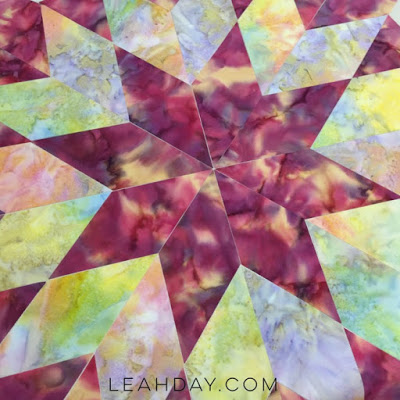
Once the diamonds looked roughly lined up, I fused them in place with a hot iron. Then I began covering the raw edges with fusible bias tape. The result is awesome!
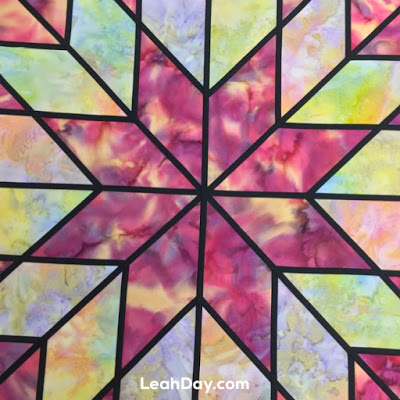
In truth, this technique works a lot like No Sewing Until You Quilt It applique but it’s much faster because you don’t have to turn the fabric edges. Instead the edges are covered with the bias tape, which also adds additional color and texture to the quilt.
Yes, you can make your own bias tape, but that takes FOREVER and you will need loads of it. I’m using Clover’s 1/4 inch fusible bias tape because it’s so easy and convenient to use.
Once I created this small block, I knew this technique would work to create a larger quilt. I jumped on my computer and created a star pattern so I could more accurately arrange the diamonds together. I ended up designing a 58 inch quilt that can be created in four 29 inch sections.
Back downstairs, I sliced up more diamonds and began arranging fabrics together to create a bright, cheerful Lone Star Quilt. I’ve only arranged 1/4 of the quilt, but used an app on my phone to see how the design will look when it’s a full quilt.
Now I need your help! Which one do you like the best?
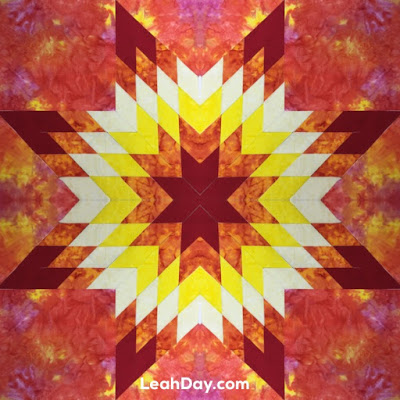
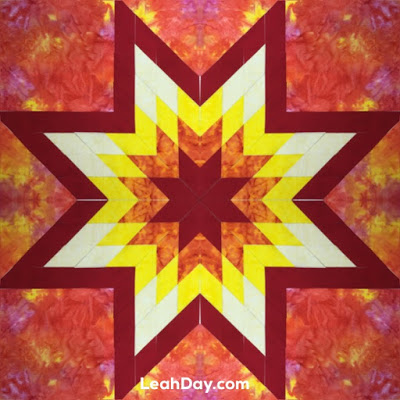
#1 Lone Star Quilt with red and orange tips
I like this one, but the orange seems to blend into the background fabric. That might not be a problem once the bias binding is in place.

#2 Lone Star Quilt with red edge
This arrangement fixes the fabric blending issue and is probably my favorite. What do you think?
#3 Lone Star Quilt with more light diamonds
This is the lightest version which is also very nice. Which do you like best? Do you have another suggestion for arranging the fabrics? Please share your suggestions in the comments below!
Let’s go quilt,
Leah Day
Love #1!
My favourite- # 2.
I like the middle one
I'm with you on liking #2 the best! This is on my bucket list, too, but I never thought of doing it stained glass style! Can't wait to see your final result!
I love the first one, but it is your quilt so it has to appeal to you.
Clever!!! #1 for me…
I like no 2 whichever version you decide on will be beautiful.
La versión uno se ve integrada al cielo … me gusta mucho!
I vote for #2. This technique looks very interesting.
#1 is my favorite.
I like #1 but Id like to see the last row a little more contrasting. Like in #2, however in number 2 the solid dark colour frames the whole star and that leads your eye. Having said that I like all 3 of them and would love to make a quilt this way…I have never used fusible bias tape.
I have actually make both hangings and quilts with the Lone Star stain glass style but by sewing in black 1" cut strips between all the diamonds. The black just adds a whole new dimension. Adding the black will change the look of all your designs.
I'm not seeing it it through your eyes so I could be seeing something entirely different. Decide on the type of look you want to achieve and then choose the one that achieves it best.
I prefer number 1, as I think the tape will deal with the colour issue. After saying that though, it's that 'colour issue' which creates the effect I love. To my eye, the white edges form the inner bright shining star and the outer dark purple arrows form a kind of pointed frame/highlight to the inner shape. It's hard to put in words so I hope you understand what I mean
#1 is super.
I like number two!! And I love how you made that lone star block, what a genius idea to use the bias binding…adding to the to-do list (which is getting ever longer!)
#1, #1, #1!!! Did I mention #1?!! That version will look so cool once the narrow black bias tape is in place, and the narrow but definitive black line will solve the colors fading into one another issue. Can't wait to see this quilt completed!
I like #1. When you add the black bias it will be spectacular!
Number ONE !! has it 🙂
I like #1 best. Can't wait to see it finished.
I like #2 the best.
I like #1. It really pops for me. I think the others look too heavy. I'm sure whichever you choose will be beautiful after you've quilted it.