
2. Quilt a 4 Patch Block with Wiggly U Shapes
Today we’re going to quilt one of these blocks with a super simple design called Wiggly U Shapes:
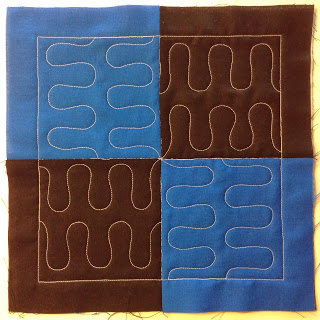
This design is a great skill builder for Stippling because we’re making that similar wiggly, curving line. Let’s learn how to quilt it together!
Just in case you missed the videos on preparing your blocks, here’s a quick recap:
Now for a few extra tips:
Stitching in the Ditch in Free Motion – Yes, yes, you might be used to grabbing your walking foot for ditching because it’s great at stitching all those straight lines perfectly. The downside is a walking foot is slow, loud, and changing feet halfway through the block will create an extra thread break we’ll have to deal with later.
If you want to gain serious skill for free motion quilting, you should ONLY stitch in free motion. All of those ditch lines are just straight lines, and you can absolutely quilt those in free motion too!
What is the benefit of FMQ Ditching?
1 – The ability to ditch and fill (stitch in the ditch, then immediately begin quilting the design within the block without breaking thread once).
2 – More practice quilting straight lines.
3 – Increased speed for quilting anything because you will have far fewer thread breaks.
I could go on with more benefits, but I think you get the point. I love ditching in free motion! (lol. I should print that on a t-shirt.)
Wiggly U Shapes – When it comes to making the wiggly U shape, you might find your hands speeding up in certain sections of the design. If any shape feels particularly comfortable for you, your hands will naturally speed up as they make that natural movement.
If you happen to notice your stitches becoming bigger in certain areas of the design, try increasing the speed of your machine slightly in these areas. Speeding up a bit will compensate for the increase speed your hands are moving.
Now what if you absolutely can’t stay on the marked lines, or in the ditch at all?
Yay! This means you’re learning! Guess what?! I couldn’t stay on a line to save my life when I first started free motion quilting.
This is a SKILL. You will likely feel out of control. You will feel a bit like a kid learning to draw and trying to trace letter A’s all down the page. I’ve watched my son James build skills all year for writing, and the key is practice, practice, practice.
Yes, wearing gloves can help you feel more in control over the block, but really the key is practice moving the block under your needle and controlling the speed of the machine at the same time.
Just to emphasize that point, Josh will be posting tomorrow and sharing his very first video. His block was far from perfect, but I want you to especially pay attention to one thing he doesn’t do: he doesn’t beat himself up for making mistakes.
Be very kind to yourself as you learn this. Don’t expect perfection because it isn’t the point of this project! Whatever you do, however you quilt this block, it is a starting point only, and you can only get better from here.
Let’s go quilt,
Leah Day
Yay! I can't wait to get started! And, yes, you should make a tshirt saying just that!! LOL! I would be the first to purchase it. The more you say it, the more you believe it and then you will have so many loving free motion stitching in the ditch! 😉
First, let me say I do not have my book handy, but I do have a question about how to end the thread for this block? Cut close or leave a long thread?
Hi Angela – Leave a long thread tail, tie a knot, and bury it in the middle layer of the quilt. You can find a video on this right here: http://www.leahday.com/shop/product/hide-your-threads-kit/
Is the only place to post your progress on Facebook?
Hi JoAnne – You can also post your progress to your own blog and link up with us on Friday. It's a great way to check out lots of different blogs and share your own progress.
Cheers,
Leah
Looks like Josh is getting really good at free motion quilting!
Hi Leah, Thank you for doing this project! I have a question about stitch length in our free motion quilting — About how many stitches per inch are you aiming for?
Judy – I have no idea how many stitch per inch because I've never taken a ruler to my quilt and measured! I'd suggest instead taking a look at your quilt and decide for yourself – does that look too big or too small?
This is the Goldilocks Rule – what is the best for you? It's going to be slightly different for everyone, so I never like to put a firm number on it. Does that make sense?
Cheers,
Leah
Wow! I just finished cutting my fabric. I will make my squares. When I start to quilt do I practice first on som scraps, or do I plunge in? I have never free motion quilted.
Sign me afraid.
Hi Snow White – If you're scared to start quilting, try figuring out exactly what you're afraid of. Are you afraid of messing up a block you've pieced? If so, yes, practice on some scrap fabric first. Are you afraid of making imperfect stitches? This is normal, and ugly stitches are 100% okay. You have to sort out the issues as they show up to figure out exactly what works and what doesn't on your machine.
The thing NOT to do is to stay stuck in that fearful place. You'll definitely never get good at FMQ if you never try it!
Hi Leah! I am ready to start quilting my first block, but have a question first. Did you ditch both of the intersecting lines? And also the 8" outer square? I am struggling to come up with a plan without a great deal of double up stitching.
Hi Lin – There will always be a bit of travel stitching involved. For this design, I stitched in the ditch through the middle of the block, then around the perimeter, then stitched some wiggly U's, then stitched the second ditch line down the middle, then filled in the remaining wiggly u's. Understand that you can ditch and fill at the same time – you don't have to ditch the block entirely first before stitching within the squares.