
Question Thursday #39
Do you quilt from the center or quilt from the corner when busting a quilt with Matrix?
Full Question: I getting ready to quilt a 90 x 90 quilt, in QAYG sections. I have 6 square and rectangular sections and you gave me the idea that I could use one design for each section. I also have to keep in mind that these are complex paper pieced stars with many areas with seam allowance build up. The smallest section is 24″ x 24″ and the largest is 36″ x 36″. If I use Matrix in one of them, I would theoretically have to start in a corner, and I know we always like to start in the center and work out. Would you quilt the first two diagonal lines starting from the center?
For what Nickersmarie is describing, I think this would be fine to quilt from corner to corner on the diagonal. So long as you stabilize the quilt really well with lots of basting pins, you should be able to quilt from edge to edge with no problem.
Now for anything larger than 36 inches, I’d probably start in the center and wiggle to the outside edges. Then break thread and return to the center and pick up right on top of the first thread start and wiggle to the opposite.
The one nice thing about Matrix is once you get the first set of wiggly lines set, the second set running perpendicular will feel a lot easier. All the pins in your quilt will like be removed and you can easily stitch from edge to edge with less stopping. We call it a Quilt Buster for a reason!
Now let’s check in with Pat at Color Me Quilty:
Could the thread at the end of a spool be causing issues for free motion quilting?
Yes, most definitely! Thread can do funny things when it gets to the end of a spool. I once heard a professional quilter (can’t remember who) mention winding bobbins off the end of a spool because the thread there was “creased” and gave a slightly different sheen than the thread on the beginning of a spool.
Not sure about creases in my thread so much as stitch issues caused by the spool not having as much weight to it! A great habit to get into would be to quilt through the beginning of a spool, then use the last half to wind bobbins. I definitely find when I’m reaching the end of a spool that problems are more frequent, the thread more finicky, and skipping and loopies on the back of the quilt more frequent.
Now for one last question from a desperate Jen from Quilter in the Closet:
How do you fix a hole in your quilt?
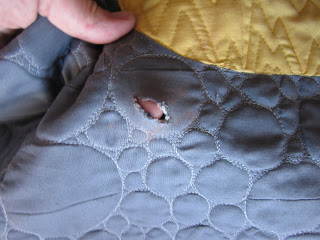 |
| Photo from Jen’s blog Quilter in the Closet |
Jen had a horrible mishap with her quilt while taking a photo and ended up with 2 holes in her quilt that go all the way through from front to back.
Now looking at the size of these holes, I don’t think this is a desperate, quilt ruining catastrophe. In fact, I think the fix could be pretty easy.
#1 – pull out that gray fabric where the hole is located.
#2 – mark a circular shape all around the hole. Because Pebbling was quilted over the area, I’d try to fit the circle to fit with the pebbling a bit if possible. It doesn’t have to be a perfect circle. An amoeba shape would be just fine so long as it fits and covers the hole and the background fill a bit.
#3 – Cut out a circle of gray fabric, place it over the hole and hand applique it in place. Make sure not to overlap the yellow section or it will show noticeably on the surface of the quilt.
#4 – Quilt over the circle applique with more pebbling to lock it in and secure the hole.
#5 – Create a name tag for the back of the quilt and cover up the back holes with it.
This is just how I’d fix this particular quilt. The gray fabric combined with Pebbling will make it easy to hide the holes, especially if you use the same gray fabric and quilt over the patch with Pebbling and make it fit consistently with the rest of the quilting.
Yes, accidents happen! I once ruined an entire quilt trying to get it clean! Try not to beat yourself up about it when it happens, but instead think of the most logical, simple way of fixing the issue. Sometimes a solution is simpler than you think and in the end, fixing the hole or issue will become the defining characteristic of the quilt.
Let’s go quilt,
Leah Day
Your advice is spot on! Best…..finish and move on/lesson learned! Have a ton of those in my history!!!! Hugs, D