
Quilt Along #28 – Auditioning Designs
Rather than learn new designs, let’s learn how to play with all the hundreds of designs we already have. By the way, if you’re ever in the mood to browse, you can find all 365 designs right here.
You can also find all 365 designs in a beautiful spiral-bound picture book that’s loads of fun to flip through and pick designs quickly for your quilts. Find 365 Free Motion Quilting Fillers right here in our quilt shop.
So how exactly do you know how a design will look in a particular area of your quilt? By giving them an audition and seeing which wins the part!
Yes, auditioning designs does require drawing, but you don’t have to be perfect at this in order to know if a design will work or not. Perfection is not the point. Just getting the general shape of the design over your quilt is the idea.
So the first thing to start with is a photo or drawing of your quilt. If your quilt is already fully finished and pieced together, hang it on a wall and shoot a photo of it.
Now get this photo on your computer or take it to a printing store and print it out in grayscale (black and white).
Why are we removing all the color? Because color can be distracting. It’s also hard to see your pencil marks over. Honestly my favorite way to do this is with a simple black and white outline of the piecing design so that way there’s no distracting color or shading to deal with.
If you have a quilt in mind, try working this week with a photograph of a single block or a border corner section. This way you can play with designs over a small section at a time and hopefully not be overwhelmed by the full design.
Of course, if you can’t do this – either you don’t know how to take and manipulate photos this way or don’t have the capability, don’t worry! Here’s an image to play with this week:
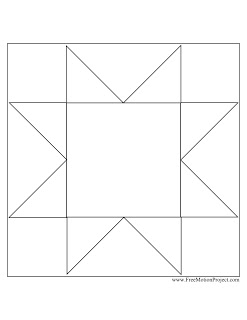
Yep, this is a simple Sawtooth Star block. No frills, no flash, just a simple star block.
But how many ways are there to quilt this block? 5? 10? 100? There are literally millions of ways to quilt this shape. How do you know what way is best?
Simple – what do YOU like best?
The only way to answer this question is to print out this sawtooth star block and draw three different versions of it. We’re simply holding an audition and any designs you like are welcome to participate!
Here are mine:

The first is a simple combination of Stippling in the block and Pebbling in the outside edges. The Pebbling is much darker and denser than the Stippling, which means the outline of the star will show up nicely.
It’s important to note that this drawing is showing very dense quilting. You will definitely need to pay attention to scale as you audition designs because this can really effect how the texture looks on your finished quilt. What is the only way to know what it will look like ahead of time? Draw it and see!

This second version fills the star with Paisley and the outer edges with Stippling. In this case the star looks much more flowing and fluid when filled with all those tear drop shapes and echoes.
Remember that every design type will appear slightly differently. Paisley is a Pivoting Design, which means it has a lot more traveling and thread play and will show up more boldly on a quilt, even with matching thread color. Stippling is an Independent Design and will always appear much lighter because it’s always a single line of thread wiggling over your quilt.
Very soon we’re going to start investigating more design types – visiting a new one each month actually so we can gain a better understanding of how all of these designs work and can fill the spaces of our quilts.

Finally this third option opens up yet another path – adding marked elements to the piecing. Let’s imagine the star was pieced, so the extra flower I’ve drawn inside was just marked on the fabric. I call these marked designs Motifs.
Motifs are designs that are not pieced or appliqued, but QUILTED in only with thread. They form new shapes and designs over the surface, and are marked to ensure their symmetry and placement.
Many times I’m asked why I mark certain things and why I don’t mark others. I mark a motif because I want it to show up as exactly THAT shape. I want exactly THAT flower, formed exactly THAT way.
I couldn’t free-hand this shape. If I tried to stitch this without marking, it would not look like this – wouldn’t be lined up properly, wouldn’t fit this space perfectly, and the effect wouldn’t be the same. Marking is required for motifs to achieve that exact shape, in that exact placement.
Fillers on the other hand are not meant to be perfect or exact. They flow and bend and fill in places organically. I don’t mark these designs because they’re meant to be random, and it would also be ridiculously time consuming to mark them over the surface of a whole quilt.
Adding the marked flower motif to the star block has opened another world of design possibilities! I can stitch Stippling around the flower, wiggling into all those tight places, then fill the outer area with Paisley. What a pretty audition!
So which of these auditions is the “right” one?
Well, all three are good designs. All three add interesting effects to the quilt. There really isn’t a “wrong” way to quilt a quilt, so there really isn’t a “right” answer here.
The right design is the one YOU like the best.
How will all this look in thread on fabric? The only way to know is to stitch a small sample using a scrap of the fabric in the quilt and the thread you planned to use.
No, you don’t have to quilt out a whole block if you don’t want to, but it’s a good idea to get some practice with the fillers you’ve selected with the thread you plan to use. Some fills like Pebbling simply won’t work with some types of thread because the layers of travel stitching will cause weak, thick thread to break.
So that is your challenge this week! If you have a quilt needing to be quilted, consider taking a photograph and playing with drawing designs over the surface. If that is not open to you, print out the sawtooth block and play with drawing designs over it.
Yes, this is play! Not torture! Just have fun, keep it simple, and experiment with the many effects you can create by auditioning different designs and marked motifs over the surface.
Instructions for Linking Up Your Blog:
1. Write your blog post. Publish it on your blog.
2. Copy the link of the specific blog post. This is not just the link to your blog itself (www.freemotionquilting.blogspot.com), but the link to the specific post: https://freemotionproject.com/2012/01/quilt-along-2-quilting-in-rows.html
3. Click the blue link up button above and paste your link into the box.
Keep in mind that you’re posting your progress from LAST week on THIS week’s post. This way you have time to watch the lesson, play with the ideas, then post your progress to the next quilt along. I hope that makes sense!
Let’s go quilt!
Leah Day
Those drawings are beautiful!
I definitely sketch before I try a design on the machine, but I haven't thought about auditioning in this way. Thanks for the tip.
Gracias Leah, tengo una colcha a punto para acolchar y tengo una idea en la cabeza. Pondré en práctica lo que acabas de explicar.
This is perfect timing for this challenge for me. I have been doing my friendship blog hop quilt, and I can't decide on the quilting! I have it narrowed down to 3 designs, but I am terrified I will pick the wrong one!!I have been at a stand-still for 3 days now. I thought I had my mind made up, but now, today, I'm still not sure! there are only 2 problems. One, my printer is out of ink(trip to kinkos?) and 2 I can't show my quilt until the blog hop:/, which means I can't link up with my project just yet! I need a program like yours. Got any CHEEP suggestions for a MAC?
Oh Leah ~ so sorry about your computer troubles! And look at you dear, you still pull together some great quilt-along lessons off the cuff! Loved last weeks lesson, 3 Christmas gifts ready to go, and this weeks challenge is also a great one to put to work! Looking forward to it!
Thank you Leah
Godspeed,
mary
Great idea Leah!
I'm behind where I want to be with my FMQing – but way ahead of where I thought I would be before I found your site! Thank you, thank you.
; )
June
I'm so glad to have read this post. It is very timely as I have just finished peicing my very first quilt top and soon it will be time to decide how to quilt it! I love the process you've outlined, sounds great. I have one question: when the pieces are patterned (i.e. you've used a fabric with a pattern on it), do you take that pattern into consideration at all when "auditioning"? Do you have any basic rules for this (e.g. never use sharp edge designs on a curvy fabric pattern)?
Great new project…I have a quilt all pieced and pin basted ready for quilting. It is a bolt of lightning design. I tried free-motion quilting along the bolts, but managed to wiggle too much – so I ripped it out…I tried walking foot along the zigs…waaaay too much time and frustration. So here it sits…tell me when to post a picture and I'd love your advice….
Computer troubles are never fun.
It is difficult to see a child transition into kindergarten, but a major milestone! Congratulations.
All of these designs are beautiful. Pick a favorite ? Not me, I love them all.
SewCalGal
http://www.sewcalgal.blogspot.com
Leah, very interested in the comment about being afraid to quilt, and I know my first 20 quilts were minimal straight line walking foot quilts, not so much because I was afraid to free motion but more didn't know where to start in terms of designing free motion patterns and also because I got tired of trying to figure out how to transfer designs.
I had 4 quilts in my UFO bucket that had been sandwiched and were waiting to be quilted for ages, and when I found your free motion project it was TaDa! The first two quilts were block round robins and I decided to trial one of your designs in each block. I wasn't going to be put off by doing things wrong and sure anyway if one block wasn’t perfect, the next would be better. I was just going to go for it. I quilted the two large nap quilts in a week each and each step was a joy, no fear, no angst. I then whizzed through a landscape wall hanging using contours for quilting and then used my now more nimble quilting fingers for a hug quilt I was making for my sister. Sewed the top and quilted it in a month.
So for those who are "afraid" to start quilting and have UFOs piled up waiting to go to their new home I would really recommend taking those babies out and practising on each one until done. You can keep yourself motivated by changing a design for each block/part of your quilt, see which ones seem easy for you and learn by trial and error how to audition designs and what works best. And at the end you'll have a finished quilt, a lighter UFO bundle and some easy/entertaining hours of quilting under your belt. Some blocks will look better than others but the whole quilt will look amazing.
First UFO Busting Free Motion Practise Quilt (Opps wondering if Leah will notice that I got her Machine Sewing Binding a bit wrong here)
http://www.facebook.com/media/set/?set=a.10151105667621215.489342.572606214&type=3&l=95744c3178
Second UFO Busting Free Motion Practise Quilt
http://www.facebook.com/media/set/?set=a.10151105659646215.489341.572606214&type=3&l=1e3f6bcea8
Third UFO Busting Free Motion Practise Quilt
http://www.facebook.com/media/set/?set=a.10151105677431215.489344.572606214&type=3
The Real Thing – Making the Practise Real
http://www.facebook.com/media/set/?set=a.10151137045766215.492813.572606214&type=3&l=006fc983f3
On a personal note I find that UFO's (and I only realised when I got to the last) cramp the creative juices. You can start another quilt but always in the back of my mind was the pressure of knowing I hadn't finished the one or ones before. I know we can have an emergency quilt to make, but really I would say try not to have more than 2 on the go. So if you find that creativity is stalled, every stitch seems a bother/effort and it’s all a bit blah – take out those UFOs and F them and have wonderful fun going mad with your free motion practise. You might find that it blows away all cobwebs and that creatively you go bump – during the practise quilting I found my mind happily teaming with new ideas. I have two quilts in my head waiting to go and the stash to do them, but will not start until the last beast has been completed.
Now to get out my last UFO which was sandwiched over a year ago – is it a UFO when it is the only thing I have going? A huge Mariner's Compass Quilt which has large amounts of white space just daunting me with the choices. So am joining the challenge and let’s see what comes of it!
Get better soon Harry
… am really thrilled now to use this method. Never did it before but I guess it's worth doing so, reduces disappointments before they appear 😉
now sitting in front of my nice ornament I designed for a first trapunto attempt, thinking of free motion thread dances…
Thanks Leah for your wonderful project and the great ideas…
btw: had such a fun with the storage system of last week. We just bought a couple of sun-blinds for our house and they were sold, stored in long plastic castors which are georgeous for this and will become my new quilt storage. What a nice right moment for your post and the fact that I do not throw them away now 🙂