Question Thursday #15
Unfortunately the review week hasn’t generated very many questions. Oh well, that just means more time for us to go quilt, right?!
The first question is from Pat at Color me Quilty:
How do I stop my foot snagging on the edges of applique?
Full Question: I really like this foot, it gives me lots of visibility. But this week I kept getting snagged on the hand applique, one side of the foot would slip under part of the applique. Would a closed foot help with this type of project? Or is there something I should do that would avoid this issue?
Yes, the particular foot you’re using will be a bit tricky to use over applique. The wide mouth, combined with the prongy edges will certainly like to snag on applique edges.
If you only have this one foot, you’re going to have to learn how to move the quilt under the foot in a way that will never have the prongs moving towards the edges of the applique. This simply takes practice and a bit of foresight and planning when you go to quilt an applique quilt.
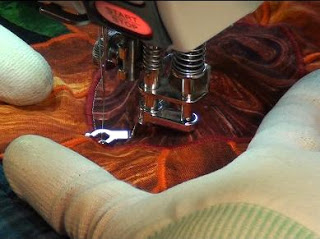
Personally I prefer to stitch sideways over appliques, so the prongs of the foot are perpendicular with the edges of the applique. This means you’ll be technically quilting sideways – running from right to left or left to right, keeping the edge of the applique perpendicular with the foot:

I like this better because I think you can see where you’re going a bit better. It does require a good deal of rotating of the quilt in order to maintain this angle.
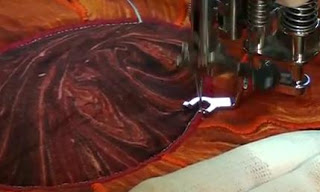
The alternative option is to stitch away from yourself, with the back of the foot running over the applique edges like this:

This is a bit harder to see where you’re going because that section of the quilt will be behind your foot and a bit behind your machine. Again you’ll have to continually rotate the quilt in order to maintain this angle and direction of your stitching.
In truth, it might be a good idea to play with both methods and be able to stitch both ways. Looking back at my videos of the sunflower applique from week #14, that’s exactly how I quilt – a bit sideways, then a bit back, then rotate the quilt, and stitch a bit sideways, then a bit back.
The one angle that will get your foot snagged is going to be when you stitch forward, towards yourself, with those prongs running straight into the edges of the applique. Of course, it’s possible to get good enough at quilting along edges and keeping the applique squished down, and your foot angled away from it that you won’t catch it.
And yes, there is another solution and that is to just buy a closed toe darning foot. Then you can stitch in all directions and there will be no prongy things to get stuck in the applique.
Only one problem though – with a closed toe you might not be able to see where you’re going!
Next I received this question from Beth via email:
Should I stay stitch the edge of my large quilt before binding?
Full Question: Currently I am working on a cheater cloth quilt (104 x 97) and I have a question about attaching the binding. I had the quilt machine quilted by someone else and I was wondering if I should straight stitch around the whole quilt before I sew on the binding? I thought it might stabilize the edge since it is so large.
Here’s the most simple advice I’ve ever given: If it sounds good to you, DO IT!
If you feel the edge of your quilt is going to do the macarana without a bit of extra stitching around the edge, take the extra step and add the stitching!
The same goes for steps you don’t feel are necessary. If you don’t want to bother blocking your quilt, don’t do it.
It’s your quilt, and every single one is a learning process. What you decide to do, or not do, and how you do it is entirely up to you.
This is why it’s a great idea to keep a quilt journal, or a record of your quilts and how things went. Make sure to make note what batting and thread you used, as well as any extra materials (starch, needles, special threads, etc) that you might want to duplicate later.
You never know when, 5 years down the road, you’ll want to duplicate that exact same color of dark red thread, and your quilt journal will definitely come in handy!
Finally one last question from Jackie in the comments of yesterday’s post:
If you’re already subscribed to the newsletter, simply let us know and mention “batik beauty” and Josh will send you the link!
That’s it for this week. I’m heading into the studio to spend some much needed time cleaning up, then tackling several UFOs all at once. Lol. That kind of makes me sound like a futuristic alien freedom fighter!
Let’s go quilt,
Leah Day

Hi Leah! I wanted to let you know that I received my order today – safe and sound! I can't wait to try out the cheater needles (I have some other brand and don't like them), my Isacord thread (SO excited to fmq with it) and my fine-line pen – very eager to try some new stencils and marking with it. I'd like to say to everyone else reading this comment that I have purchased the Ultimate Quilting Kit from Leah, as well as the Gidget table, in addition to the above mentioned products. Everything has been wonderful, exactly as described, and the service from Day Style Designs Quilt Shop has just been fantastic! I am never disappointed! Thank you Leah & Josh!
To the person who asked about stay stitching before binding I have another suggestion- I happen to have a serger and I always serge the edges of my quilt before binding which makes it lay flat in the binding very nicely and is great for strengthening the edges too- even if you don't have a serger a zig zag stitch can achieve the same effect. I machine stitch both sides of my binding and can only do this successfully because I take the time to serge my edges- just thought this tip might be helpful.
Leah, Could not figure out where to leave this question so hope I am doing the right thing. One day I started practicing free motion quilting and finished a place mat and thought how well I did and how easy it had seemed. Then I noticed that I had forgotten to put my Quilting foot on. So it turned out I was quilting with the needle, no foot, feed dogs down. So I put the foot on and practiced some more and found it harder. It was so much easier without a foot at all. Why do we even have to use a foot! I saw a video with quilting/embroidery (not an embroidery machine) with no foot but using a hoop. I can send you the link if you like. But I would like your thoughts on quilting without a foot at all. Is it rough on the machine or needles? Thanks, Donna Rae
Great advice/tips! I have found that moving at a slight angle while quilting alleviates some of the snagging problems (applique, which I seem to always do) and those situations when a quilting pattern goes right through a slightly bulkier (where seams converge) area that can't be avoided. It works well but I have to remember to take time to straighten/relax my neck muscles and not hold the position for any length of time! I sure do love the fact that the 'notion' of quilting "rules" have been dismissed (although there are some constants that will bring better results!) and accomplishing the finished item may take each of us down slightly different pathways! Thanks, once again, Leah! Hugs, Doreen
Another suggestion for the snagging problem – I use a closed foot and sometimes even it gets caught. What works for me is to slow down and move my fingers really close to the foot until I pass over the edge of the applique. Lots of different ways to tackle the same problem – one's bound to work! Happy quilting!
I quite often will stay stitch the outer border of the quilt top. It does help when applying binding and I'll even do it if I know that the borders will be heavily free motion quilted too.
It's worked very well to add that extra stability and keeping everything in place.
I'm glad to know I'm not the only one who has had problems with the open foot snagging things- although for me, it will often catch a stitch I made too large… So when I do large scale freemotion and don't need as much visibility, I used a closed darning foot.
I used to think I wasted my money on the open toe foot, but when we did the microstippling I found that you were right- it really is necessary for that!