Quilt Along #7 – Connecting Quilted Pieces
Whoa! Can you believe we’re on week #7?! It’s hard to believe we’ve spent so many weeks working on Stippling! Just in case you’ve missed a week or two, you can find all the Quilt Along posts right here.
I don’t know about you, but my sewing room is filling up with small practice quilts and I think it’s time we learned how to put these quilted pieces together to create bigger quilts.
This method is traditionally known as Quilt As You Go because you can literally quilt each piece as you create your quilt, then put the quilted pieces together at the end.
I love this method because it’s SO much easier to quilt smaller pieces on a domestic sewing machine. While not every quilt pattern can accommodate a Quilt As You Go construction method, many can, and it’s definitely worth considering, especially if you have a king sized quilt in your future.
So let’s learn how to put our quilted pieces together using binding strips:
Now just in case you can’t watch the video, let’s review how to connect quilted pieces together:
#1 – Trim and Square – Trim your quilted pieces so they’re roughly the same size and square.
Let’s call these pieces Piece A and Piece B.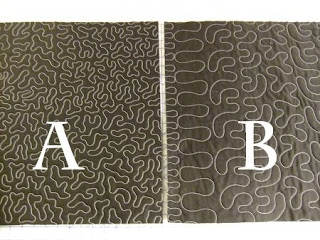 Make sure to trim off any places where the fabric shifted to show the batting underneath. You need a solid piece with fabric+batting+fabric through the whole sandwich. Also make sure to trim INTO the quilting so you’re not leaving weird lines you stitched to get to another row, etc.
#2 – Cut Binding – You will need 2 strips of binding for every seam you connect:
Top Binding: 1 inch wide
Back Binding 1 1/2 inches wide – fold this binding in half and press the snot out of it.
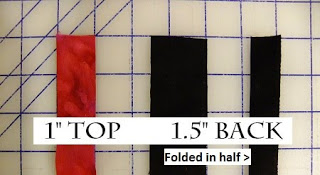
Make sure both binding strips are a bit longer than the pieces you’re connecting together. It’s always easier to trim the excess away, but not add more if it runs out half way through the seam!
#3 – Layer first seam – Lay the top binding on your table with the raw edges facing the RIGHT. Lay Piece A with the raw edges matching up with the raw edges of the top binding. Lay the TOP binding strip on top of this stack. Hold them together or pin as needed to get to your machine.
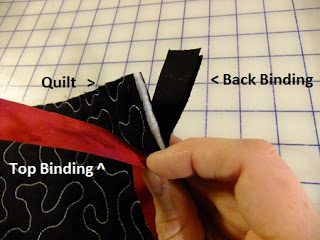
#4 – Stitch seam #1 – Stitch through all 3 layers: top binding, Piece A, back binding carefully with a SUPER accurate 1/4″ seam allowance.
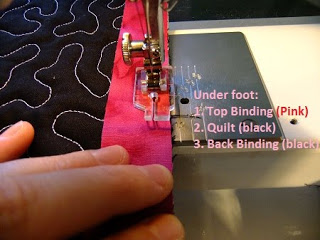
With all these layers it’s sometimes easier to stitch this with a walking foot, but I prefer to use a piecing foot because it’s much more accurate. Of course if you have a 1/4″ walking foot, you’ve got the perfect foot for the job!
#5 – Finger press and prep for second seam – Lay Piece A on your table and finger press the TOP binding over to the RIGHT. If you need to hit this with your iron you can, but finger pressing firmly usually works fine.
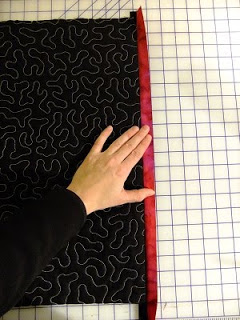
Now layer Piece B right side UP, and put Piece A on top, right side down. Line up the TOP binding with the edge of Piece B.
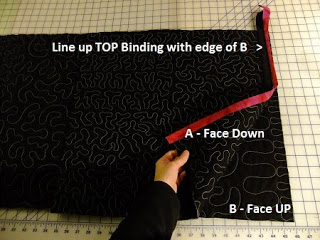
Make sure the back binding stays firmly attached to the back of the quilt. and out of your way You do NOT want to stitch through it in the second seam.
#6 – Second seam – Match up the TOP binding strip with the edge of Piece B. This leaves a nice little groove for your foot to fit into as you stitch the seam.
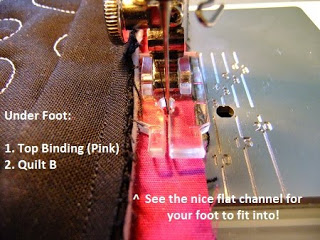
By stitching this way, the back binding is on top so there’s no chance of accidentally stitching through it!
#7 – Finish folded back binding – With the second seam stitched, take the connected quilted pieces and unfold them. Press both seam allowances into the groove created by the TOP binding.
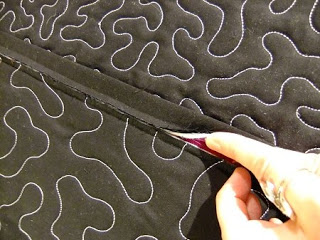
Here you can see both seam allowances fitting snugly together in that 1/2 inch groove created by the top binding.
Flip the quilt over to the back and finger press the BACK binding over to the right. You want this top binding to stretch over both seam allowances and be secured along the second line of stitching.
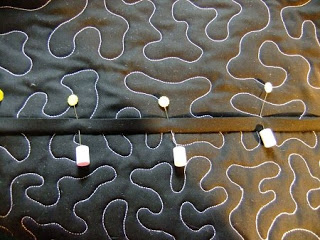
Pinmoors are wonderful for capping the ends of these pins so you don’t get stuck while closing the seam!
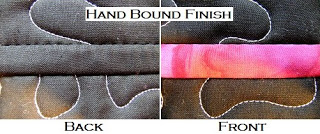
Here’s what it looks like when you secure the back binding by hand:
Here’s what it looks like when you secure the back binding by machine:
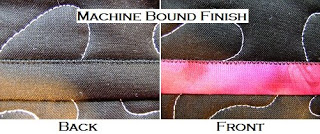
It’s entirely up to you which way you secure the back binding! Securing by hand will give you a perfect, seamless, stitchless finish on both sides.
Securing by machine will be much faster and of course, you can use less visible thread that won’t show up as much on either side.
Once you connect and finish the seam for 2 pieces, the next step is to connect 2 more pieces, then connect all 4 together to create a pretty quilt! All the seams can be connected using this same method, just make sure to cut longer and longer binding strips.
Now keep in mind that this is not the only Quilt As You Go technique or the only way to connect quilted pieces together!
There are many more methods and even whole books written on these Quilt As You Go techniques. I simply prefer this one because it creates a nice flat finish and it allows you to connect fully quilted pieces together. You don’t have to worry about leaving space along the edges or anything crazy like that, and it also binds up all your thread ends so there’s no mess!
Now what exactly should you practice this week?
Definitely try this method of connecting quilted pieces and also get on your machine to do a bit more Stippling. Make sure to ask any questions you have about this design before we start moving on to new designs this spring!
Now let’s link up our progress from last week’s Quilting in Sashing and Borders!
Instructions for Linking Up Your Blog:
1. Write your blog post. Publish it on your blog.
2. Copy the link of the specific blog post. This is not just the link to your blog itself (www.freemotionquilting.blogspot.com), but the link to the specific post: https://freemotionproject.com/2012/01/quilt-along-2-quilting-in-rows.html
3. Click the blue link up button above and paste your link into the box.
Keep in mind that you’re posting your progress from LAST week on THIS week’s post. This way you have time to watch the lesson, play with the ideas, then post your progress to the next quilt along. I hope that makes sense!
As always, any questions you have, please post them in the comments below or on your blog and I’ll answer 5 tomorrow on Question Thursday.
Time for me to shut up and quilt,
Leah Day

What a great, helpful video! You are so generous! Thanks a bunch!
oh, brilliant! I wonder if making the binding between the pieces wider, like 2-3" then adding a strip of batting between you could then quilt that too like it was a border. I think the hand piecing looks neater but the machine finishing is so much faster. Maybe if I zig-zagged both sides it would look more intentional…so many ideas to try! Thanks you for these videos.
Thanks, Leah. This was really informative. I read the instructions and then went back to watch the video. That was my "Aha" moment. Thank you, again.
I have read a lot about this method but never fully understood until I saw your video. Thanks So Much Leah.
Rawyah
Thanks so much Leah for the lesson on "quilt as you go". Out of all the information on this technique,
yours has been the easiest to understand.
I love these lessons. I have learned so much in these weeks.
Thanks so much.
Elaine
I love how easy and sensible this method is! My dad made a quilt (which he continues to maintain is the only one he'll ever make!) in which he quilted each block separately and then attached them together. I had always wondered how he accomplished this, and now I bet you've just shown me!
Thank you for showing us how you do this :-))))
This looks like fun – but my practice pieces are going to make a seriously weird quilt!
Juliana Lund asked about using wider strips for borders, etc. that is exactly what I did with the quilt I made. I used a triple zigzag stitch at it's widest with thread that coordinated with the fabric for sewing down the folded piece and it blended right in.
Leah, I've been hearing about you and your great quilting information for awhile now on the Horizon digest. Today, being a sick day for me 🙁 I finally had some time to pop in to see what your videos and courses are all about. I hope you will forgive me, but I wanted to encourage your readers/watchers to see what is possible with the quilt as you go technique and so posted the picture of the queen sized quilt I made and finished in December 2011 using this same technique. I could have never done it without it being in sections and the quilt as you go is a great technique! I have much more to learn and practice as soon as my arthritis leaves me alone for awhile, but I do greatly appreciate your tutorials!
Hi Leah,
Thanks for your straightforward, easy-to-follow instructions and video on the quilt-as-you-go technique. I've read books and more on it but never tried it because they made it seem harder than it needed to be.
I look forward to trying your way 🙂
Best,
Jae
Thank You Leah for your great tutorials my stippling has improved SO much, the one thing I have a problem is that I can not see behind the needle where I have already quilted, what would happen if I started at the bottom of the quilt and quilted up the quilt, something like the chinese read from right to left
Hi Leah, Thanks for showing how to put the practice pieces together. It was just the thought I had this evening when I was thinking about to do more stippling. It was very helpful to see what to do.
Thanks so much for doing this.
I have done several quilts this way, the only difference it that I have used a decortative stitch on both edges of the strip or just pinned the bottom one in place and then stippled the strip. The stippling will hold the back peice down.
Hate to hand sew anything.
Marge
This is a great tutorial. QAYG techniques are so hard to explain even with pictures. But your video tutorial makes it clear as DAY! LOL. Thanks again Leah. As always you are an inspiration.
-Amy
This was a wonderful tutorial. It helped me a lot..Thank you.
This is a wonderful tutorial, I have tried this in the past with no success ,ather watching this I think I can do it now , Thanks Leah. Barbara
I'm a new quilter … I've made one baby quilt, and by the time I finished it the child used it for her dolls. lol Now I'm attempting a full size quilt for my granddaughter, so I figure the QAYG method would be a better choice.
Connecting the quilted blocks has always been a problem for me. I've been afraid to use the sashing method, as I thought it would be so much more time consuming, and more difficult. But after watching your video, I'm thinking of changing my mind about it. I'm going to give it a try, but I'm still a little leary. Wish me luck!
Thank you for posting this tutorial. No one else has mentioned it, so I may be wrong, but I think in step #3, it should be the BACK binding, not the top binding in the two places where I have it capitalized here:
Lay the BACK binding on your table with the raw edges facing the RIGHT. Lay Piece A with the raw edges matching up with the raw edges of the BACK binding. Lay the TOP binding strip on top of this stack. Hold them together or pin as needed to get to your machine.
The picture is clear, but the text doesn't match.
Thanks again! Christina
I agree, Christina.
This method can actually work either way. When I shared this tutorial, I had the strips going the way it’s written. After the comments and more tests, I found it was easier to have the folded binding on the front instead of the back. Keep in mind in quilting, there is no such thing as the wrong way to do something. And you can find an updated tutorial here: https://leahday.com/blogs/machinequilting/how-to-connect-supersized-quilt-blocks-quilt-as-you-go-tutorial