
Quilt Along #5 – Stippling in Blocks
Whoohoo! It’s Wednesday again and it’s time to start filling the blocks of our sawtooth star quilt with Stippling!
 Last week we stitched each of the star blocks in the ditch so this week let’s fill each of them with a smaller scale stippling.
 Watch the video to see how this works:
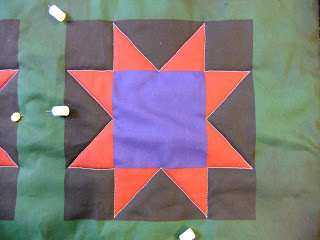
In the video I promised a worksheet you could use to practice with this week. Play with marking and quilting this little sawtooth star block this week: For my little quilt, I’ve chosen to fill 4 of the sawtooth star blocks with a smallish version of stippling. This is stitched on a 1/4″ scale:
 But this block wasn’t filled willy nilly with stippling wiggling in all different directions. It was quilted in logical rows that allowed the block to be filled very quickly and systematically.
Here’s a little diagram of how the block was filled starting on the red dot, then working in rows to finish up on the blue dot: Feel free to print all of these diagrams out to practice with. Share them with your friends and even use them in classes if you happen to teach.
Now you might be wondering why I choose to stitch the blocks on a 1/4″ scale.
How densely you fill a space on your quilt is entirely up to you. This is a personal choice – a design choice – that is always dependent on your personal style and desire.
Many quilters see quilting this close together and are immediately turned off by it. You might even now be thinking “that’s too dense for a bed quilt.“
This judgement is understandable – no one wants to curl up with a quilt that feels stiff as a board on top of them!
But the thing is – I’m not quilting the whole quilt on this smaller scale. I’ve ONLY quilted the quilt blocks.
The blocks of a quilt are always in the center, separated by borders and sashing, which can both be quilted much more openly, keeping the quilt soft and comfortable.
I truly believe that you can play with a smaller scale in your quilt blocks and still end up with a very comfortable quilt. The plus side of this is you’ll also draw more attention to the blocks – presumably the areas you took the most time to create and logically the areas you’d like to get the most credit for.
But just in case you’re ready to hit the “back” button and get away from this girl trying to seduce you into dense stitching, here’s another worksheet filled with Stippling on a 1/2″ scale: See! You really can fill the space on any scale you want. The point is to play with scale and experiment with what gives you the look and feel you want from your quilts.
Of course, when we start discussing scale it’s important to clarify that playing with tiny dense fillers and giant open fillers in the same quilt can create issues.
It won’t matter at all if you keep your scale changes reasonable – using 1/4″ scale in the blocks and 1/2″ scale in the sashing actually worked quite well.
 It’s when you do radical chances like 1/8 inch scale through the center of the quilt and 3 inch scale through the edges. This is a radical difference in stitch density and obviously the fibers aren’t going to carry that density evenly.
I learned this lesson the hard way with this goddess quilt Life and Fire. Her body was quilted on a dense 1/8 inch scale, but the background was filled only with wavy lines 3 inches apart. The result is a quilt that hangs terribly.
But note this point – this ONLY matters if you want to HANG your quilt on the wall.
So if you’re focused on making bed quilts, your life is automatically a million times easier simply because you don’t have to worry so much about the quilt hanging perfectly. It’s going to be smoothed out on a bed and take it from me – all quilts look great on a bed!
Now let’s talk about the second part of the video: stitching around a marked motif.
 Motifs are something I really haven’t discussed much on the project because my focus has been on fillers for so long. They’re an interesting element to free motion quilting and definitely something you should play around with along with filler designs.
A motif is a design you mark on your quilt, quilt right on top of those marked lines, then fill around it with a filler design.
Motifs allow you to create specific shapes and designs on your quilts like hearts, stars, feathers, and pretty much any other symbol you can think of. If you can draw it, you can turn a shape into a motif.
You might be wondering why we bother with motifs when these designs can also be stitched free hand. Why bother taking the time to mark designs on your quilt?
The answer is simple: marking a design on your quilt allows you to position the design perfectly and line it up in a symmetrical fashion. It also allows you to create a SPECIFIC DESIGN. This is important when you want a specific shape to fit at a specific angle within a specific block.
Take a look at this little wholecloth quilt I created last fall:
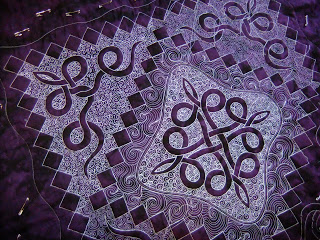 The squares and woven knots are all marked motifs. The FILLERS then go around the marked designs to flatten the background areas.
So let’s play with this idea of filling AROUND a motif with this star worksheet: First practice stitching the motif right on the line, then practice filling the space inside and around the design with stippling. See how this creates a nice additional design within the block? Pretty!
 Now that you’ve gotten a lot of practice and learned many different ideas for filling a block with stippling, let’s talk about one last, very important point:
This is not the only way you can quilt this quilt!
There are probably a million ways to quilt this quilt with stippling. Right off the top of my head, I can think of 100 ways to fill the sawtooth star blocks with stippling or marked motifs or a combination of the two!
I believe this is part of the problem when it comes to teaching free motion quilting and why so many pattern designers just write “quilt as desired” after the piecing instructions simply because there’s no way to design a quilting design that EVERYONE will like.
There is such a vast number of possibilities and options when it comes to quilting a quilt, it’s no wonder we find ourselves stuck when it comes to picking just one design.
You might love filling the block with 1/4″ stippling, but hate the fact that I’m ignoring the center square.
You might love the idea of stitching a marked design in the center, but have absolutely no desire to fill around it with stippling.
You might love the empty block and wish I hadn’t filled it with anything!
Get my drift? You can quilt this quilt any way you like. YOUR the quilter!
So go play with this block this week and have fun. Play with filling it in many different ways and decide which on works best for you.
Now it’s time to link up your progress on Quilting on a Line:
Instructions for Linking Up Your Blog:
1. Write your blog post. Publish it on your blog.
2. Copy the link of the specific blog post. This is not just the link to your blog itself (www.freemotionquilting.blogspot.com), but the link to the specific post: https://freemotionproject.com/2012/01/quilt-along-2-quilting-in-rows.html
3. Click the blue link up button above and paste your link into the box.
Keep in mind that you’re posting your progress from LAST week on THIS week’s post. This way you have time to watch the lesson, play with the ideas, then post your progress to the next quilt along. I hope that makes sense!
As always, any questions you have, please post them in the comments below or on your blog and I’ll answer 5 tomorrow on Question Thursday.
Time for me to shut up and quilt,
Leah Day
Great Quilt along Wednesday! I have a question…I am going to assume that on your quilt if this was not for tutorial you would have used a black thread to stitch in the ditch. But my question is if you weren't teaching with project what could would you use for the stipple in the blocks? The white shows up for the video but in reality what would you choose when the blocks are two different colors like that? Blue? Red? Black again? These are the things that keep me up at night! LOL not really!
You've done an awesome job on this series, and I especially like the detail in this video.
Catching up with my blog reading today. Hope to have time to read the rest of your posts later.