Free Motion Quilt Along #1 – Let’s Wiggle!
Welcome to the first week of our Free Motion Quilt Along! I’ve been gearing up for this week with several posts such as Understanding Free Motion Quilting and Memorizing Quilting Designs. Make sure to check out both of those articles if you find yourself needing tips on relaxing at your machine or figuring out what or where to stitch next while working on your next quilt.
After reading those articles you’ll find a theme that runs through both: the importance of practice.
I can’t stress it enough, I can’t say it enough, I can’t do it enough –
Watching videos will only get you so far, drawing on a notebook will only get you so far, you’re going to have to actually get on your machine and shut up and quilt sometime during this week and play with this design if you truly want to master it.
Now with my lecture out of the way, let’s watch this week’s video:
Please keep in mind that I’m still learning how to shoot larger scale fillers. I couldn’t really tell if I was getting a good angle or not, but I’m pretty pleased with this so far. I just keep having to remind myself to slow down!
Now let’s go into a bit more depth about what you saw in the video:
First off, Stippling is governed by two very simple rules:
1. Stitch a wiggly line.
2. Don’t allow this line to cross itself.
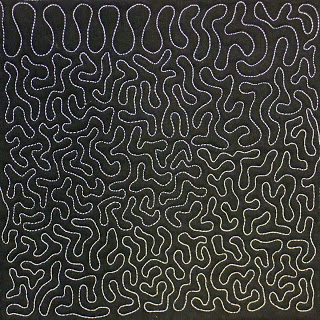
This is a pretty simple set of rules, yet Stippling can be challenging when you try to immediately stitch something like this:
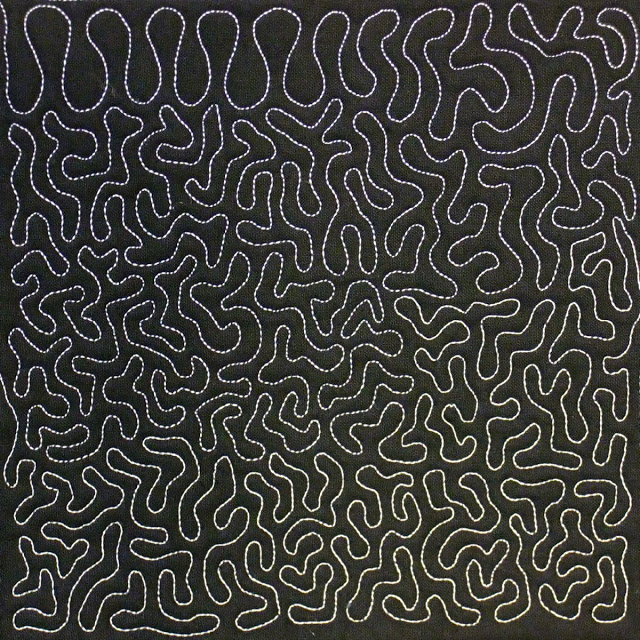 This is the more complex form of Stippling which forms a dense, wiggly mass over your quilt. But it took a few weeks of practice to get here. I certainly didn’t start stippling this complex version right off the bat, and I don’t advise you to try it that way.
To learn Stippling, I broke the design down into a simpler version and got the hang of that first, then slowly added more bends and curves until it became the complex design it is today.
So if we break down those rules into the simplest format, you will get a Super Simplified Version of Stippling that looks something like this:
 Let’s call this U Shape Stippling.
Spend some time drawing and quilting this wiggly line. Wiggle and Wiggle and Wiggle until you start to go a bit wiggly, and then wiggle some more!
When you’re so bored out of your mind with wiggles you’d like to kill me, move on to a slightly more complex wiggle:
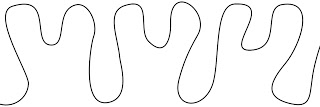 Let’s call this Peace Sign Stippling, and make sure to try the reverse version as well:
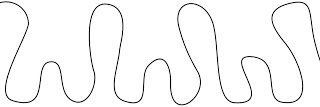 Again, draw and quilt this new wiggly line. Feel free to print this page and trace it if you have to. Whatever you have to do in order to get the practice you need!
Only when you’re bored to tears again, play with bending the curve to create a bit more complexity:
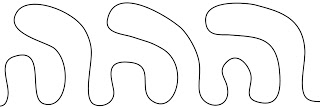 Let’s call this one Lobster Claw Stippling and again, make sure to stitch the reverse version as well:
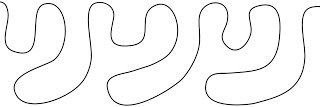 Do you see where I’m going with this? Each row of shapes is slightly more complex, but at the same time they’re very simple because it’s just the same wiggles repeated over and over again.
When you’re ready, you can start mixing and matching these simple shapes to create a more complex version.
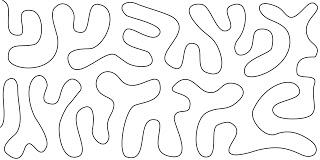
Practice Ideas
Really you can practice this however you like, but here’s what I did this week:
I made a 1/2 yard quilt sandwich with black fabric and stitched across the narrow side several times with each version of Stippling.
You might have noticed marked lines on my quilt sandwich. I marked lines about 3 inches apart so I could work my rows of simple stippling straight across the quilt:

You don’t have to mark the lines unless you want to. I like it because it gives me a visual line on a blank piece of fabric to shoot for. Without it, I tend to wiggle off into oblivion!
If you finish your practice piece and still feel excited and enthusiastic about your progress, make another sandwich and keep quilting!
If you finish your practice piece and feel so frustrated and angry you’re ready to throw your machine out the window, please stop quilting and go have fun doing something else! This is not a torture session here!
See Stippling in a Real Quilt
Now you might be thinking that only the most complex version of Stippling is acceptable to stitch over a real quilt.
And you’d be wrong.
You can stitch even the most simplistic version of stippling – yes! even those basic rows of U shapes can go on a REAL QUILT!
This Pink quilt was my very first free motion quilted quilt:
I only had a vague idea of what stippling looked like. All I knew for sure was that you didn’t cross your lines so I just stitched rows and rows of U shapes:
I think this looks really nice! I spaced this stippling so there was around 1/2 inch between each line of quilting. While you might think the quilt would end up stiff, it’s actually one of the softest quilts I’ve ever made.
Here’s another tip if you want to practice on a real quilt – if you use a cotton batting that has a slight shrink to it, and if you’ve not pre-washed your fabric (this is the ONLY time I’ll EVER say this is okay), then when you wash the quilt the first time, it will shrink slightly and you will get that nice soft ripply texture you see on my quilt above.
Whenever you stop and start, try taking a few stitches with your machine at a slow speed, then slowly bring the machine up to full speed again as you return to stitching the design smoothly.
Now if stitching on a small scale is your goal, you can follow all the same steps as above, only instead of stitching big, shrink it down and stitch each row really small. All the same rules apply for big quilting or small quilting and the lessons work either way.
 Okay, I think we’ve pretty much nailed down the basics of Stippling! If I’ve missed anything or am confusing in any way, please share your question in the comments below. Don’t be surprised if I answer your question tomorrow on the project!
Spend a week working on this design, then be ready to share your progress and any questions next Wednesday.
Let’s go quilt!
Leah

Great lesson! I got your two books for Christmas and am really enjoying looking at all the designs and eager to try them out on my quilts. Right now I am using Railroad Tracks on a charity quilt. Thanks so much!
Although I developed a style of stippling a long time ago, I still read everyone's advice on how to do it. This, Leah, must be the most easy to understand set of instructions I have ever seen. You definitely rock as both a quilter, and a teacher!
Absolutely awesome! I spent some time last night watching some of your videos on YouTube – I am feeling inspired, and (almost) ready to get out the fabric sandwiches – But I am thinking I'll try some on paper first! 😉 Thanks!
Great lesson. I've been teaching myself but taking it step by step like this I think will make me feel less chaotic at the machine doing fmq. thanks!
I've just been learning FMQ the past few months. I've taken classes from a couple of different teachers and no one has broken down stippling in this way for me before. I think this is very helpful. Thank you!
Thanks so much, Leah. I've been terrified to try stippling because I just couldn't wrap my head around how to start, even though I've done more complex FMQ. I'm definitely going to give this a try.
Thank you for the new video on stippling. I wondered when doing this on a real quilt where do you start and stop and does this depend on the size of the quilt? Love to learn new things and your breaking it down to make it less intimidating.
Thanks so much! I needed this help! ~Jeanne
Hi Leah this is a terrific video. I like the way you have broken stippling down in to basic shapes and made it really understandable.
Your calm voice and demeanour on the videos take the panic out of FMQ!
FINALLY somebody who can take me from step 1! Thanks a ton Leah 🙂
I love this quilt-a-long idea, I'm in for some learning! I've dabbled with some of the beginner designs that you show on this site, but I never made much headway on it because I didn't know how to begin with it on a "real" scale. I'm so excited to join in and learn.
Thank you, Leah, for a very straight forward explanation of FMQ the stipple. I've never seen it broken down into parts before and now that I read and see what you are doing… well, let's just say "the light bulb went off!". Thank you. I know what I will be doing this week and my new mantra is: I can do this and it is FUN! [repeat]. lol
WOW – what a great idea for 2012. As a retired teacher (Chemistry not quilting!) I love the way you give instructions – simple and confidence building. Will be tuning in each week to learn more.
Leah, Thanks so much for the lesson on stippling. I've taken a couple of FMQ classes but never really practiced much. I'm going to keep practicing and follow your instructions. You broke it down in nice easy steps. Thanks for the lesson.
I am so ready to begin learning how to do this. I've been gathering all I need, and figuring out how to set up my machine to do this. NOW I am ready to try it out. Thanks for the easy directions. Also, what type of machine are you using? Does it have a stitch regulator?
Excellent teaching! You do a fabulous job of explaining. I am so excited for these weekly lessons. I can't join in for a couple weeks but I will soon.
Thanks so much for all the hard work you put into the project.
Thank you Leah so much for your help with freehand quilting. I am a new longarm quilter and most of your quilt designs adapt to the longarm well. You have given me confidence and that is so important. I am looking forward to this year and OUR new project. thank you again. Nancy
Leah I have been following your posts since last March. I am new to quilting freehand and I use a hq longarm. Most of your designs adapt to longarm beautifully.
It has been such a help to me to watch your videos and I am also looking forward to this year with your new project.
Most of my quilting this year has been meandering or stippling so this first post seems easy for me. Thank you so much for helping beginning quilters like myself. Confidence is a must and one of the hardest things to acquire. Thank you and happy quilting.
Thank you so much! I have been hesitant to start quilting my first quilt because I don't have any practice with stippling, but now I have to basics to begin. I really appreciate it!
Leah, you are great!!!!
Now it's very late, here in Spain and I'm going to bed, but tomorrow morning I will try this first lesson you explained so well. You make it seem easy. I must look for some very cheap fabric to parctise it. Here in Spain,fabric is so expansive….
I'm going to put a link in my blog so that many Spanishquilters could follow your useful lessons.
Thank you SEW much! I will be practicing this week!
Great tutorial.
Love this, Leah 🙂
I never thought of stippling as having a logical sequence to it…I've been making it harder on myself than it has to be, all these years (lol) ~
Best,
Jae
thank you, thank you and, again thank you!!!! With this easy and great master class I think I will be able to start machine quilting which is a great advance for me!!!
Thanks from me too, Leah! I'm ready to start quilting and I surely appreciate you starting from the beginning this year!
While I've done quite a few quilt tops, they've been either straight-line quilted or tied quilts. This is my first foray into actual quilting. Last week, I got my quilting foot and put together a toddler size play quilt and started stippling across the United States. (lol – it's a map on the fabric). By the time I hit Florida, I was feeling pretty confident with stippling. It's certainly not perfect but it's better than I imagined my first attempt would be. You lesson today just inspired me to start on the oceans and get it done. I love the way you teach – in methodical, logical steps. THANK YOU! I'll practice some of your movements before I hit the waves (teehee). 🙂
Leah you are the best! All along I thought stippling didn't have a pattern to follow and I'm lost in life without detailed instruction and video. I can see myself attempting this now but unfortunately I'm in FL and my Janome 7700 is in MA. I took my White light weight with me which has a 4" space. Will your lessons be available to me when I get home in April?
Marie
I'm so happy you started a quilt along Leah! I participated in one at Fluffy Sheep Quilting and was very sad when she stopped.
Leah,
Thanks for this, reminds me I need to practice my basics again. I am not good at free motion .
Marie – Absolutely! I'm not going anywhere and you can easily work at you own pace.
Cheers,
Leah
Thank you so much for starting this quilt-along project. I am definitely going to work on this. I so basic stippling, but am eager and willing to work more variety and more complex design in my quilting life. Thank you for being so generous with your time and your knowledge. You have a great heart to share with us.
Hi Leah, I've been following your excellent designs and I am so excited to see that you'll be doing this weekly quiltalong. Your videos are wonderful and build a lot of confidence in a beginning quilter! Thank you!
Leah, I am new to your blog and website, and I am excited to be following this FMQ project. I have a short arm setup that I have not done too much with other than pantograph and my own version of squiggly swirly quilting. I want to learn more of your designs so I can take the next step forward in my FMQ.
When you say "1-inch scale," do you mean the space between your quilting lines is one inch?
Sheila – Yes, that's exactly what I mean. Scale always refers to how far your lines of quilting are apart. 1 inch scale means there's 1 inch roughly (you don't have to be exact) between the lines of quilting on your quilt.
Hope that helps!
Leah
Just made my sandwich and quilted half of it…so far so good! Thanks for your detailed instructions! I'm doing this to learn how to quilt without my bsr, so this is a challenge!
Hello
How much you are wonderful
Your business special
I want to work on this form quilt size 180 * 200 cm
How to start??
Please help
You are his teacher in this art
Great video, Leah! My favorite way to get in to stippling is to imagine making Bullwinkle the moose's antlers. Strange but it works for me! Question – what are those things that look like marshmallows in your video? Were they anchoring your pins? I couldn't tell. Thanks for the quiltalong!
So helpful thanks heaps! Too many comments for me to get through right now, maybe you have addressed it already but despite your explanation on Thursday I haven't managed to link my post?! http://monika-quiltingjourney.blogspot.com/2012/01/fmq-practise-and-something-different.html
Keep up the great work, not only are you a brilliant artist also a fantastic teacher!
OK – I'm failing at the link business. I tried the link button at the end, but I get a link from your blog ON MY blog and I want it the other way round… Which button/link is it again?? below is my page…
http://andthentoni.blogspot.com/2012/01/first.html
Wiggled with you this weekend and loved it! Besides your names, I came up with Moose Antlers and Boxing Glove.
Looking forward to the next installment of Quilt Along.
You're awesome!
Liz
Did a little wiggling!! Not perfect results. I did enjoy practicing.
Hey leah,
I admit – I'm a little confused on the linkedink business also. I've used it before but can't find it on any of your posts.
You said it would be in the Wednesday post. Will that be the Wednesday following the lesson? So this week the linkedink we would click on would be on the January 11th blog post?
Thanks for your clarification and keep up the great work. I am itching to get back out to my machine and practice some more.
Thank you for the great information! I tried my first stippling tonight. I love it:)
wohoo! this is fantastic. I was following sew cal gals fmq challenge and there was so little information about the actual quilting. thank you so much for sharing this and the great video. I'm off to practice my stippling!
This is a great video. Thank you for breaking down the stipple into easy steps. It has really helped me and I know I'll have a better sense of "where to go" next. Thanks so much for sharing your time and talents.
Thank you for such simple, understandable teaching! I'm so glad I found you. My family say I'm obsessed with quilting…I call it passion. lol and learning FMQ is the next level. Level up? 🙂
Your instructions and your video were so easy to watch and so very informative. Thank you!
Hello, I have been looking at your site for the last 5 months. Have off and on tried to FMQ and had a smaller entry level machine and never could figure it out. While today I got a new machine and sat down and was able to FMQ pretty well. SO today is my Day one on the Quilt along. I look forward to watching more of your video's but wanted to just say thank you for putting this all together it was helpful to watch and re watch this video and figure out how to do this.
Richard Healey
Wow, that was the first time I have watched stippling, and it was great. Now to practice. I was reading the comments and see one from Richard Healey. I do believe i have done a swap with him.
But I have a question…. when you first drop the needle to begin any sort of fmq, how do you lock the first stitch. I was shown once how you drop the needle then bring it up and then drew the thread to the top but do not know what do do from there, /Does anyone have the answer for me.
Cheers Ann
Ann – Just start stitching after you've pulled your bobbin thread up to the top. Try not to stitch small stitches or back stitch as this will create a noticeable area on your quilt (basically a bullseye for your start and stop).
After you finish quilting, go back to those starting thread tails, tie them in a knot and hide them in the middle layer of the quilt to secure them. You can find that tutorial right here: http://www.daystyledesigns.com/cheaterneedles.htm
boa noite leah
estou começando tudo ,costurar ,aprender patchwork e também quiltar.
Foi assim que descobri seu blog e lá vamos nós,tentar praticar estes ensinamentos,obrigada por dividir com a gente,Néia
Leah,
Thank you very much for this lesson, i have been following your blog for months now, but never really sat down to make something, using your guidance. However, since i got my first ever machingers from you a couple of days ago, and a proper cotton batting too, i made myself a 15in sample sandwich and started wiggling about. firstly, i realised, i couldn't have done it without the gloves, and then, your technique and your guidance are really simple and easy to follow. and now, im so proud of my sample!!! the only thing i was worried about, since im using a basic Singer machine, which works with the foot pedastal, i have to keep a specific pressure on the foot, and find the right movement on the hand, in order to have a proper length on the stitch. im working on it, to make it better. big thank you again, for your help. i really admire what you do!!! keep it up! Eleni
I am so grateful for your style of teaching fmq. It's just what I need. I'm inspired to get started. I say this as my practice sandwich is in my machine and I've done a few rows of large U's. Thank You.
Thanks Leah for posting your fantastic videos on how to stipple and FMQ I have always wanted to have a go and I've just made a start – so far so good. I love using my machine so much and its taken to stippling as much as I have!
Thanks Leah, after seeing your videos I have gone on to wiggle quilt my first double size quilt.
It looks great, the top has been one of my UFO needing quilting for around a year and I was considering sending it away to be long armed quilted.
If truth be told awe-inspiring toil with the blog. I do akin to your durable employment and will hang around for more post from you as post gave me satisfaction and gives some helps to do same work right here. Thanks a lot.Private equity Placement
When I was learning to free-motion quilt, I made adult-size lobster bibs for all my siblings to practice on. Turned out great!
I'm amazed how you manage to quilt and video yourself at the same time. What camera do you use? Any special lenses or tricks?
This is an older post so I hope you are still checking it. I have watched numerous videos on free motion quilting and you all make it look so easy. My problem is the back side. The last time I tried, after watching several of your videos, It looked great on the top but not the back. The stitches were loose and long. I have tried feed dogs up, down. I have tried no tension, different tensions. What is going on? Please help.
Hmm…there's actually many different things that could be going on. First off – rethread your machine and see if the issue continues. I can't count the number of times my machine has missed a guide and that has been causing all my frustrating thread issues.
If that doesn't fix it, try stitching some straight lines across a scrap quilt sandwich. What happens when you stitch simple straight lines? If the loops go away – chances are this is not a tension issue, but an issue in balancing the speed of your machine with the movement of your hands.
Really, I think I could write a whole book on this issue alone! Shoot me an email with a photo of the back of your block and I'll write up a whole post on it: http://www.leahday.com/contact/
Thanks for this! I'm going to take a deep breath and give this a try. Just having some idea where to start makes a huge difference.
Love it
great teacher!
Thank you!
Leah I am so sorry that you have so much to work through. Your voice betrays the stress. I have followed, learned and loved your videos for a few years. My heart goes out to you and your family. My family is going through medical issues right now and your videos are one of my favorite ways to think about something fun and comforting for just a little while. I wish I could return the favor.
The only I can think of to help is just be a friend. Someone you can talk to about anything, everything or nothing at all. Please reach out t me if I can help you.
Thank you Jeanette. We really appreciate your kindness and support.
These are the most helpful instructions I have ever ran across! Leah, you really explain things as simple as I need to hear. Thanks.
I’m so happy you enjoyed this post! Have fun stitching some wiggles!